Adakah anda pelabur pilihan binari mencari sistem perisian dagangan terbaik untuk pendekatan strategik anda? Adakah anda berminat untuk menjalankan kajian hands-on tentang pilihan binari, perisian pilihan binari dan firma pembrokeran?
Mencari mereka tidak mudah sama sekali. Industri pilihan binari penuh dengan penipu, penipu dan perkhidmatan mengerikan yang menyeluruh. Dan tidak banyak perisian yang sangat baik dan bereputasi di luar sana. Dalam artikel ini, kami telah membandingkan dan menyemak perisian dagangan pilihan binari terbaik untuk awak.
Lihat senarai perisian binari kami yang paling dipercayai di sini:
Perisian:
Ketersediaan:
Kelebihan:
Akaun:
Web, Android, iOS
- Pulangan tertinggi
- Pelaksanaan terpantas
- Isyarat
- Perdagangan 24/7
- Demo percuma
- $ 10 min. deposit
(Amaran risiko: Modal anda boleh berisiko)
Web, Android, iOS
- Bonus
- Perdagangan 24/7
- Perdagangan sosial
- Demo percuma
- $ 50 min. deposit
(Amaran risiko: Modal anda boleh berisiko)
Web, Desktop, Android, iOS
- Mesra pengguna
- Muat turun
- Sokongan 24/7
- Pulangan tinggi
- Demo percuma
- $ 10 min. deposit
(Amaran risiko: Modal anda boleh berisiko)
Fakta paling penting tentang perisian Binary Options:
- Perisian dagangan binari yang boleh anda gunakan pada komputer dan peranti mudah alih anda.
- Kebanyakan perisian dagangan binari menyokong perdagangan automatik.
- Menggunakan perisian dagangan binari daripada broker biasanya percuma.
- Tiada bayaran untuk data pasaran.
Apakah itu Perisian Dagangan Pilihan Perduaan?

Untuk menjelaskannya dengan jelas, perisian perdagangan pilihan binari adalah apa yang membolehkan anda berdagang dalam pilihan binari pasaran. Ia biasanya disediakan melalui pembrokeran yang membolehkan anda memasuki pasaran terus dari bursa itu sendiri.
Ini adalah satu-satunya cara untuk berdagang pilihan binari, jadi memilih platform yang baik tidak boleh dirunding. Walau bagaimanapun, tidak semua aplikasi perisian dicipta sama - perbezaan antara sistem yang sangat baik dan platform dagangan pilihan binari yang dahsyat agak ketara.
Tambahan pula, kerana industri pilihan binari dibelenggu dengan penipu, anda akan mahu memilih tapak yang dibenarkan dan berdaftar. Dan jika anda ingin berjaya dalam perdagangan pilihan binari, anda perlu mempertimbangkan elemen lain seperti analisis, sumber pendidikan dan kepantasan pelaksanaan.
3 Perisian Dagangan Pilihan Perduaan Terbaik / Broker Pilihan Perduaan untuk Pemula
Kami telah mengkaji, menganalisis dan menyelidik banyak broker yang berbeza dengan perisian binari untuk membawa anda pilihan ini perisian dagangan pilihan binari terbaik untuk pemula. Mereka semua adalah broker pilihan binari yang hebat dan dikawal, tetapi masing-masing meliputi kawasan yang berbeza, jadi mari lihat siapa yang sesuai untuk anda.
Lihat perisian binari terbaik di sini – Anda juga boleh membaca ulasan terperinci kami:
- Quotex – Perisian Binari Terbaik untuk isyarat perdagangan dan ketersediaan di semua negara
- Pocket Option – Perisian Binari Terbaik untuk perdagangan sosial
- IQ Option – Perisian Binari Terbaik untuk pemula (paling mesra pengguna)
1. Quotex – Perisian binari terbaik untuk isyarat dagangan dan ketersediaan di semua negara

Quotex, jenama Maxbit LLC, ialah perisian binari terbaik untuk isyarat. Ia telah dilancarkan pada 2020 dan serta-merta mendapat populariti, bukan sahaja kerana ia tersedia di semua negara, tetapi juga kerana penyelesaian dan seni bina yang mesra pengguna yang menjadikan perdagangan binari begitu cekap.
- Mereka mempunyai pembangun dan penganalisis mahir yang bekerja 24 jam sehari, 7 hari seminggu untuk memastikan pelanggan syarikat mendapat akses kepada penyelesaian kualiti terbaik.
- Syarikat itu dikawal selia oleh IFMRRC (International Financial Market Relations Regulation Centre).
- Teknologi dagangan Quotex sangat canggih dan mudah digunakan. Antara muka pengguna adalah berasaskan web dan direka bentuk untuk memenuhi semua keperluan anda.
(Amaran risiko: Modal anda boleh berisiko)
Aset boleh labur:
Quotex membolehkan anda berurusan dalam lebih 100+ aset dagangan dengan mudah. Mereka dikelaskan kepada kumpulan yang berbeza:
- Ekuiti
- Pasaran komoditi, seperti emas, perak dan gas.
- Indeks seperti FTSE 100, Dow Jones, dan sebagainya.
- Pasangan mata wang seperti JPY/GBP, USD/CAD, dan sebagainya.
- Mata wang kripto, seperti BTC, ETH, dan Litecoin.
Setiap instrumen boleh didagangkan dengan mudah.
Jenis akaun:
Di Quotex anda boleh mengalami pelbagai jenis akaun dagangan. Terdapat 3 jenis akaun yang tersedia: Biasa, Profesional dan Premium, serta Akaun Percubaan.

- Akaun Asas
Ini adalah akaun yang paling mudah dan tempat yang hebat untuk bermula untuk pemula. Deposit $10 adalah semua yang diperlukan untuk akaun ini.
- Akaun Pro
Ini adalah untuk peniaga profesional. Akaun ini membolehkan anda memperoleh lebih banyak wang dan mengambil bahagian dalam insentif atau pertandingan tambahan. Anda mesti mendepositkan $1000 untuk layak mendapat akaun Profesional.
- Akaun Premium
Untuk memastikan akaun VIP Quotex anda aktif, masukkan $5000 ke dalam akaun dagangan anda. Keuntungan dan promosi akan meningkat. Akaun ini adalah untuk pelabur berpengalaman.
- Akaun Demo

Akaun demo Quotex disertakan dengan maksimum $10,000 dalam bentuk wang maya, yang boleh ditambah nilai pada bila-bila masa. Akaun ini membolehkan anda memperhalusi strategi dagangan anda. Ia juga berfungsi dengan fungsi membenarkan akaun demo dan nyata menggunakan fungsi dan pengalaman yang serupa. Akaun demo percuma memberikan anda semua yang anda perlukan untuk mempelajari pilihan binari a.
Pengeluaran dan pembayaran

Anda perlu melabur $10 untuk membuka akaun sebenar dengan broker Quotex.
Anda akan layak untuk membuat pembayaran dengan cara berikut:
- Visa
- MasterCard
- Bitcoins
- XRP
- Adv Cash
- Wang Sempurna
- Neteller
- Pemindahan bank
- Skrill
- Yandex
Kaedah ini boleh dipercayai dan selamat, memastikan pelaburan anda selamat.
Pengeluaran mengikut proses yang sama seperti deposit. Mereka juga pantas dan boleh dipercayai. Bergantung pada kaedah pengeluaran, ia mungkin mengambil masa 1-5 hari untuk dana muncul dalam akaun bank anda.
Kelebihan:
- Terdapat di banyak negara
- Versi web, untuk Android dan iOS
- Deposit minimum $ 10
- Akaun demo percuma
- Isyarat dagangan
- Mesra pengguna
- Pelaksanaan perdagangan pantas
- Perdagangan minimum $1
Kelemahan:
- /
(Amaran risiko: Modal anda boleh berisiko)
2. Pocket Option – Perisian Binari Terbaik untuk perdagangan sosial

Perisian pilihan binari kedua terbaik ialah Pocket Option. Ia terkenal dengan set ciri yang kaya dan keupayaan perdagangan sosial, menjadikannya mudah untuk anda meniru pedagang lain dan mendapat keuntungan.
Platform ini telah beroperasi sejak 2017 di bawah nama Gembell Ltd, yang berpangkalan di Kepulauan Marshall. Syarikat broker itu telah memperoleh sejumlah besar pelanggan sejak kemunculannya.
- Pocket Option menggunakan platform MetaTrader 5 (MT5), yang memastikan keselamatan data dan pembayaran. Broker ini menerima pelanggan dari seluruh dunia dan menawarkan penyelesaian perisian yang hebat untuk mereka. Platform ini kini digunakan oleh pengguna dari 95 negara yang berbeza.
- Broker adalah ahli Pusat Peraturan Perhubungan Pasaran Kewangan Antarabangsa (IFMRRC). Pocket Option terkenal dengan polisi anti-pengubahan wang haramnya.
- Pasukan di Pocket Option terdiri daripada para profesional yang bekerja tanpa mengenal penat lelah untuk memastikan bahawa piawaian tapak adalah sangat baik untuk penggunanya. Mereka komited untuk mengumpul maklum balas pelanggan dan memasukkannya ke dalam produk masa depan.
Di samping itu, perisian Pocket Option sentiasa dikemas kini untuk memenuhi keperluan pengguna, menjadikannya pilihan yang sangat baik untuk pedagang.
(Amaran risiko: Modal anda boleh berisiko)
Aset boleh labur
Di Pocket Option, anda boleh berdagang lebih 100 aset. Aset ini dikategorikan seperti berikut:
- Pasangan mata wang (Forex) seperti EUR/USD, CAD/USD dan JPY/GBP.
- Komoditi seperti emas, perak, minyak, gas dan produk petroleum
- Indeks OTC AUS 100, OTC 100 GBP dan OTC SP500 semuanya disertakan.
- Mata wang kripto seperti Ether, BTC dan Litecoin.
- Sekuriti: Saham seperti Facebook, eBay, Amazon dan Apple.
Jenis akaun
Sebelum anda mendaftar dengan broker, anda disyorkan supaya membaca banyak maklumat fakta dan meluangkan masa anda untuk memutuskan akaun mana yang terbaik untuk anda.
- Akaun Demo

Tidak semua syarikat menawarkan pilihan akaun dagangan percubaan, dan ramai yang tidak membenarkan anda menggunakannya melainkan anda menyertainya. Selalunya, mereka mengharapkan anda memberikan mereka butiran log masuk anda bersama-sama dengan pembayaran daripada akaun sebenar.
- Pocket Option mengambil pendekatan yang lebih santai, membolehkan anda berdagang dengan dana rekaan dengan mengklik butang. Anda akan segera dibawa ke halaman di mana anda boleh berdagang $10,000 dalam bentuk wang rekaany.
- Akaun demo membolehkan anda memahami sepenuhnya platform dagangan dan ciri asasnya dalam masa beberapa saat. Oleh kerana platform berbeza, ini berguna untuk profesional.
- Ia juga merupakan cara yang baik untuk pemula untuk melihat sama ada perdagangan adalah untuk mereka sebelum meletakkan wang mereka dalam talian.
- Akaun Sebenar
Jika anda ingin berdagang secara sebenar, anda harus membuat a deposit minimum $50 untuk mendapatkan pengalaman perdagangan binari terbaik.
Kami mengesyorkan bermula dengan akaun demo dan kemudian naik taraf kepada akaun biasa. Pocket Option menawarkan pelanggannya pilihan pelaburan tanpa kebimbangan. Anda boleh mula berdagang dengan serendah US$1. Sebaik sahaja anda telah menyertai, anda boleh berdagang pelbagai jenis instrumen termasuk pasaran komoditi, indeks, saham dan forex. Anda akan mempunyai akses kepada insentif pulangan tunai, perdagangan sosial, sumber pendidikan, pertandingan, penunjuk dan makluman.
Pengeluaran dan pembayaran

Pelaburan minimum pada Pocket Option ialah $50, manakala pengeluaran maksimum hanya $10. Mata wang utama perisian kini ialah dolar AS, jadi semua urus niaga dijalankan dalam USD.
Pembayaran adalah cepat dan mudah. Dalam sesetengah kes, ia boleh mengambil masa 1-2 hari perniagaan. Pengeluaran dibuat dalam masa 24 jam dan tiada had masa. Walau bagaimanapun, jika terdapat sebarang masalah teknikal, ia mungkin mengambil masa 1-3 hari perniagaan untuk memulihkan dana.
Alternatif deposit dan pengeluaran terbaik Pocket Option yang mudah dan global adalah seperti berikut:
- Kad kredit VISA, Maestro dan Master Card.
- Mata wang kripto seperti Bitcoin, Litecoin dan Ripple.
- Webmoney, Perfect Money dan Skrill adalah contoh e-dompet.
- Pindahan Wang daripada Bank
Walau bagaimanapun, kerana urus niaga adalah dalam USD, deposit dan pengeluaran adalah percuma; entiti asing (seperti bank) boleh mengenakan yuran pertukaran mata wang.
Kelebihan:
- Syarikat yang dikawal selia
- Deposit minimum rendah $ 50
- perisian MetaTrader 5
- Versi web, Android dan iOS
- Perdagangan sosial tersedia
- Tiada bayaran tersembunyi
- Jumlah dagangan minimum $ 1
Kelemahan:
- Tidak tersedia di setiap negara
(Amaran risiko: Modal anda boleh berisiko)
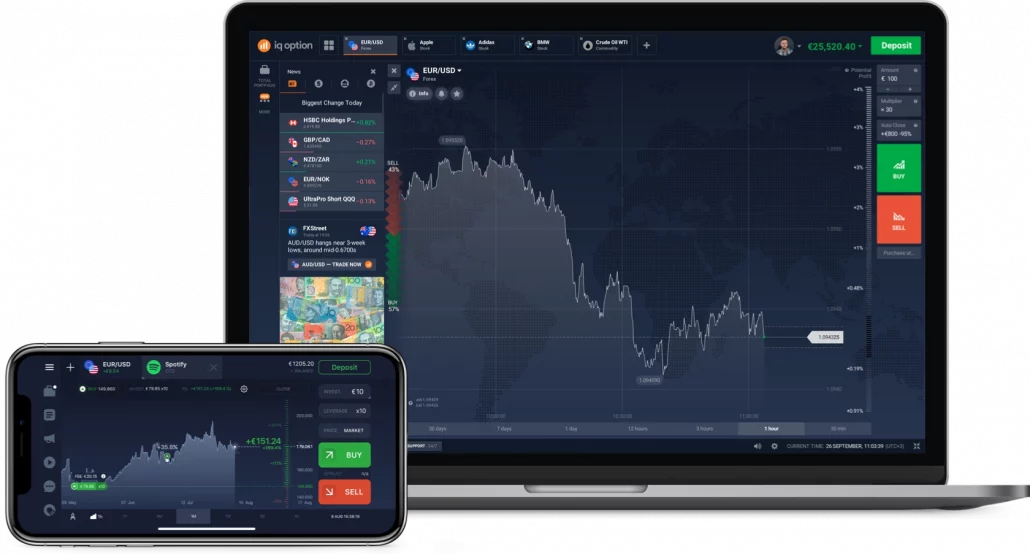
3. IQ Option – Perisian Binari Terbaik untuk pemula (paling mesra pengguna)

Ketiga dalam senarai kami ialah IQ Option, iaitu perisian binari terbaik untuk pemula. Diasaskan pada 2013 dan berpangkalan di St Vincent dan Grenadines, ia merupakan salah satu pembrokeran pilihan binari terbesar yang terdapat pada hari ini.
Produk dan tapak web mereka menawarkan semua alatan yang anda perlukan untuk mendapatkan ganjaran anda, bersama-sama dengan pelbagai analisis dan cadangan.
Sebelum anda menggunakan sepenuhnya, uji kemahiran anda dengan $10,000 dalam dana maya dengan akaun demo. Apabila anda sudah bersedia, tukar ke akaun sebenar di mana anda boleh memperoleh sehingga 95% pada setiap perdagangan yang berjaya.
(Amaran risiko: Modal anda boleh berisiko)
Aset boleh labur

IQ Option menawarkan pelbagai jenis produk dagangan. Pengguna boleh berdagang lebih 90 aset berbeza, termasuk saham, komoditi, mata wang kripto, forex, ETF dan banyak lagi.
- Pasaran ekuiti
Pada IQ Option anda boleh membeli lebih 180 saham. Beberapa syarikat yang anda boleh berdagang ialah Tesla, FB, Google, Amazon dan lain-lain.
- Cryptos
Anda boleh berdagang ZCash, Trx, Bitcoin, Ripple, Eth, Litecoin, Qtum, Ethereum dan banyak lagi mata wang kripto.
- Pasaran komoditi
Empat komoditi utama boleh didapati dengan IQ Option: Platinum, Perak, Emas dan Minyak.
- ETF
Lebih 4000 ETF tersedia di IQ Option, membolehkan pedagang memilih daripada pelbagai jenis ETF.
Jenis akaun

Selain akaun demo, IQ Option menawarkan berbilang akaun untuk dipilih: Akaun Biasa dan Akaun Vip.
- Akaun Demo
Pengguna boleh bermain dengan $10,000 wang maya dalam akaun percubaan IQ Option, yang boleh ditambah sekerap yang mereka suka. Dengan akaun demo, anda boleh mendapatkan pemahaman yang lebih baik tentang tapak dan ciri-cirinya.
Jika anda teragak-agak untuk melabur dengan wang sebenar, anda sentiasa boleh berlatih dengan akaun demo untuk meningkatkan kemahiran dagangan anda. Sebaik sahaja anda telah memperoleh pengalaman yang mencukupi dengan akaun demo, anda boleh dengan cepat bertukar kepada akaun langsung dan mula berdagang dalam masa nyata.
- Akaun Biasa
Pelaburan $10 diperlukan untuk memulakan dagangan dengan akaun biasa. Anda akan diperkenalkan kepada pelbagai instrumen dagangan serta penunjuk teknikal dan analisis. Anda juga boleh memperoleh wang tambahan dengan menyertai pertandingan mingguan IQ Option.
- Akaun Premium
Untuk menggunakan akaun Premium anda perlu membuat deposit yang besar dalam masa beberapa hari. Akaun ini hanya tersedia untuk pelanggan bukan Eropah. Akaun Premium membolehkan anda memperoleh sehingga 3% pulangan bonus. Jika anda mempunyai akaun Premium, anda juga akan dapat menerima kemas kini yang kerap.
Deposit dan pengeluaran

Perisian dagangan ini menyokong pelbagai kaedah deposit dan pengeluaran, termasuk pindahan kawat, e-dompet, dan kad kredit dan debit.
Lihat gambaran keseluruhan di sini:
- Pemindahan wayar
- E-dompet (Neteller, Paypal, Perfect Money, Skrill dan E-Dompet lain)
- Kad Kredit & Debit (termasuk Visa, MasterCard dan Maestro).
Pembayaran e-dompet mengambil sedikit masa untuk diselesaikan. Urus niaga e-dompet boleh diselesaikan dalam sehari atau beberapa jam. Pembayaran yang dibuat melalui pindahan bank atau kad kredit dan debit pada kedua-dua belah pihak mengambil masa yang lebih lama. Jika anda mengeluarkan melalui pindahan wang melalui bank atau kad kredit, proses tersebut boleh mengambil masa sehingga 10 hari.
Kelebihan:
- Perisian yang paling mesra pengguna
- Deposit minimum rendah $ 10
- Jumlah dagangan minimum $ 1
- Pelaksanaan perdagangan pantas
- Sokongan 24/7
- Muat turun untuk sebarang peranti
Kelemahan:
- Tidak tersedia di setiap negara
(Amaran risiko: Modal anda boleh berisiko)
Pertimbangan penting apabila memilih perisian pilihan binari yang baik
Sekarang kita telah membandingkan 3 perisian dagangan binari terbaik, mari kita lihat dengan lebih dekat pertimbangan penting yang perlu anda buat semasa memilih platform yang boleh dipercayai.
Peraturan dan pelesenan – memastikan keselamatan dan akauntabiliti
Pertama sekali, sila sentiasa memberi perhatian kepada peraturan dan pelesenan perisian atau broker yang berkaitan. Ia mustahak. Dikawal oleh pihak berkuasa kewangan yang diiktiraf bukan sahaja memastikan akauntabiliti tetapi juga memberi anda ketenangan fikiran dengan mengurangkan kemungkinan penipuan.
Antara muka pengguna – menavigasi perjalanan perdagangan anda

Antara muka pengguna ialah tetingkap kepada aktiviti dagangan anda. Platform yang baik akan berasa intuitif dan menawarkan visualisasi yang jelas, carta yang mudah dibaca dan pelaksanaan pesanan yang mudah. Ingat, kadangkala detik dikira dalam perdagangan dan anda tidak mahu meraba-raba.
Kepelbagaian aset – meneroka peluang perdagangan yang pelbagai

Ia juga penting untuk mempunyai a pelbagai jenis aset pada pelupusan anda. Platform serba boleh akan membolehkan anda mencuba mata wang, komoditi, saham dan indeks. Kepelbagaian ini boleh berguna terutamanya jika anda berminat untuk meneroka pasaran yang berbeza.
Jenis dagangan yang berbeza dan masa tamat – memastikan kepelbagaian

Seperti yang anda ketahui, tidak semua perdagangan pilihan binari adalah sama, jadi perhatikan perisian yang menyokong pelbagai jenis dagangan dan masa tamat tempoh. Di luar pilihan tinggi/rendah klasik, adalah berfaedah jika perisian menyokong jenis perdagangan seperti pilihan satu sentuhan, sempadan dan tangga. Ditambah dengan ini, pertimbangkan masa tamat tempoh yang ditawarkan oleh perisian. Rangkaian daripada dagangan pantas 60 saat hingga tamat tempoh harian atau mingguan akan memberi anda fleksibiliti dalam strategi anda.
Kadar bayaran – berusaha untuk ketelusan dan daya saing

Memastikan bahawa kadar bayaran untuk perdagangan yang berjaya adalah telus dan berdaya saing.
Pembayaran maksimum mewakili wang yang akan diterima pengguna jika pilihan binari mereka menguntungkan. Sebagai contoh, jika anda membeli binari untuk $10 dengan pembayaran 80%, jika wang itu masuk ke dalam wang, anda akan mendapat kembali $10 anda + 80% daripada $10, atau $8, untuk jumlah 18TP103T.

Ambil perhatian bahawa bonus besar ada di luar sana – ada yang setinggi 900%. Walau bagaimanapun, kebanyakannya adalah sangat berbahaya atau gimik untuk menarik peniaga baru. Secara umum, cara paling mudah untuk menentukan sama ada ganjaran platform adalah munasabah adalah membandingkannya dengan ganjaran pesaingnya.
Dagangan Mudah Alih – Dagangan pilihan binari semasa dalam perjalanan
Dalam era digital yang serba pantas hari ini, anda mungkin ingin melaksanakan perdagangan sambil menghirup kopi di kafe atau menunggu rakan. Di situlah perdagangan mudah alih keupayaan masuk. Apl mudah alih atau platform responsif mudah alih boleh menjadi tidak ternilai.
Akaun demo – berlatih tanpa risiko

Jika anda baru dalam dunia Binary Options atau ingin menguji strategi, platform menawarkan a akaun demo adalah emas. Ini membolehkan anda merasai platform dan berlatih berdagang tanpa risiko kehilangan wang sebenar.
Sokongan Pelanggan – tonggak kritikal pengalaman dagangan anda

Sama ada anda mengalami masalah teknikal atau memerlukan penjelasan tentang sesuatu ciri, tepat pada masanya, sokongan berkualiti tinggi boleh membuat semua perbezaan.
Jangan sekali-kali memandang rendah kepentingan perkhidmatan pelanggan. Walaupun kita semua ingin berfikir bahawa kita tidak perlu menghubungi perkhidmatan pelanggan, sebenarnya kita akan melakukannya. Tindak balas yang pantas dan berguna boleh menghalang masalah kecil daripada meningkat kepada masalah besar, dan boleh membantu meredakan emosi anda dalam senario yang tegang.

Apabila menilai perkhidmatan pelanggan platform, pertimbangkan cara menghubungi mereka, apabila mereka tersedia dan sama ada mereka memberikan sokongan dalam pelbagai dialek atau tidak. Jika boleh, hubungi sokongan pelanggan sebelum melanggan platform tertentu. Ini akan memberi anda pengalaman langsung tentang cara syarikat menangani masalah anda.
(Amaran risiko: Modal anda boleh berisiko)
Keselamatan – melindungi wang dan maklumat peribadi anda

Mengenai subjek keselamatan, dana dan data anda harus berada di bawah perlindungan penyulitan mewah dan ketat keselamatan protokol.
Alat analisis teknikal dan perdagangan sosial – melengkapkan diri anda untuk membuat keputusan termaklum

Ramai peniaga bersumpah alat analisis teknikal. Jika anda antara mereka, cari platform yang menyediakan penunjuk, carta dan alatan lukisan. Sementara itu, jika anda seorang yang percaya kepada kebijaksanaan orang ramai, platform dengan ciri dagangan sosial boleh menarik.
Ketelusan dalam yuran dan komisen – mengelakkan kos tersembunyi

Seseorang tidak boleh cukup menekankan kepentingan ketelusan, terutamanya apabila ia berkaitan yuran dan komisen. Adalah bijak untuk mengetahui semua kos yang berkaitan dengan platform pilihan anda.
Deposit permulaan yang rendah – memastikan kos dagangan yang sederhana

Untuk semua akaun dagangan, deposit permulaan hendaklah kekal sederhana. Ia adalah hadiah mati jika anda terjumpa syarikat yang meminta beribu-ribu dolar.
Hakikat bahawa pembrokeran boleh diakses oleh anda tidak semestinya bermakna anda akan dapat menggunakannya. Jika anda boleh mendaftar dan membuka akaun tetapi tidak mempunyai dana yang mencukupi untuk membiayainya, anda kembali kepada asal.
(Amaran risiko: Modal anda boleh berisiko)
Sumber pendidikan – menyokong pembelajaran dan penambahbaikan

Akhir sekali, bagi mereka yang berminat untuk belajar dan menambah baik, platform yang murah hati menawarkan sumber pendidikan, sama ada dalam bentuk webinar, artikel atau tutorial, adalah satu rahmat.
Pilihan binari mungkin kelihatan mudah pada pandangan pertama, tetapi untuk melindungi keuntungan anda secara konsisten, anda perlu mempunyai asas pengetahuan yang agak luas dan pemahaman yang mendalam tentang keadaan pasaran. Anda memerlukan dua perkara untuk melakukan ini: belajar dan pendidikan.
Yang kurang penting antara keduanya ialah bahan pendidikan. Walaupun tapak web tidak menyediakan banyak kandungan pendidikan, anda masih boleh menemui sumber yang sah dalam talian. Mempunyai segala-galanya di hujung jari anda adalah satu kelebihan yang hebat. Sebaliknya, analisis, yang merangkumi analisis pasaran pilihan binari, alat carta, cadangan perdagangan, penyelidikan trend dan nasihat pakar, adalah topik yang meluas.
Bagaimana untuk memuat turun perisian Dagangan Pilihan Perduaan

Perisian binari tersedia untuk sebarang peranti. Untuk memuat turun perisian daripada broker peribadi anda, anda perlu melakukan langkah-langkah tertentu.
Jika anda ingin memuat turun perisian untuk peranti Android, hanya pergi ke Kedai mainan dan cari broker anda. Di samping itu, anda boleh pergi ke tapak web broker anda dan melihat butang muat turun. Cara yang serupa untuk meneruskan adalah untuk peranti iOS.
Sesetengah broker seperti IQ Option menawarkan perisian pilihan binari untuk dimuat turun pada komputer anda. Ia juga berjalan pada tingkap dan MAC. Anda boleh memuat turunnya dari laman utama rasmi (lihat tangkapan skrin di atas).
(Amaran risiko: Modal anda boleh berisiko)
Perisian dagangan Opsyen Binari Automatik
Jika anda biasa dengan Pilihan Perduaan, anda akan tahu ia adalah sejenis perdagangan kewangan yang mana anda meramalkan arah pergerakan harga aset dalam jangka masa yang ditetapkan. Sekarang, bayangkan mempunyai perisian melakukan ramalan itu dan berdagang bagi pihak anda; di situlah perisian automatik untuk perdagangan pilihan binari dimainkan.
Pertama, jika anda mempertimbangkan untuk menggunakan perisian automatik, adalah penting untuk mengiktiraf kepentingan peraturan dan pelesenan. Sama seperti yang anda lakukan dengan perisian dagangan tradisional, anda ingin memastikan bahawa perisian atau broker yang bergabung dengannya diawasi oleh pihak berkuasa kewangan yang diiktiraf. Ini bukan hanya soal formaliti; ia adalah mengenai memastikan anda dilindungi daripada potensi penipuan dan aktiviti tidak bertanggungjawab.

Walaupun daya tarikan perdagangan automatik adalah kuat, anda mungkin tertanya-tanya tentang pengalaman pengguna. Lagipun, jika perisian melakukan kebanyakan kerja, adakah antara muka itu penting? Jawapannya ialah ya dengan tegas. Malah platform automatik harus mempunyai antara muka yang mesra pengguna dan intuitif. Ini akan memastikan anda boleh memantau dengan mudah perkara yang dilakukan oleh perisian dan membuat pelarasan jika perlu.
Apabila menyelidik pilihan perisian yang berbeza, perhatikan dengan teliti julat aset yang mereka tawarkan untuk berdagang. Rangkaian yang pelbagai memberi anda lebih banyak pilihan, daripada mata wang dan komoditi kepada saham dan indeks. Ia juga berfaedah jika perisian menyokong pelbagai jenis dagangan, melangkaui pilihan binari tinggi/rendah klasik kepada yang lain seperti pilihan satu sentuhan atau tangga.
Walaupun nampaknya perisian itu boleh melakukan segala-galanya, ingat bahawa ia berfungsi berdasarkan parameter yang anda tetapkan. Inilah sebabnya platform dagangan dalam talian yang menawarkan alat analisis teknikal boleh sangat membantu. Penunjuk, carta dan alatan lukisan boleh membantu anda memutuskan parameter yang hendak ditetapkan, walaupun anda tidak membuat dagangan secara manual.
Bercakap tentang menetapkan parameter, pertimbangkan platform dagangan binari yang menawarkan a akaun demo. Ini membolehkan anda menguji strategi dagangan dan merasai perisian tanpa meletakkan wang sebenar pada risiko. Seperti yang anda ketahui, tiada apa yang mengatasi pengalaman praktikal dan akaun dagangan demo menawarkan hanya itu, tanpa risiko. Pada akaun demo, anda boleh menjejaki semua parameter pengurusan risiko yang penting dan menambah baik gaya dagangan anda.
Perdagangan automatik boleh menjadi pengubah permainan, tetapi penting untuk mengekalkan elemen kawalan. Oleh itu, sentiasa pilih platform dagangan pilihan binari yang menyediakan maklumat yang jelas tentang potensi pembayaran dan yuran yang telus. Anda tidak mahu apa-apa kejutan buruk di kemudian hari.

Bendera merah dalam perisian binari
Kami mengesyorkan agar anda melihat tanda merah tertentu dalam perisian binari.
Malangnya, banyak broker membuat janji palsu atau menggunakan penipuan untuk membuat anda menyerahkan wang anda. Sentiasa semak reputasi mana-mana pembekal perisian. Jika anda perasan bahawa sebuah syarikat mempunyai yang ketara bilangan ulasan buruk yang tinggi dalam talian, ini adalah bendera merah.
Kami juga mengesyorkan agar anda memilih pembekal yang mempunyai kitaran pengeluaran yang singkat. Lagipun, anda tidak mahu menunggu minggu untuk wang anda jika anda telah membuat keuntungan. Sekiranya tempoh pengeluaran lebih lama daripada tiga hari, ini juga merupakan bendera merah dan tanda yang jelas bahawa anda harus memilih alternatif lain.
Pasukan sokongan pembekal perisian harus sentiasa tersedia untuk menjawab soalan anda. Jika anda mendapati bahawa pasukan sokongan mengambil satu tidak perlu lama untuk bertindak balas atau tidak menjawab soalan anda dengan secukupnya, anda mungkin mahu menjauhkan diri daripada syarikat ini. Walau bagaimanapun, pembekal yang disenaraikan di sini semuanya telah diuji dengan teliti oleh kami, jadi anda tidak boleh tersilap dengan mereka.
Kesimpulan: Quotex ialah perisian pilihan binari terbaik, tetapi terdapat juga alternatif yang hebat
Akhirnya, kami telah membuat kesimpulan, dan mungkin sekarang, anda mempunyai pemahaman yang lebih baik tentang betapa kritikalnya penggunaan perisian dagangan kini dalam industri pilihan binari yang pantas. Ini adalah antara beberapa masa apabila anda benar-benar boleh mendapat kelebihan, jadi rebutlah ia.
Dalam perbandingan kami, Quotex adalah perisian dagangan terbaik untuk Pilihan Perduaan. Tetapi anda juga boleh menggunakan alternatif. Contohnya, Pocket Option dan Deriv menawarkan antara muka dan perisian yang sangat mesra pengguna.
Kesimpulannya, anda perlu memutuskan perisian mana yang paling sesuai untuk anda. Jadi buka akaun demo Pilihan Perduaan percuma dan mula memuat turun perisian:
- Quotex – Perisian Binari Terbaik untuk isyarat dan ketersediaan di semua negara
- Pocket Option – Perisian Binari Terbaik untuk perdagangan sosial
- IQ Option – Perisian Binari Terbaik untuk pemula (paling mesra pengguna)
(Amaran risiko: Modal anda boleh berisiko)
Beberapa Soalan Lazim (Soalan Lazim) tentang perisian untuk perdagangan pilihan binari:
Adakah perisian perdagangan pilihan binari percuma?
Ya, perisian perdagangan pilihan binari biasanya disediakan secara percuma oleh broker. Anda boleh memuat turun dan menggunakannya pada bila-bila masa. Daripada kajian kami, tiada kos tambahan. Broker membuat wang daripada komisen perdagangan dan menyediakan perisian secara percuma kepada pedagangnya.
Pada peranti manakah saya boleh menggunakan perisian perdagangan pilihan binari?
Perisian perdagangan pilihan binari tersedia untuk setiap peranti. Muat turun untuk komputer (PC), peranti Android atau peranti iOS anda.
Adakah perisian pilihan binari selamat dan terjamin?
Ya, perisian perdagangan pilihan binari adalah selamat jika anda menggunakan broker yang dikawal selia. Kami tidak mengesyorkan menggunakan broker tidak berdaftar untuk berdagang pilihan binari. Berhati-hati di mana anda mendaftar. Rekod prestasi syarikat juga penting. Jika anda menggunakan broker yang dikawal dengan baik dan terkenal, adalah sangat selamat untuk menggunakan perisian pilihan binari.
Apakah perisian perdagangan pilihan binari yang terbaik?
Selepas ujian menyeluruh kami, perisian perdagangan pilihan binari daripada Quotex, Pocket Option dan IQ Option muncul sebagai yang terbaik. Kami mengesyorkan Quotex untuk pengalaman pengguna yang sangat baik.


