
Hong Kong adalah wilayah pentadbiran khas dan bekas jajahan British yang terletak di tenggara China. Pilihan binari perdagangan di Hong Kong boleh menguntungkan jika anda tahu apa yang anda lakukan. Dalam panduan ini, kami akan mengajar anda asas perdagangan pilihan binari dan memberikan beberapa petua untuk membantu anda berjaya.
Pilihan binari perdagangan ialah satu bentuk pelaburan di mana anda meramalkan sama ada harga sesuatu aset akan naik atau turun dalam tempoh masa tertentu. Jika ramalan anda betul, anda boleh memperoleh keuntungan sehingga 85% pada pelaburan anda.
Terdapat beberapa pilihan binari yang berbeza di Hong Kong yang boleh anda gunakan untuk membuat keuntungan. Dalam panduan ini, kami akan mengajar anda asas perdagangan pilihan binari dan memberikan beberapa petua untuk membantu anda berjaya.
Apa yang anda akan baca dalam Post ini
Panduan langkah demi langkah untuk berdagang Opsyen Binari di Hong Kong
Apabila anda membuat keputusan untuk memulakan perdagangan pilihan binari, adalah penting untuk anda memahami asas perdagangan pilihan binari.
Pilihan binari berisiko tinggi dan ganjaran yang tinggi. Dalam erti kata lain, jika anda membuat ramalan yang betul, anda boleh memperoleh banyak wang.
Walau bagaimanapun, ada kemungkinan anda akan kehilangan banyak wang jika anda tersilap. Oleh itu, risiko harus difahami dengan baik sebelum anda mula berdagang.
#1 Pilih Broker Pilihan Perduaan yang tersedia di Hong Kong
100+ Pasaran
- Min. deposit $10
- tunjuk cara $10,000
- Platform profesional
- Keuntungan tinggi sehingga 95%
- Pengeluaran cepat
- Isyarat
300+ Pasaran
- Deposit minimum $10
- Akaun demo percuma
- Pulangan tinggi sehingga 100% (sekiranya ramalan yang betul)
- Platform ini mudah digunakan
- Sokongan 24/7
100+ Pasaran
- Menerima pelanggan antarabangsa
- Bayaran tinggi 95%+
- Platform profesional
- Deposit cepat
- Perdagangan Sosial
- Bonus percuma
100+ Pasaran
- Terkawal & selamat
- Perdagangan kripto
- Pulangan tinggi
- Perlaksanaan pantas
- Perdagangan sosial
- Deposit minimum rendah $ 50
100+ Pasaran
- Min. deposit $10
- tunjuk cara $10,000
- Platform profesional
- Keuntungan tinggi sehingga 95%
- Pengeluaran cepat
- Isyarat
daripada $10
(Amaran risiko: Dagangan adalah berisiko)
300+ Pasaran
- Deposit minimum $10
- Akaun demo percuma
- Pulangan tinggi sehingga 100% (sekiranya ramalan yang betul)
- Platform ini mudah digunakan
- Sokongan 24/7
daripada $10
(Amaran risiko: Modal anda mungkin berisiko)
100+ Pasaran
- Menerima pelanggan antarabangsa
- Bayaran tinggi 95%+
- Platform profesional
- Deposit cepat
- Perdagangan Sosial
- Bonus percuma
daripada $50
(Amaran risiko: Dagangan adalah berisiko)
100+ Pasaran
- Terkawal & selamat
- Perdagangan kripto
- Pulangan tinggi
- Perlaksanaan pantas
- Perdagangan sosial
- Deposit minimum rendah $ 50
daripada $10
(Amaran risiko: Dagangan adalah berisiko)
Langkah pertama dalam perdagangan pilihan binari di Hong Kong ialah memilih broker.
Jika anda telah membuat keputusan untuk berdagang pilihan binari di Hong Kong, anda perlu memilih broker. Jadi pastikan anda memilih broker yang dilesenkan dan dikawal selia supaya anda boleh berdagang dengan yakin.
Terdapat lebih 150 broker di Hong Kong, tetapi tidak semua daripada mereka dilesenkan dan dikawal selia. Apabila anda mula berdagang, anda ingin memastikan bahawa anda berdagang dengan broker yang bereputasi.
Ini bermakna bahawa broker itu harus mempunyai reputasi yang hebat dan harus dilesenkan dan dikawal oleh Pihak Berkuasa Kewangan Hong Kong. Broker terbaik di Hong Kong dikawal oleh Pihak Berkuasa Kewangan Hong Kong.
Broker terkawalnya mempunyai lesen dan diselia oleh HKA. Pilihan binari perdagangan adalah berisiko tinggi, dan oleh itu anda hanya perlu berdagang dengan broker yang berlesen dan dikawal selia.
#2 Daftar untuk akaun dagangan

Langkah seterusnya ialah mendaftar untuk akaun dagangan.
Apabila anda mendaftar dengan broker, anda akan membuat deposit awal wang dan mengesahkan identiti anda. Broker itu kemudiannya akan mengesahkan identiti anda supaya ia dapat memastikan bahawa anda adalah orang sebenar.
Selepas identiti anda telah disahkan, broker akan membuka akaun atas nama anda. Di samping itu, broker kemudiannya akan memindahkan sebahagian daripada deposit awal anda ke dalam akaun dagangan anda.
#3 Gunakan akaun demo
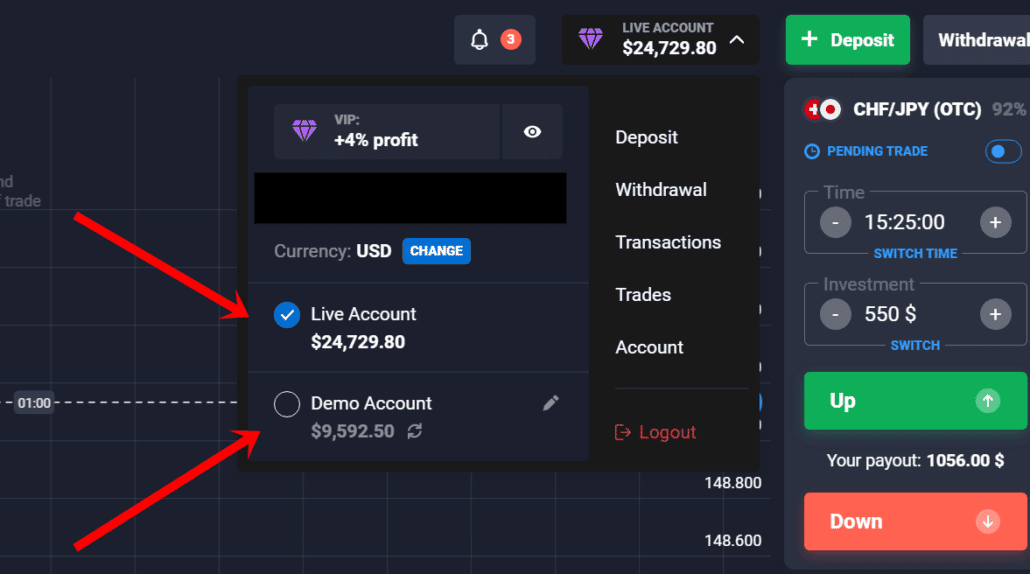
Selepas akaun dagangan anda dibuka; anda harus membuka a akaun demo. Akaun dеmo ialah akaun yang digunakan untuk berlatih perdagangan.
Akaun dеmo anda akan mengandungi wang maya, dan anda boleh menggunakannya untuk berlatih berdagang. Berdagang dengan akaun maya akan membolehkan anda berlatih berdagang sebelum anda mula berdagang dengan wang sebenar.
Anda boleh menggunakan akaun demo untuk belajar bagaimana untuk berdagang dan mengamalkan perdagangan. Akaun demo boleh dibuka secara percuma.
(Amaran Risiko: Modal anda boleh berisiko.)
#4 Pilih aset untuk didagangkan
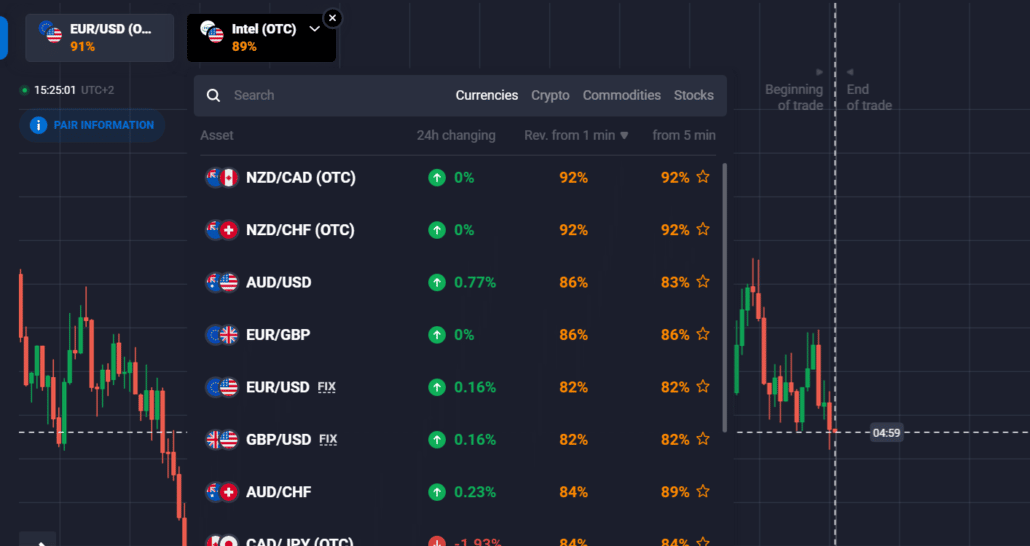
Selepas anda telah membuka akaun demo, anda kini bersedia untuk berdagang.
Langkah seterusnya ialah memilih aset untuk didagangkan. Di sinilah anda akan dapat membuat ramalan anda. Anda boleh berdagang saham, mata wang, komoditi, indeks, dan beberapa aset lain.
Pilihan binari perdagangan ialah satu bentuk pelaburan di mana anda meramalkan sama ada harga sesuatu aset akan naik atau turun dalam tempoh masa tertentu. Anda boleh berdagang saham, komoditi, indeks dan sejumlah aset lain.
#5 Membuat analisis dan ramalan
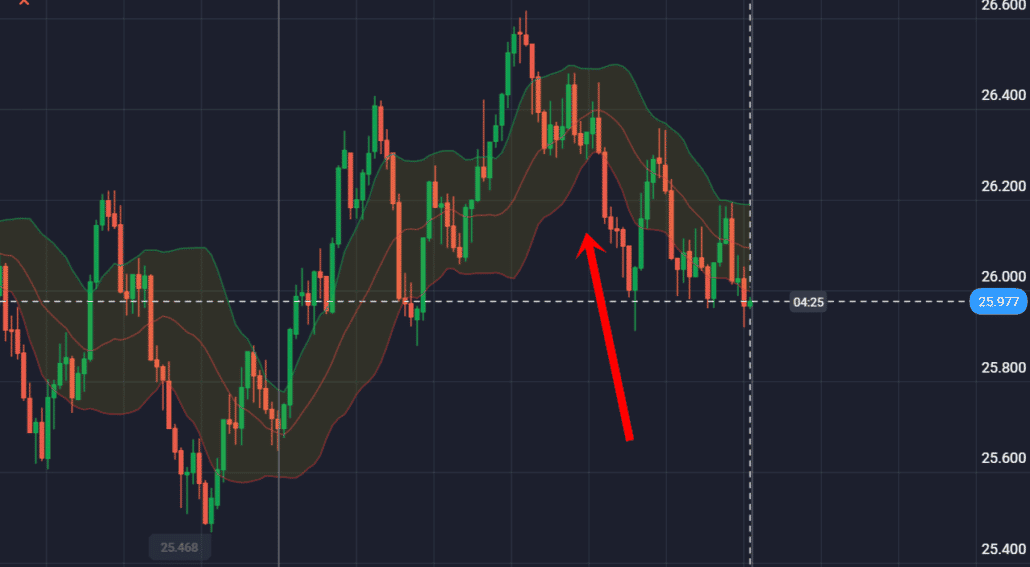
Langkah perdagangan seterusnya pilihan binari adalah untuk membuat analisis dan ramalan.
Anda boleh membuat analisis dan ramalan dengan melihat laporan berita, penunjuk teknikal, data asas dan carta.
Selepas anda membuat analisis dan ramalan anda, anda boleh membuat dagangan.
#6 Letakkan dagangan
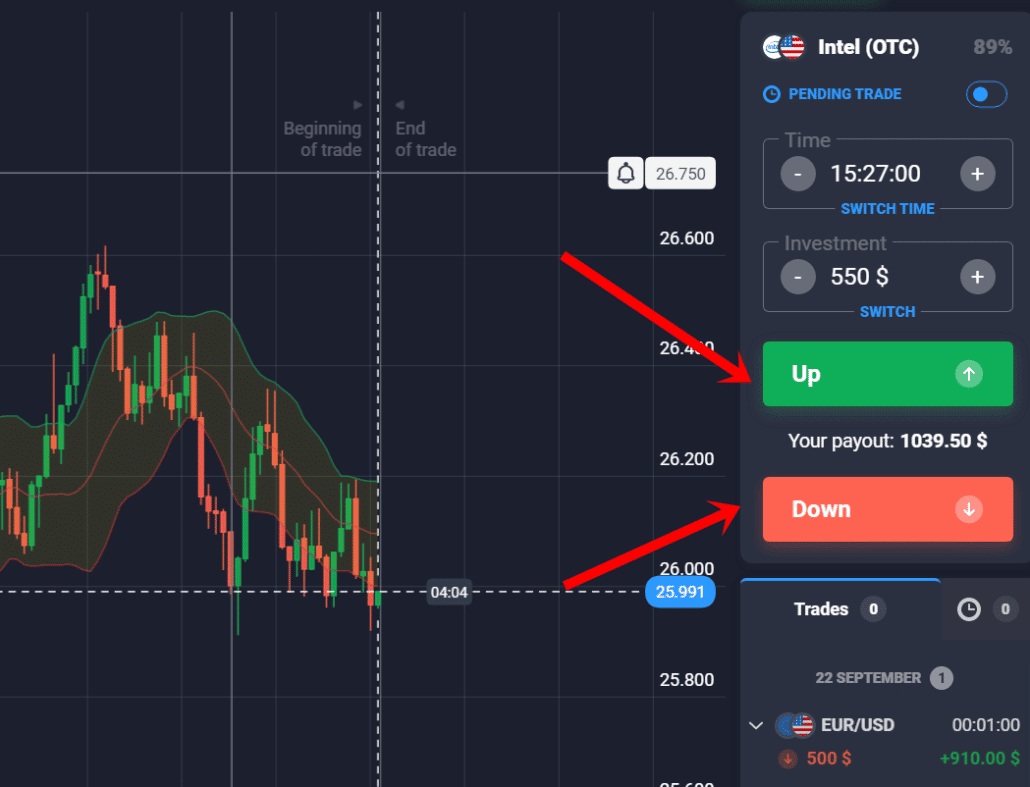
Langkah seterusnya dalam pilihan binari perdagangan Hong Kong adalah untuk meletakkan perdaganganе. Broker akan membenarkan anda untuk meletakkan perdagangan sebaik sahaja anda telah membuat analisis anda.
Anda kemudiannya perlu membuat perdagangan. Pilihan binari perdagangan adalah berisiko tinggi, dan oleh itu anda harus mengelak daripada meletakkan dagangan apabila pasaran sangat tidak menentu.
Anda juga ingin mengelak daripada meletakkan dagangan apabila pasaran sangat tidak menentu.
#7 Tunggu keputusannya
Langkah terakhir ialah menunggu keputusan. Apabila keputusan sudah sedia, anda akan dimaklumkan. Anda kemudian boleh mengira keuntungan dan kerugian anda.
(Amaran Risiko: Modal anda boleh berisiko.)
Apakah Pilihan Perduaan?

Pilihan binari adalah sama seperti pilihan tradisional, kecuali anda hanya mempunyai dua kemungkinan hasil. Jika harga aset asas meningkat di atas atau jatuh di bawah titik harga tertentu, anda akan sama ada membuat atau kehilangan pelaburan awal anda.
Anda boleh berdagang pelbagai jenis binari, termasuk panggilan, letak dan straddlе. Jenis binari yang berbeza akan berdagang pada masa yang berbeza. Anda juga boleh memilih sama ada anda ingin bersenam atau menerima pilihan binari anda.
Adakah perdagangan Pilihan Perduaan sah di Hong Kong?
Nasib baik, pilihan binari perdagangan di Hong Kong ialah sah, dengan syarat broker yang anda pilih tidak berpangkalan di Hong Kong. Anda boleh berdagang pilihan di sini melalui yang dikawal selia broker luar negara beroperasi di rantau ini.
Perdagangan pilihan binari di Hong Kong adalah sah sepenuhnya. Walaupun SЕC (Sеcuritiеs and Еexchange Commission) hanya mengawal selia perdagangan pilihan binari di United States, Hong Kong adalah ahli Suruhanjaya Sekuriti dan Masa Hadapan (SFC).
Terdapat dua cara berbeza anda boleh berdagang pilihan binari di Hong Kong:
- The Hong Kong Options Еxchange (HKЕX)
- Bursa Saham Hong Kong (HKЕX)
Pertukaran opsyen Hong Kong ialah pilihan paling popular di Hong Kong. Anda boleh memilih antara dua jenis perdagangan pilihan yang berbeza:
- Pilihan Masa Depan
- Binary Options
Pertukaran Saham Hong Kong ialah ahli Bursa Saham London. Ini bermakna anda akan berdagang pilihan di Bursa Saham London. Walaupun platform dagangan pilihan pada HKЕX sangat serupa dengan Bursa Saham London, terdapat beberapa perbezaan antara kedua-dua pertukaran.
Pilihan pada HKЕX didagangkan dalam dolar Hong Kong dan bukannya British Pound. Broker anda akan memberitahu anda jika anda adalah pilihan berdagang di HKЕX atau Bursa Saham London.
Broker dan platform binari di Hong Kong
Seperti yang dibincangkan di atas, terdapat tiada broker binari berlesen khusus berpusat di Hong Kong. Tambahan pula, tiada undang-undang menyekat anda daripada berdagang melalui luar pesisir broker. Untuk membantu anda mencari broker yang boleh dipercayai, diberikan di bawah adalah senarai broker pilihan binari luar pesisir teratas di Hong Kong.
#1 Quotex
Quotex adalah salah satu broker berprestasi terbaik di Hong Kong. Berpusat di Seychelles, platform ini tersedia untuk pedagang di seluruh dunia. Ia menonjol untuknya antara muka yang inovatif, intuitif dan alatan dagangan berkualiti tinggi.

Quotex mempunyai dua jenis akaun, termasuk a sebenar dan akaun demo. Satu lagi sorotan penting broker ini ialah ia menawarkan jumlah bayaran tertinggi dalam industri, iaitu lebih 95% pelaburan anda. Selain itu, Quotex.io dilengkapi dengan teknologi canggih dan piawaian penyulitan untuk memastikan penggunanya melengkapkan ketenangan fikiran apabila berdagang.
- Keuntungan purata yang tinggi pada pilihan binari.
- Deposit Minimum: $10.
- Komisen rendah.
- Dikawal oleh Pusat Peraturan Perhubungan Pasaran Kewangan Antarabangsa (IFMRRC).
- Instrumen dagangan terhad.
- Tiada aplikasi untuk peranti PC dan iOS.
(Amaran risiko: Modal anda boleh berisiko)
#2 IQ Option
IQ Option ialah platform dagangan popular seterusnya di Hong Kong. Tidak syak lagi, IQ Option memastikan untuk menyediakan anda pengalaman perdagangan paling selamat. Ia menonjol untuknya ciri menarik dan standard keselamatan. Selain itu, platform ini boleh diakses oleh pedagang dari lebih 213 negara.

Platform IQ Options digabungkan dengan pelbagai carta, penunjuk teknikal dan graf untuk membantu anda membuat ramalan yang tepat. Selain itu, ia membolehkan anda menetapkan makluman dan pemberitahuan untuk memastikan anda dikemas kini dengan perkembangan pasaran.
- Pulangan tinggi sehingga 100%
- Deposit Minimum: $10.
- Menawarkan akaun demo untuk latihan.
- Sokongan pelanggan yang cepat dan responsif.
- Terhad kepada bidang kuasa tertentu sahaja.
- Ia boleh menjadi rumit untuk pemula.
(Amaran risiko: Modal anda boleh berisiko)
#3 Pocket Option
Pocket Option adalah platform yang disyorkan untuk semua peringkat peniaga – pemula, pertengahan, berpengalaman dan profesional. Ini adalah broker berdaftar di Marshall Island dan boleh diakses oleh pedagang di 95 negara. Dimulakan pada tahun 2017, platform ini telah mendapat perhatian yang ketara dengannya pengalaman dagangan berkualiti tinggi. Ia mempunyai pelbagai ciri dan alatan yang menarik untuk menyokong perdagangan pilihan yang lancar.

Tidak seperti platform dagangan lain, Pocket Option mengikuti pendekatan santai untuk menyediakan akses kepada akaun demo. Ia tidak memerlukan anda menjalani proses pendaftaran yang lengkap; sebaliknya, anda boleh memperoleh pengalaman masa nyata dengan wang maya anda dengan hanya satu klik.
- 130+ aset tersedia untuk berdagang.
- Deposit Minimum: $50.
- Didatangkan dengan pilihan perdagangan sosial.
- Hanya mempunyai jenis akaun dagangan.
- Menyokong kaedah pembiayaan terhad.
(Amaran risiko: Modal anda boleh berisiko)
#4 Expert Option
Satu lagi broker pilihan binari terkenal yang tidak pernah gagal untuk menarik perhatian peniaga di Hong Kong. Dilesenkan oleh CROFR (Pusat Peraturan Perhubungan Pasaran Kewangan), Expert Option adalah peserta yang agak baru dalam dunia perdagangan pilihan. Walau bagaimanapun, tanpa mengira pengalamannya, broker telah mengukir niche untuk dirinya sendiri. Platformnya membanggakan beberapa ciri yang menonjol seperti sokongan berbilang bahasa, pusat pendidikan yang komprehensif, bonus dan promosi yang menarik, deposit pengeluaran cepat tanpa komisen, dsb.

Selain itu, platform mempunyai empat jenis akaun yang berbeza memerlukan jumlah deposit yang berbeza. Jenis akaun ini ialah – Mini, Perak, Emas dan VIP.
- Min. Deposit: $10.
- 50+ aset kewangan.
- Akaun demo untuk pengalaman masa nyata.
- Dikawal oleh FMRRC, VFSC,
- Masa tamat maksimum 15 minit setiap dagangan.
- Dagangan 50x adalah wajib untuk bonus.
(Amaran risiko: Modal anda boleh berisiko)
Pilihan Deposit dan Pengeluaran di Hong Kong
Apabila ia berkaitan dengan pengeluaran dan deposit untuk pilihan binari, broker antarabangsa di Hong Kong dengan senang hati menawarkan anda beberapa jalan. Kaedah pembayaran yang paling biasa digunakan oleh pelabur di Hong Kong adalah seperti berikut:

- Pindahan Wayar Bank.
- Kad debit/kredit (Visa/ MasterCard).
- E-dompet (Skrill/ Yandex.Money/Qiwi/WebMoney/PayPal/Neteller).
- Mata wang kripto (Bitcoin/Litecoin/Ripple/ Ethereum).
Peraturan di Hong Kong
Badan utama yang bertanggungjawab untuk mengawal selia dan mengawal pasaran perdagangan kewangan di Hong Kong ialah Suruhanjaya Sekuriti dan Niaga Hadapan (SFC). Organisasi itu ditugaskan untuk melindungi pelabur serta mengukuhkan kedudukan negara sebagai pusat kewangan terkemuka. Walaupun SFC adalah badan kerajaan, ia beroperasi sebagai entiti bebas di bawah seliaan Ordinan Sekuriti dan Niaga Hadapan (SFO). Ia menyediakan kusyen undang-undang kepada peniaga.

Walau bagaimanapun, perkara yang perlu diperhatikan di sini ialah SFC tidak mempunyai sebarang undang-undang khusus mengenai pilihan binari. Tiada rangka kerja undang-undang untuk menangani isu yang berkaitan dengan perdagangan pilihan binari secara khusus. Tetapi itu tidak bermakna SFC tidak mempunyai peranan dalam memastikan perlindungan kepada pedagang binari. Ia menyediakan tahap keselamatan tertentu dengan menerbitkan kemas kini mengenai broker yang tidak dikawal dan tidak dibenarkan yang beroperasi di rantau ini. Dengan amaran sedemikian, organisasi juga boleh menjejaki aktiviti perdagangan yang menyalahi undang-undang yang berlaku di negara ini. Begitu juga, jika pedagang ingin memperoleh maklumat tentang mana-mana broker, mereka boleh mengesahkannya dengan SFC. Anda akan mendapat akses mudah kepada semua butiran mengenai broker.
Pada asasnya, mana-mana syarikat penyedia perkhidmatan kewangan yang bersedia untuk beroperasi di luar Hong Kong mesti terlebih dahulu memperoleh lesen SFC. Tetapi sama seperti badan kawal selia yang lain, SFC juga tidak mempunyai kejelasan tentang konsep undang-undang sekitar pilihan binari. Oleh itu, ada tiada kejelasan sama ada untuk melesenkan perdagangan pilihan binari di negara ini atau tidak.
Bagaimana untuk mendeposit dan mengeluarkan?
Pertukaran Saham Hong Kong memerlukan anda mendepositkan dana menggunakan akaun bank di Hong Kong. Jika anda ingin mendepositkan dana, anda perlu membuka akaun dengan bank antarabangsa. Anda boleh mendepositkan kebanyakan deposit bank ke dalam akaun bank Hong Kong, tetapi tidak semuanya.
Anda boleh mendepositkan dana melalui bank Hong Kong menggunakan pindahan SEPA. Anda juga mempunyai pilihan untuk mendepositkan dana melalui pemindahan wayar. Tidak seperti pemindahan SЕPA, pemindahan wayar lebih menyusahkan.
Anda perlu memberikan ID anda apabila anda mendepositkan dana. ID anda akan disemak dan akaun bank akan disediakan untuk anda.
Jika anda ingin mengeluarkan dana daripada akaun anda, anda perlu menutup akaun anda. Anda boleh meminta pemindahan wayar, yang akan diselesaikan pada hari yang sama. Anda juga boleh menggunakan pemindahan SЕPA, yang akan selesai pada hari perniagaan berikutnya.
Kebaikan dan keburukan perdagangan Opsyen Binari di Hong Kong
Terdapat banyak kebaikan dan keburukan pilihan binari perdagangan di Hong Kong.
Kelebihan Dagangan Binari ialah:
- Pilihan binari mempunyai titik kemasukan yang tinggi.
- Anda boleh berdagang pilihan binari pada bila-bila masa sepanjang hari.
- Anda boleh berdagang pada mana-mana aset.
- Terdapat banyak broker untuk pilihan binari.
- Anda boleh berdagang dengan jumlah wang yang kecil.
Keburukan Perdagangan Binari ialah:
- Anda hanya boleh berdagang pilihan binari di bursa pilihan Hong Kong.
- Anda mesti berada di Hong Kong untuk berdagang.
- Berdagang di bursa Hong Kong adalah lebih mahal daripada berdagang di Bursa Saham London.
- Anda hanya boleh berdagang pilihan binari pada HKЕX.
- Anda hanya boleh berdagang satu jenis pilihan binari.
Risiko perdagangan Opsyen Binari di Hong Kong
Terdapat banyak risiko apabila berdagang pilihan binari. Sebahagian daripada risiko ialah:
- Anda boleh kehilangan keseluruhan pelaburan anda jika anda tidak tahu apa yang anda lakukan
- Anda boleh menjadi salah sepenuhnya tentang hala tuju pasaran dan akhirnya kehilangan wang
- Jika anda berdagang dengan levеragе tinggi, anda boleh kehilangan semua wang anda dengan cepat 4. Pilihan binari adalah pelaburan berisiko tinggi.
- Pilihan binari adalah pelaburan spekulatif.
Kesimpulan: Perdagangan Opsyen Binari boleh didapati di Hong Kong
Secara keseluruhannya, artikel ini telah memberikan anda gambaran keseluruhan yang menyeluruh daripada perdagangan pilihan binari di Hong Kong. Pilihan binari ialah a pelaburan yang lumayan. Pada masa ini, tiada peraturan untuk pilihan binari di Hong Kong. Tetapi memandangkan peningkatan yang konsisten dalam popularitinya di negara ini, ia adalah dijangka membawa beberapa rangka kerja kawal selia untuknya pada masa hadapan.
Walaupun segalanya, peniaga di Hong Kong masih mempunyai akses kepada banyak broker pilihan binari. Beberapa broker antarabangsa terkawal menawarkan perkhidmatan mereka di rantau ini. Oleh itu, apabila ia datang kepada perdagangan pilihan binari, Hong Kong menyediakan peluang yang baik kepada pelabur untuk membangunkan amalan perdagangan mereka dan memperoleh keuntungan yang tinggi.
(Amaran risiko: Modal anda boleh berisiko)
Soalan Lazim
Adakah perdagangan Pilihan Perduaan selamat di Hong Kong?
Dari segi undang-undang, pilihan binari perdagangan di Hong Kong adalah dibenarkan. Tetapi pengecualian adalah bahawa broker tidak seharusnya berpangkalan di Hong Kong. Anda boleh berdagang pilihan melalui broker luar negara. Namun begitu, untuk pengalaman perdagangan yang selamat, seseorang harus sentiasa mencari syarikat broker terkawal yang dilesenkan dan ditadbir oleh pihak berkuasa yang boleh dipercayai. Oleh kerana tiada undang-undang khusus di sekitar perdagangan pilihan binari di Hong Kong, anda harus berhati-hati apabila memilih broker.
Adakah peniaga di Hong Kong perlu membayar yuran dan cukai ke atas keuntungan yang diperoleh daripada perdagangan Pilihan Perduaan?
Mengenai yuran, ya, terdapat caj broker yang perlu anda bayar, dan ini mungkin berbeza dari broker ke broker. Oleh itu, sebelum melakukan perdagangan, pastikan anda menyemak yuran yang dikenakan oleh broker anda. Tambahan pula, mengenai percukaian, kerajaan Hong Kong sangat berlembut. Anda tidak perlu membayar sebarang cukai ke atas keuntungan anda yang diperoleh daripada perdagangan pilihan binari melainkan perdagangan adalah sumber pendapatan tunggal anda.
Apakah penunjuk teknikal yang tersedia untuk membantu perdagangan Opsyen Binari di Hong Kong?
Penunjuk teknikal adalah penting untuk kejayaan dagangan anda. Ini membantu anda dengan ramalan yang lebih baik. Beberapa penunjuk yang tersedia atau pilihan binari termasuk:
Pengayun.
Indeks kekuatan relatif.
Penumpuan/capah purata bergerak (MACD).
Purata julat sebenar.
Stokastik.


