L'article fournit un aperçu complet des points pivots du trading d'options binaires, soulignant leur importance dans la prévision des tendances du marché et des mouvements de prix. Les points pivots sont calculés en utilisant les prix haut, bas et de clôture de la session précédente et sont réglables pour différentes périodes.
Dans le trading d'options binaires, ces points sont essentiels pour déterminer les niveaux potentiels de support et de résistance et pour réaliser des transactions rentables basées sur les prévisions d'orientation du marché.

Bon à savoir:
- Les points pivots sont des indicateurs techniques utilisés pour prédire les tendances du marché et les mouvements de prix dans le trading d'options binaires.
- Ils sont calculés en utilisant les prix haut, bas et de clôture de la session précédente et peuvent être ajustés pour différentes périodes.
- Un prix au-dessus d'un point pivot suggère un marché haussier, tandis qu'un prix en dessous indique un marché baissier.
- Les points pivots servent d'indicateur à court terme et sont utilisés pour déterminer les niveaux potentiels de support et de résistance dans les échanges intrajournaliers.
Ce que vous lirez dans cet article
Quelle est la stratégie des points pivots
La stratégie Pivot Points est une méthode populaire utilisée par les traders pour déterminer les niveaux potentiels de support et de résistance sur le marché. Cette technique consiste à calculer des points pivots sur la base de la moyenne des prix haut, bas et de clôture de la séance de négociation précédente. Les traders utilisent ensuite ces points pour prédire les mouvements futurs du marché, identifiant ainsi les points d'entrée et de sortie potentiels de leurs transactions.
La stratégie est particulièrement efficace dans le trading d’options binaires, où des prévisions précises sur l’orientation des prix sont cruciales. Lorsque le prix d’un actif se négocie au-dessus d’un point pivot, cela indique souvent une tendance haussière du marché, tandis qu’un cours en dessous d’un point pivot suggère une tendance baissière.
En combinant cette stratégie avec d'autres indicateurs et analyses de marché, les traders peuvent prendre des décisions plus éclairées et potentiellement augmenter leurs chances de rentabilité.
Utilisation stratégique des points pivots dans les options binaires
Une fois que vous avez créé les points pivots, vous pouvez les utiliser pour aider un trader à prédire comment le prix d'un actif évoluera. Lorsque le coût d'un actif se négocie juste au-dessus du point pivot, on pense généralement que le marché de cet actif évolue vers un marché haussier. Lorsque le coût d'un actif passe en dessous du point pivot, on dit que le marché tend vers un marché baissier.
Dans le trading d'options binaires, il est essentiel de savoir comment se déroulera le mouvement des prix, et une prédiction appropriée du mouvement des prix peut aider un trader à réaliser un gros profit en peu de temps.
L'un des aspects les plus difficiles du trading est de juger si les prix vont s'inverser ou continuer dans leur direction actuelle. Bien qu'il ne puisse pas être décrit comme simple, il est essentiel de le comprendre car il peut être utilisé comme un guide lors de l'utilisation de diverses méthodes à la fois pour le forex au comptant et les options binaires. Différents indicateurs ont été développés, et ils ont été complétés par une description des niveau de résistance et niveau de support analyse pour aider les commerçants à déterminer le modèle des mouvements de prix plus précisément.
Néanmoins, on ne peut nier que même lors de l'utilisation d'indicateurs, des considérations subjectives jouent un rôle dans l'identification des niveaux de support et de résistance.
Les traders doivent être prudents lorsqu'ils utilisent des indicateurs de Fibonacci pour définir leurs propres points de retrait des lignes swing bas et swing haute ou des lignes de support et de résistance. Mais n'ayez crainte, il existe des indicateurs plus quantitatifs, notamment les points pivots. Ce signal de point pivot est également approprié pour les traders d'options binaires.
Les risques extraordinaires peuvent être difficiles, mais si vous analysez vos risques, l'approche des options binaires deviendra beaucoup plus efficace.
En ce sens, le Pivot Point et ses variantes sont un outil conçu pour fournir des niveaux établis de support et de résistance tout en réduisant le risque. Lorsqu'ils sont utilisés conjointement avec des points pivots, il a été démontré que les bons vieux outils techniques fonctionnent mieux dans les meilleures approches d'options binaires que lorsqu'ils sont utilisés seuls. Le commerce des points pivots peut être utilisé de manière extrêmement efficace et rentable par les traders binaires.. Pour savoir comment lire l'article complet.
Heureusement, le marché des options binaires nous permet d'échanger des mouvements de prix de toute nature. Contrairement au trading forex ou même à d'autres marchés sur lesquels le marché doit évoluer pour gagner de l'argent, vous pouvez profiter du marché des options binaires même si les valeurs de l'actif sous-jacent restent statiques.
Dans l'article d'aujourd'hui, nous passerons en revue un scénario appelé cassure qui se produit lorsque le marché évolue. Après des intervalles d'inaction des prix, des cassures se produisent. Ils se produisent lorsque les commerçants voient un signe d'approche marché événement qui impactera la valeur d'un sous-jacent et décidera de prendre position pour en tirer profit.
L'examen du modèle de mouvement des prix à des niveaux critiques de support et de résistance est une approche pour le déterminer.
Les prix peuvent avoir défié les niveaux de résistance à plusieurs reprises avant de casser à la hausse, les points de renversement augmentant progressivement. Cela suggère qu'il existe un fort désir d'acquérir. Lorsque nous observons cela, nous savons que les prix sont sur le point d'exploser à la hausse.
En cas de cassure à la baisse, c'est l'inverse qui est vrai. Les niveaux de support seront remis en cause à plusieurs reprises, les points de retracement allant de plus en plus bas, indiquant une pression de vente.
Maîtriser les points pivots pour une prévision précise de la direction des prix

Avoir les bonnes prévisions de direction des prix est essentiel pour les performances de trading d'options binaires. Si un commerçant peut correctement prévoir où le prix va évoluer, il réalisera presque certainement une transaction rentable.
L'étude d'un graphique technique n'est pas simple pour quiconque négocie des options binaires, en particulier pour ceux qui ne sont pas familiers avec les marchés des capitaux, et l'évolution des prix fait partie des indications les plus complexes à anticiper avec précision. Les traders utilisent ce que l'on appelle le « trading par points pivots » pour les aider à percevoir plus clairement l'évolution des prix. Ceux-ci peuvent grandement simplifier le processus d’analyse des fiches techniques pour un actif donné.
Les points pivots sont des indicateurs de trading utiles pour déterminer les mouvements du marché sur une certaine période. Ils sont généralement calculés en prenant en compte les hausses et les baisses quotidiennes de la séance de trading précédente ainsi que la clôture quotidienne de l'actif sélectionné. En regardant plusieurs passés délais, l'échange de points pivots peut être modifié. Le graphique horaire affichera les données de l'heure précédente, tandis que le graphique hebdomadaire affichera les données de la semaine précédente, et ainsi de suite.
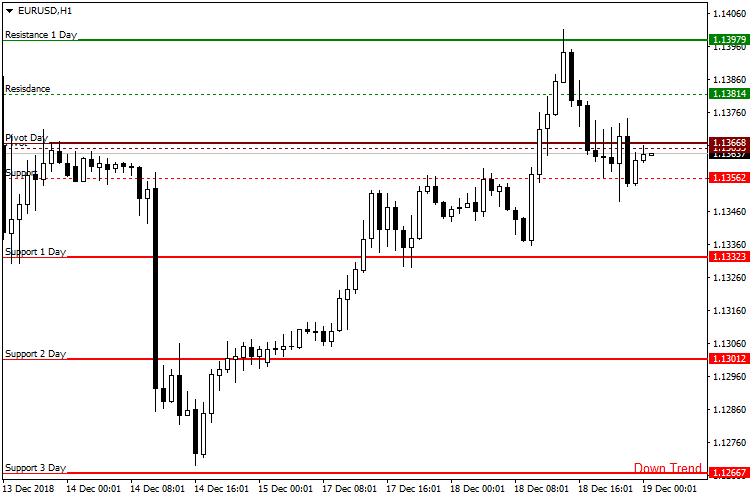
Niveaux de support et de résistance et points pivots
Les points pivots peuvent être utilisés pour indiquer les niveaux de résistance et de support, par exemple. Les niveaux de support et de résistance peuvent souvent être estimés en utilisant le niveau de prix du pivot, puis en mesurant l'écart entre les prix les plus élevés et les plus bas de la session précédente.
Supposons que le prix traverse l'une de ces régions, soit à la hausse, soit à la baisse. Dans ce cas, les prochains niveaux de support et de résistance doivent être déterminés en calculant en utilisant la distance de prix entre le plus bas et le plus haut de la session précédente, avec une cassure de tendance haussière de la résistance ou du niveau de support préliminaire en essayant de cibler le degré supplémentaire de résilience ou de support.
Pourquoi le point de pivot ?
Il y a quatre raisons pour lesquelles les traders d'options binaires utilisent des points pivots :
- Premièrement, les points pivots ont une méthode de calcul simple.
- Deuxièmement, les points générés à partir des estimations commerciales des points pivots peuvent être placés sur une variété de graphiques d'outils, notamment le forex, les actions, les matières premières, les options binaires et d'autres actifs financiers négociables.
- La troisième raison d'utiliser un point pivot est qu'il offre une grande précision. C'est pourquoi les points pivots sont si populaires parmi les commerçants. Les attentes des traders concernant la fiabilité des indicateurs de trading fournis sont presque toujours satisfaites.
- Quatrièmement, dans la technique de mouvement des prix, le point pivot est le signal le plus important. Par rapport au signal MA (Moving Averages), le commerce du point pivot réagit plus rapidement au mouvement puisque les traders doivent simplement prédire si le prix va rebondir ou franchir le niveau de l'indicateur. L'AMM, en revanche, dépend des décisions de tarification sur 5, 10 ou 30 jours ; ainsi, il sera en retard ou en retard par rapport aux mouvements actuels du marché.
Indicateur à court terme : Points pivots
Bien que les points pivots soient un outil précieux pour déterminer la tendance directionnelle du marché, il est important de se rappeler qu'ils sont souvent utilisés comme indication à court terme. Cela indique qu'il est essentiel de maintenir toutes les transactions sur une période de temps constante, car la période suivante rendra l'activité des prix plus difficile à anticiper. Les points de pivot sont grands indicateurs qui aident un commerçant à choisir où effectuer une transaction de vente ou d'achat si cette directive est suivie.
Pivots pour le calcul de la stratégie de trading binaire
Vous pouvez calculer des points pivots pour les outils binaires à tout moment de la journée. Les taux du jour de bourse en cours peuvent être calculés en utilisant les valeurs du jour de bourse précédent.
Les points pivots sont calculés à l'aide de la formule suivante :
Haut (précédent) + Bas (précédent) + Fermer (précédent)/3 = Point pivot pour le courant
Après avoir calculé les points pivots, vous pouvez les utiliser pour déterminer les niveaux de support et de résistance du jour de bourse.
Le calcul des points de pivot peut être accompli de plusieurs façons. Les traders peuvent désormais utiliser un calculateur de points pivots pour calculer instantanément les points pivots grâce aux avancées technologiques.
Principalement, voici les formules que les traders peuvent utiliser pour calculer les points pivots.
- Point pivot (PP) : (haut + clôture + bas) / 3
- Résistance 1 (R1) : (2 x PP) – faible
- Prise en charge 3 (S3) : faible - 2 x (élevé - PP)
- Prise en charge 1 (S1) : (2 x PP) - haut
- Résistance 3 (R3) : élevée + 2 x (PP-faible)
- Résistance 2 (R2) : PP + (haut – bas)
- Support 2 (S2) : PP – (haut – bas)
Où
- haut : prix le plus élevé
- clôture : cours de clôture
- bas : prix le plus bas
Le niveau du prix à la fin de la période précédente est utilisé pour calculer les prix les plus élevés, les plus bas et de clôture. Ceci est déterminé par la période d'utilisation par les commerçants. Si un trader regarde le graphique journalier, le coût du jour précédent est utilisé. De même, pour le délai d'une fois par semaine, le trader utilisera le prix réalisé la semaine précédente.
Quels points pivots sont les meilleurs pour l'intraday ?
L'un des styles de trading populaires qui dépendent fortement des points pivots est le trading d'une journée ou intraday. En effet, le trading de point pivot implique généralement des méthodes qui permettent aux traders intrajournaliers d'entrer et de sortir des transactions en une seule journée.
Cependant, il existe plusieurs façons de calculer les points pivots forex. Chaque technique a son propre ensemble de points d'entrée et de niveaux. Naturellement, la question se pose : quelles sont les positions de pivot idéales pour trading intrajournalier? Dans cet article, nous tenterons de répondre à cette question.
Méthodes de calcul des points de pivot
Il existe cinq façons principales de calculer les points pivots. Le Classique, Woodie, Camarilla, Fibonacci, et Central Pivot Ranges en font partie (CPR).
Et ils ont tous un facteur commun : ils calculent le support et les niveaux de résistance en utilisant les prix haut, bas et de clôture des séances de bourse précédentes.
Point de pivot classique

Considérez le point de pivot traditionnel, par exemple.
Tout commence par le point pivot fondamental (PP). Le PP sert alors de base à tous les niveaux pivots suivants.
- Point de pivot de base (PP) = (Haut + Bas + Fermeture) / 3
- Résistance 2 (R2) = PP + (Haut – Bas)
- Support 2 (S2) = PP – (Haut – Bas)
- Résistance 1 (R1) = (2 x PP) – Faible
- Prise en charge 1 (S1) = (2 x PP) – Élevé
- Résistance 3 (R3) = Haut + 2 (PP – Bas)
- Support 3 (S3) = Bas - 2 (Haut - PP)
Le Pivot Point le plus efficace pour le trading intraday

Il n'y a pas de point pivot unique qui soit incontestablement le meilleur pour les échanges intrajournaliers. Ce que nous avons ici est un pivot qui fonctionne mieux pour vous que pour les autres traders intrajournaliers. Tout se résume à des choix personnels.
Si vous souhaitez effectuer de nombreuses transactions chaque jour, vous pouvez choisir les points pivots Camarilla et CPR. Ces techniques de calcul aboutissent à davantage de lignes pivots. Et plus le nombre de lignes pivots est grand, plus les possibilités de trading sont grandes. L’inconvénient de ce type de trading actif est que vous devez vous contenter de gagner quelques centimes à la fois.
Par exemple, les R1 et R2 de la technique de calcul Camarilla peuvent n'être distants que de 10 à 15 pips.
Et, en fonction de l'étendue des spreads de votre courtier, vos pertes et vos gains sont généralement inférieurs à cela. Cependant, étant donné que vous effectuez plusieurs transactions au cours de la journée, vous pouvez accumuler des profits ou des pertes après la journée de négociation.
Mais si vous êtes un trader intrajournalier qui choisit de n'effectuer qu'une ou deux transactions par session, le trading traditionnel avec point pivot de Woodie et Fibonacci peut être plus approprié pour votre stratégie de trading. Ces deux approches produisent rarement autant de lignes pivots qu’une autre.
Il y a aussi des occasions où R3 et S3 sont introuvables. En conséquence, il y a moins de possibilités de trading. Néanmoins, les lignes de pivot sont généralement plus éloignées, laissant plus de pépins entre les points de pivot.
(Avertissement sur les risques : votre capital peut être à risque)
Meilleures stratégies de trading Pivot Point pour le trading intraday

Les niveaux de résistance et de support pour les cinq techniques de calcul de points pivots diffèrent. Cela pourrait servir de base à la création d’une méthode de trading basée sur des points pivots. Par exemple, le R1 du point pivot de Fibonacci peut être à une position, tandis que le R1 du point pivot classique peut être dans une position distincte.
Et, dans la plupart des cas, la variance entre ces deux R1 n'est que de quelques pips. Ainsi, en utilisant une technique de calcul, vous pouvez obtenir une ligne de pivot grattant le haut d'un chandelier, mais en utilisant une autre, vous pouvez voir une différence entre le haut et la lumière du chandelier.
Vous pouvez donc choisir à quel point votre niveau de résistance est proche, et le support devrait se situer par rapport à vos chandeliers.
Il existe des techniques de trading populaires que vous souhaiterez peut-être suivre, quelle que soit la technique de calcul que vous choisissez. Voici quelques-unes des techniques de trading intraday les plus efficaces qui utilisent des points pivots.
- Stratégie de trading intrajournalière utilisant des points pivots
L'objectif de cette technique de négociation est de négocier des cassures de coûts autour des lignes pivots. Chaque fois que le prix dépasse une ligne pivot de résistance, vous achetez, et une fois que le prix atteint en dessous de la ligne de support, vous vendez.
En règle générale, la meilleure approche pour prévoir le biais de prix d'une journée est de voir si l'action commence au-dessus ou en dessous du point pivot fondamental (PP). Une cassure en dessous du PP indique un biais baissier, tandis qu'une cassure au-dessus indique un biais haussier.
Surveillez les cassures sur vos lignes de pivot de résistance si vous avez une inclinaison haussière. En revanche, si vous avez une inclinaison baissière, vous devriez chercher évasions plus bas que les lignes de support.'
Mais, vous n'avez pas toujours besoin de suivre ce principe car le prix peut commencer avec un biais haussier et terminer la journée en deçà de son point de départ. Pour compenser, vous pouvez trader les cassures des lignes de résistance et de support, quel que soit le biais. Néanmoins, étant donné que vous traderiez par opposition au biais, cela peut augmenter considérablement les risques.
- Stratégie de trading intraday utilisant le rebond de point pivot
La technique de rebond du point pivot est basée sur la capacité des lignes pivots à agir comme des moments pivots des prix. Chaque fois que le prix évolue vers la ligne et revient dans la position précédente, il est temps d'entrer dans un commerce sur ce chemin.
La stratégie Pivot Point est-elle une bonne stratégie d'options binaires ?

Le point pivot est idéal pour les options binaires. Le facteur essentiel à savoir lors de l'utilisation d'une approche de point pivot pour les options binaires serait que les changements de mouvement de prix ne sont pas fixes. En d'autres termes, aucune règle inhérente ne régit le coût d'un actif en fonction de ses points pivots ou de ses niveaux de résistance ou de support.
Chaque jour, des points pivots sont passés sans mouvement de prix significatif ; les niveaux de support se dégradent, tandis que les niveaux de résistance peuvent casser lorsqu'un actif reprend sa course haussière. Le seul principe est qu'il n'y a pas de principes.
Cependant, depuis échanges de points pivots sont utiles et fiables, les traders expérimentés apprennent à les utiliser. Ils sont assez précis et simples à calculer et sont un outil important pour les indicateurs techniques. Si vous ne comptez pas déjà sur eux pour votre plan de trading d'options binaires, c'est le moment idéal pour commencer.
Les points pivots sont une technique courante dans l'analyse technique du marché et peuvent être utilisés dans diverses situations de trading. Apprendre à déterminer les points pivots et comment ils peuvent vous aider à acquérir des options binaires vous fournira un autre instrument pour vous permettre de devenir lucratif.
(Avertissement sur les risques : votre capital peut être à risque)
Pourquoi devriez-vous échanger des points pivots avec des options binaires ?
Les options binaires offrent l'avantage de calculer le risque et d'avoir un rendement possible élevé. La perte la plus élevée est généralement limitée au montant du pari. Cela implique qu'il n'y a pas de pertes plus importantes que prévu, ce qui peut se produire lors de la négociation ou de CFD Forex avec une mauvaise exécution (glissement). La plupart des sociétés d'options binaires proposent également une assurance perte, ce qui signifie que si le contrat expire hors de l'argent, jusqu'à 15% du capital est remboursé.
Parce que le règlement est généralement déterminé à la fin de la période, les options binaires ont une tolérance inhérente aux erreurs. Les changements de prix tout au long de la période sont généralement sans importance. En conséquence, il n'y a aucun moyen de sortir de la transaction, et le temps est moins important que dans le trading Forex ou CFD.
Si un trader d'options binaires, par exemple, choisit d'acheter un appel au support S1 avec une période de plusieurs heures, le prix peut baisser dans l'intervalle jusqu'au support S2 sans causer de perte directe. Si le prix de l'actif fondamental tourne au point pivot S2 et n'est supérieur qu'à un clic à la fin de la période qu'au début, le trader gagne le profit prédéterminé.
La principale raison pour laquelle les points pivots sont une technique de prévision populaire parmi les commerçants est que les données qu'ils offrent sont précises pour toute la journée, donc aucun effort ou temps n'est consacré à essayer de calculer. En fonction de la manière dont les données seront utilisées, commerce de point pivot peut être déterminé sur une base mensuelle, hebdomadaire ou quotidienne.
De plus, comme les niveaux de support ou de résistance sont simples à saisir et peuvent être visualisés graphiquement sur un graphique, les traders trouvent que les points pivots sont simples à comprendre et bénéfiques, en particulier lors de la négociation d'options avec un court délai d'expiration.

Les avantages de l'utilisation des points pivots binaires
Prenez la paire de devises EUR/USD et construisez un outil statistique démontrant à quelle distance chaque bas et haut sera de chaque niveau de résistance et de support pour avoir une meilleure compréhension de pourquoi les points pivots sont des techniques d'options binaires importantes.
Calculez-vous
- Effectuez une analyse complète en calculant le total des points pivots, ainsi que les niveaux de support et la résistance pour l'ensemble du nombre de jours de discussion.
- Réduisez les niveaux de points de support à partir du vrai moindre point d'une journée de négociation. (Faible-S)
- Supprimez les points de pivot pour la résistance du vrai plus haut. (Haut-R)
- Ensuite, calculez la moyenne de chaque différence.
Pour mieux comprendre les points pivots en tant que meilleure stratégie d'options binaires, considérez le record de l'euro depuis sa création le 4 janvier 1999.
- En moyenne, le vrai plus bas est inférieur d'un pip au support 1.
- En général, le vrai plus haut est inférieur d'un pip à la Résistance 1.
Pour le second degré de support et de résistance :
- Le fond réel est généralement supérieur de 53 pips au support 2.
- Le pic réel est généralement inférieur de 53 pips à la résistance 2.
Puisqu'elle encourage une stratégie systématique de négociation d'options binaires, la notion de points pivots est idéale pour une utilisation en tant que méthode d'options binaires. Les options binaires ont la capacité de produire des récompenses importantes tout en posant un risque gérable. Les points pivots offrent des points d'entrée bien définis sur le marché avec une forte probabilité de succès.
En conséquence, les options binaires et les points pivots constituent une excellente relation symbiotique lucrative pour les traders impulsifs mais à la fois stratégique. Les traders, en particulier sur le marché des options binaires, peuvent commencer avec des comptes de trading extrêmement petits, ce qui entraîne une pénurie de savoir-faire stratégique en conjonction avec le trading d'espèces.
(Avertissement sur les risques : votre capital peut être à risque)
Conclusion
L'idée de pivot est également une tactique utile pour les nouveaux traders pour organiser leur trading et ainsi augmenter leurs longues chances de succès.
Lorsque vous deviendrez plus expérimenté dans le trading d'options binaires, vous constaterez peut-être des tendances du marché qui renforcent ces échanges de points pivots. Vous commencerez à améliorer votre capacité à prévoir le moment optimal pour souscrire des options et les actifs les mieux utilisés avec cette approche d’investissement.
Comme pour la plupart des autres techniques de trading forex, il n'y a pas de point pivot supérieur à un autre. Tout dépend de vos choix.
Questions fréquemment posées sur les points pivots :
Quels sont les points pivots dans le trading d’options binaires ?
Les points pivots sont des indicateurs techniques utilisés pour prédire les tendances du marché et les mouvements de prix en utilisant les prix hauts, bas et de clôture de la session précédente.
Comment sont calculés les points pivots dans le trading d’options binaires ?
Ils sont calculés en prenant la moyenne des prix hauts, bas et de clôture de la séance de bourse précédente.
Pourquoi les points pivots sont-ils importants dans le trading d’options binaires ?
Les points pivots sont cruciaux pour identifier les niveaux potentiels de support et de résistance, aidant ainsi les traders à prendre des décisions éclairées sur l'orientation du marché et les transactions rentables.
Les points pivots peuvent-ils être ajustés pour différentes périodes ?
Oui, les points pivots peuvent être ajustés pour s'adapter à différentes périodes, des graphiques horaires aux graphiques hebdomadaires, offrant ainsi une flexibilité dans les stratégies de trading.


