In questa guida di esperti imparerai tutto sul trading di opzioni binarie. Ti presenteremo le nozioni di base, ti mostreremo come funziona il trading binario, ti spiegheremo le migliori strategie di trading binario e risponderemo a tutte le domande su come negoziare opzioni binarie.

Definizione: cosa sono le opzioni binarie?
Le opzioni binarie sono uno strumento finanziario che guadagnato il attenzione di molti trader negli ultimi anni. Puoi fare trading sui mercati lunghi o corti entro un periodo di tempo definito. La cosa speciale di Opzioni binarie è:
Come trader hai solo due opzioni.
Sia che tu perda tutti i tuoi soldi con un trader o che tu riceva un pagamento fisso elevato tra 75 e 95 % del tuo denaro. Scommetti su mercati in aumento e in calo.
Come strumento finanziario, Le opzioni binarie sono molto flessibili – puoi utilizzare periodi di tempo diversi e scambiare quasi tutti gli asset. I periodi di tempo normalmente partono da 5 secondi e arrivano fino ad almeno un'ora. Quindi hai solo due modi possibili per piazzare uno scambio:
- Chiama / Superiore: La tua previsione è un prezzo futuro più alto (mercato in aumento)
- Metti / Abbassa: La tua previsione è un prezzo futuro più alto (mercato in aumento)
Continua a leggere per scoprire informazioni più dettagliate su come fare trading con le Opzioni Binarie. La corretta conoscenza è la chiave del successo sostenibile. Devi anche essere consapevole dei rischi che derivano dal trading di un'opzione binaria.
(Avviso di rischio: il tuo capitale può essere a rischio)
Guida passo passo: come fare trading con le opzioni binarie
Nella sezione seguente, te lo mostreremo come fare trading in dettaglio. Segui questi cinque semplici passaggi:
- Trova un broker affidabile
- Registra il tuo conto di trading binario
- Deposita denaro o utilizza il conto demo
- Scegli l'asset da negoziare
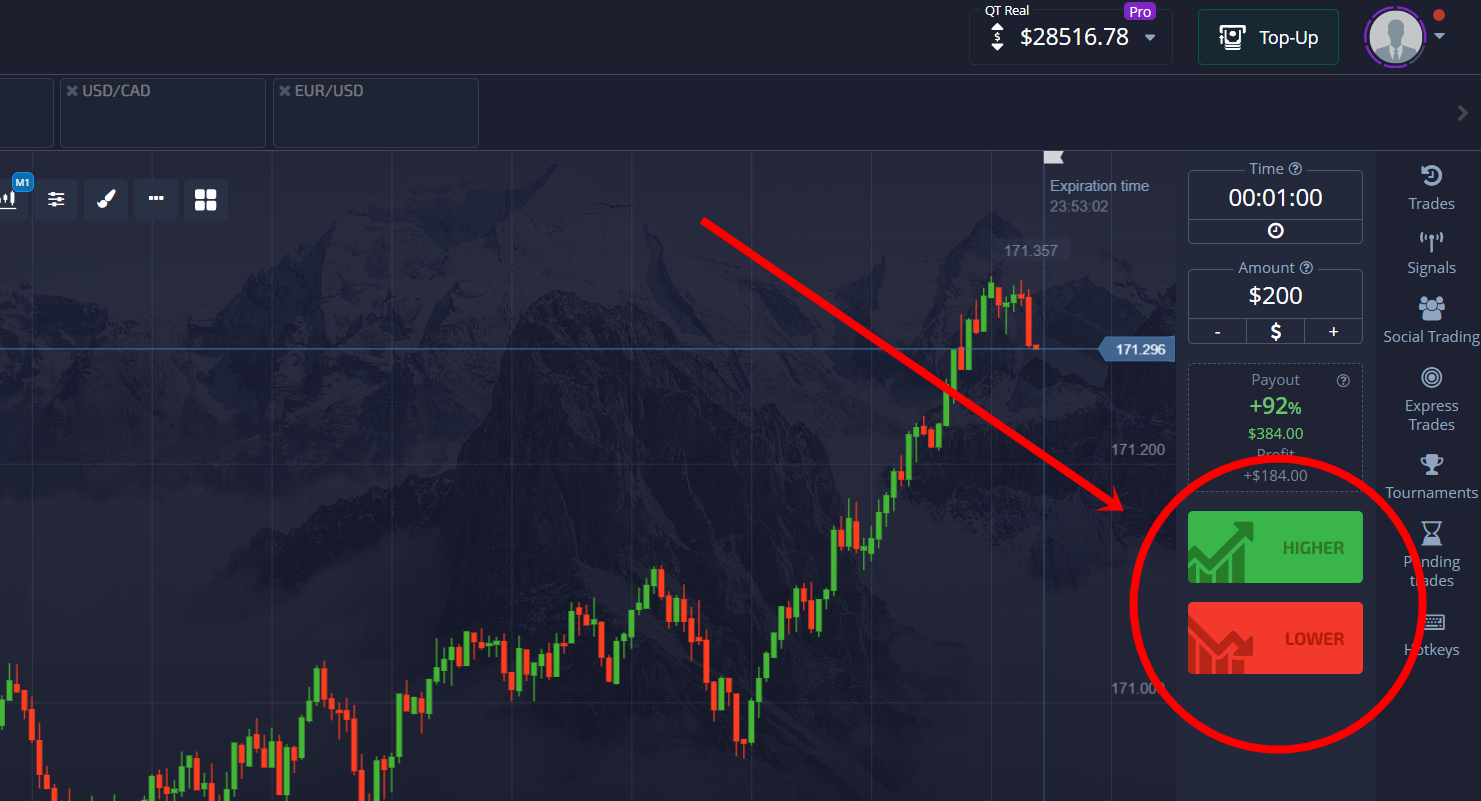
- Fare una previsione: prezzo su o giù?
- Scegli l'ora di scadenza
- Scegli l'importo dell'investimento
- Avvia lo scambio e attendi che scada
Entriamo nel dettaglio di ogni singolo passaggio.
1. Trova un broker di opzioni binarie affidabile
Nelle prossime sezioni ti spiegheremo ulteriormente come funziona il trading di opzioni binarie. Ma prima di tutto, lRispondiamo alla domanda su quale broker sia il migliore con cui fare trading. Non tutti i broker online o broker Forex offrono operazioni binarie, quindi devi cercare un'azienda che offra questo strumento finanziario.
Nella tabella seguente puoi vedere tre dei nostri più favorevoli Broker di opzioni binarie. Questi sono broker che soddisfano molti requisiti diversi che impostiamo durante il test di tutti i broker. Sono sicuri, ti danno un rendimento elevato come trader e si trovano in tutto il mondo. Con ogni broker, puoi aprire un conto demo binario gratuito per iniziare senza rischi.
- Accetta clienti internazionali
- Alte vincite 95%+
- Piattaforma professionale
- Depositi veloci
- Trading sociale
- Bonus gratuiti
- min. deposito $10
- $10,000 demo
- Piattaforma professionale
- Alto profitto fino a 95%
- Prelievi veloci
- Segnali
- Deposito minimo $10
- Conto demo gratuito
- Elevato rendimento fino a 100% (in caso di previsione corretta)
- La piattaforma è facile da usare
- Assistenza 24 ore su 24, 7 giorni su 7
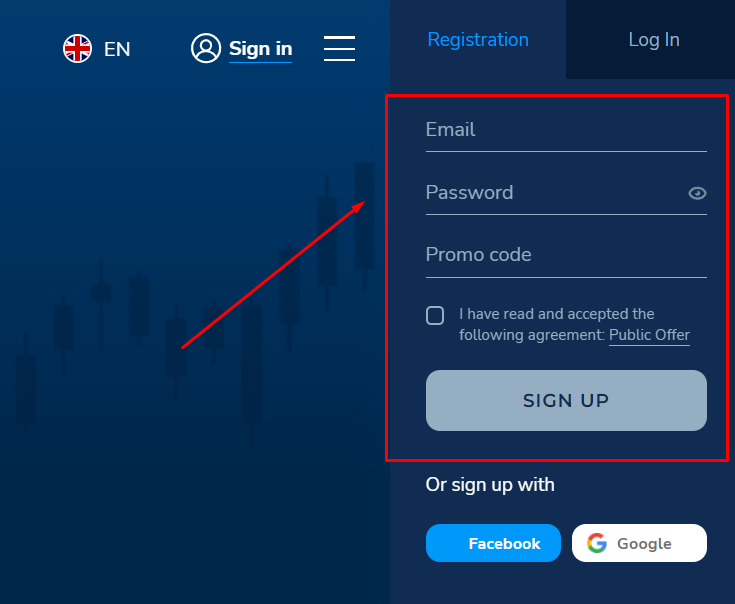
2. Registra il tuo conto di trading
Dopo aver selezionato il tuo broker binario, devi registrarti per il tuo conto di trading. Avrai bisogno di un'e-mail sicura e di una password. Inoltre, puoi registrarti principalmente tramite profili e reti social.
(Avviso di rischio: il tuo capitale può essere a rischio)
3. Deposita denaro o utilizza il conto demo
Ora hai 2 opzioni: se utilizzare il conto demo per esercitarti o iniziare direttamente a fare trading con soldi veri. Si consiglia sempre di iniziare con il conto demo perché il trading di opzioni binarie è rischioso e puoi perdere il denaro investito molto velocemente. Le piattaforme ti consentono di passare dal conto reale a quello demo in pochi secondi.
Non sai cosa a conto demo sembra? Sono conti di investitori al dettaglio che hanno (per lo più) tutte le funzioni di un conto live, ma contengono solo denaro virtuale che puoi aggiungere gratuitamente ogni volta che vuoi.

4. Scegli l'asset sottostante
Quando fai trading di azioni, ad esempio, sei limitato a un asset. La cosa buona delle opzioni binarie è che sei libero di scegliere il tuo attività sottostanti. Puoi scegliere tra mercato Forex, azioni, mercato delle materie prime con asset come oro o petrolio, criptovalute, indici azionari e altro ancora.
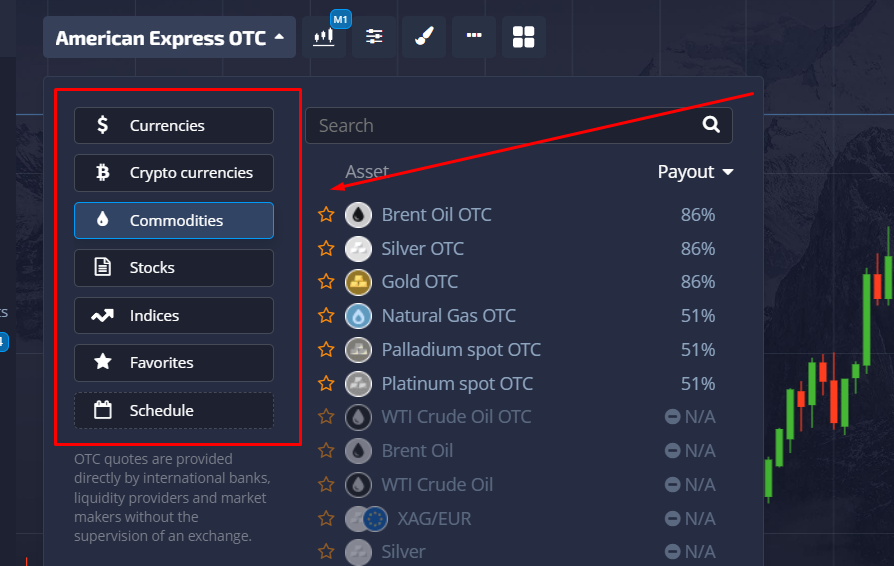
Non importa quale risorsa preferisci, il trading tramite Opzioni Binarie funziona sempre allo stesso modo. Il processo mostrato di seguito è sempre esattamente lo stesso. Se non conosci il trading di opzioni binarie, ti consigliamo di iniziare con un conto di trading pratico in cui puoi fare trading ed esercitarti senza rischi.
(Avviso di rischio: il tuo capitale può essere a rischio)
5. Fai una previsione con una strategia: prezzo al rialzo o al ribasso?
Dopo aver scelto un asset sottostante o un mercato sottostante (ad esempio il mercato forex), sei pronto per partire. La domanda principale è: Il prezzo dell'attività sale o scende in futuro? Devi a questa previsione. Per ottenere una risposta a questa domanda, è necessario identificare le tendenze del mercato e utilizzare gli indicatori per analizzare l'attività sottostante.

È molto importante avere una giusta strategia di trading per ottenere il massimo profitto. Usa l'analisi tecnica per ottenere idee di trading e sviluppare la tua strategia di trading. Puoi anche utilizzare i diversi strumenti didattici offerti da molti broker di opzioni binarie.
6. Scegli la data di scadenza
Ogni contratto di Opzione Binaria scade dopo un tempo definito (data di scadenza). Quindi, nella tua previsione se il prezzo di mercato aumenterà o diminuirà, devi considerare il tempo di scadenza. Puoi impostarlo in a gamma tra 5 secondi o molte ore, la scelta è tutta tua. Vedi: è possibile negoziare opzioni binarie a lungo oa breve termine.

Una volta decisa la direzione - su o giù - e il tempo di scadenza, sei a un passo dal piazzare lo scambio. Solo per ricordarti le due opzioni che hai:
- Chiamata (superiore): Il prezzo aumenta nel tempo di scadenza
- Metti (inferiore): Il prezzo scende nel tempo di scadenza
7. Scegli l'importo dell'investimento
L'ultimo passaggio prima di poter piazzare il tuo trade è impostare l'importo dell'investimento. Alcuni broker lo limitano a un importo specifico che spesso dipende dal livello del tuo account.

Ad esempio, se hai un account per principianti puoi fare trading solo con $500. Ma con un account VIP, puoi scambiare fino a $5000 in uno scambio.
Stai attento: Il tuo investimento è la quantità di denaro che puoi perdere. Se la tua previsione è sbagliata, tutti i tuoi soldi sono andati.
8. Avvia lo scambio e attendi la scadenza
Se imposti l'importo dell'investimento, fai clic su Su / Chiama o Giù / Metti per piazzare il commercio. Alcuni broker vogliono che tu verifichi il trade, quindi devi fare un altro clic. Ora è il momento di aspettare fino alla scadenza del tuo trade. Alcuni broker offrono a chiudere le negoziazioni prima che il tempo di scadenza sia scaduto – questo ti permette di ridurre l'impatto di una decisione sbagliata chiudendo il trade quando raggiunge un certo prezzo.

Se hai ragione e il prezzo di mercato si muove nella giusta direzione al di sotto o al rialzo del tuo prezzo di esercizio, otterrai un vincita tra 75-95% del tuo investimento. Il rendimento dipende dal broker e dall'asset sottostante selezionati.
(Avviso di rischio: il tuo capitale può essere a rischio)
Esempio di perdita sul trading di Opzioni Binarie:
Capirai le basi della perdita delle opzioni binarie grazie a questo esempio.
Supponiamo di aver selezionato un mercato sottostante in cui desideri negoziare opzioni binarie. Questo mercato ti permetterà di scegliere le tue materie prime preferite, indici, ecc.
L'opzione binaria che scegli di negoziare avrà un prezzo di esercizio. Avrà anche un tempo di scadenza che decide se vinci o perdi.
A seconda delle tue preferenze, scegli un'opzione call o put. Supponiamo che il prezzo di esercizio dell'attività sottostante sia $75. Il tuo buon senso ti dice che il prezzo dell'asset scadrà a un prezzo superiore a $75. Supponiamo che ti aspetti che si fermi a $100.
Al momento della scadenza, il prezzo dell'attività sottostante è pari a 0. Pertanto, la previsione con cui sei andato a piazzare questo trade è diventata priva di valore. A causa delle lacune nella tua ricerca, perdi denaro e quindi assisti a una perdita di opzioni binarie.
Esempio di profitto sul trading di opzioni binarie:
Se hai ragione, accadrà esattamente il contrario e il prezzo sale a $ 100. Il tuo prezzo di esercizio è $ 75 e ora il prezzo è superiore. Al termine del tempo di scadenza, otterrai un profitto dal rendimento dell'opzione binaria. Un investimento di $ 1.000 può valere $ 1.800 con un rendimento di 80% sul tuo broker di opzioni binarie!
Termini di base utilizzati nelle opzioni binarie per i manichini
Quando si avvia il commercio in opzioni binarie, incontrerai molti termini con cui potresti non avere familiarità ma che sono importanti per fare un'operazione di successo. Ecco le terminologie di base che ogni trader deve conoscere.
- Risorsa: Una delle parole più usate nel mondo del trading è "asset". È l'azione sottostante, gli indici, le materie prime o la valuta che scegli di permutare.
- Broker: È il fattore agente attraverso il quale vengono effettuati gli accordi.
- Data di scadenza: È la data o l'ora in cui l'operazione termina.
- Strumenti finanziari: Uno strumento finanziario significa un contratto con un certo valore monetario ed è composto da un acquirente e un venditore.
- Analisi fondamentale: Questi sono l'esame delle attività in base a fattori geografici, politici e macroeconomici.
- Nei soldi: Molti broker usano questo termine per visualizzare il risultato della tua operazione. Significa che la tua previsione è corretta e otterrai il ritorno.
- Margine: Per mantenere il tuo spot aperto al mercato, è richiesto un deposito sul tuo conto di trading, noto come margine.
- Richiamo di margine: Si verifica quando il tuo account scende al di sotto dell'importo di mantenimento richiesto dal broker. Per evitarlo, aggiungi fondi extra per sostenere le perdite correnti.
- Prezzo di esercizio: È quel tasso al quale l'attività può essere acquistata o venduta, oppure a questo tasso, puoi eseguire le opzioni call o put.
- Fuori dai soldi: È l'opposto di in-the-money. Viene mostrato quando il risultato è contrario all'opzione scelta, il che significa che la tua previsione è sbagliata e hai perso i soldi.
- Tasso di profitto: È quella percentuale di rendimento che otterrai dopo la chiamata corretta.
- Analisi tecnica: L'esame del mercato prendendo nota dei precedenti record commerciali e del movimento del grafico dei prezzi.
Trading di opzioni binarie: è sicuro o no?
Una domanda molto importante a cui rispondere è la sicurezza di uno strumento finanziario o di un broker come Nadex (North American Derivatives Exchange). Il trading di un'opzione binaria è sicuro, ma è necessario il broker giusto. Dovrebbe essere affidabile, degno di fiducia e regolamentato. Nella nostra recensione del broker di opzioni binarie abbiamo discusso i pro ei contro dei nostri dieci broker favorevoli, regolamentati e non regolamentati. Leggi l'articolo per entrare nel dettaglio.
È più sicuro se fai trading con un broker regolamentato che con uno non regolamentato!
Abbiamo fatto molte ricerche mentre scrivevamo tutti questi articoli e possiamo dirlo un broker regolamentato non ti tradisce mai come cliente. Per essere onesti: anche la maggior parte dei broker non regolamentati non imbroglia. Ma non è mai 100 % sicuro con queste aziende per lo più piccole e sconosciute.
Quindi, in conclusione, Il trading di opzioni binarie è sicuro? Sì. Usa un broker regolamentato se vuoi iniziare a fare trading di opzioni binarie. Non fidarti mai ciecamente e fai le tue ricerche prima di registrarti con un broker e depositare denaro. Inoltre, puoi fare affidamento sulle nostre informazioni.

Ci sono una manciata di regolatori sicuri e ben noti. Se il broker che hai scelto è regolamentato da una di queste società e istituzioni, è un buon segno:
- CySEC (Europa)
- La Commissione Finanziaria (Internazionale)
- Commissione per i servizi finanziari di Vanuatu (Vanuatu)
Tieni anche presente se istituzioni affidabili come la Commodity Futures Trading Commission (CFTC), la National Futures Association (NFA) o in particolare la Securities and Exchange Commission (SEC) esprimere preoccupazioni.
(Avviso di rischio: il tuo capitale può essere a rischio)
Piattaforme e broker di opzioni binarie: come utilizzarli
Sono disponibili molte piattaforme di opzioni binarie e devi cercare quella che non solo è sicura ma offre anche le funzioni di cui hai bisogno per fare trading in modo efficace. La cosa buona è che oggigiorno quasi tutti i broker offrono le stesse funzioni come il trading mobile o un software di creazione di grafici moderno e flessibile. L'opportunità di fare trading tramite un'app mobile è importante se vuoi fare trading ovunque tu sia.

Se sei un principiante, sembra di esserlo difficile imparare a fare trading di opzioni binarie con una piattaforma nuova e sconosciuta. Molte piattaforme offrono così tante funzionalità che possono confonderti. Ma alcuni broker offrono anche materiale educativo. Tutorial video, guide dettagliate o persino assistenza clienti individuale tramite posta, telefono o chat per rispondere alle tue domande dettagliate.
Indicatori e strumenti:
Ogni piattaforma offre anche alcuni indicatori e strumenti tecnici, diversi tipi di grafici come il grafico a candele più comune e molte altre cose per analizzare i tuoi grafici. Alcuni broker ti danno anche accesso gratuito e diretto alle notizie economiche. Puoi usarlo per essere sempre aggiornato e reagire alle notizie che incidono sugli asset con cui fai trading.

Ancora una parola su indicatori: Sono molto importanti quando si fa trading di binari. Ti consigliamo di familiarizzare con quelli più importanti. Leggi l'articolo collegato per saperne di più su come utilizzare MACD, RSI, ecc.
(Avviso di rischio: il tuo capitale può essere a rischio)
Le piattaforme di trading di opzioni binarie offrono il trading mobile?
Per reagire ai mercati ovunque tu sia hai bisogno di un broker che offra commercio mobile. Quindi l'unica cosa di cui hai bisogno per fare trading è Internet. Il trading mobile è una grande opportunità per aumentare i tuoi profitti, cosa che i trader di opzioni binarie un tempo non avevano.

La maggior parte dei broker offre il trading mobile e molti di loro hanno sviluppato un'app speciale per fare trading sul tuo smartphone. Puoi scaricarlo dall'App Store (iOS) o dal Play Store (Android). Se un broker offre un'app mobile, normalmente lo fa per entrambi i sistemi comuni. Ciò ti consente di fare trading 24 ore al giorno, 7 giorni alla settimana, indipendentemente da dove ti trovi.
Trading di Opzioni Binarie al banco
Ma: la maggior parte di voi, ne sono sicuro, ed è così che lo preferisco, meglio commerciare alla scrivania con il computer. Perché? Hai più strumenti per analizzare il grafico e a migliore panoramica se hai uno o più monitor e non solo il minuscolo display del tuo smartphone.
(Avviso di rischio: il tuo capitale può essere a rischio)
Le condizioni del trading di opzioni binarie:
Sei completamente libero di negoziare qualsiasi asset sottostante tu possa immaginare – e le offerte del tuo broker. Non importa se scegli azioni, materie prime, forex o criptovalute, il processo è sempre lo stesso. La maggior parte dei broker che abbiamo testato ti dà la possibilità di negoziare più di 100 diversi asset.

Il il tempo di scadenza varia da broker a broker. Ma la maggior parte di essi offre tempi di scadenza a partire da 5 secondi. Il limite massimo è per lo più di un'ora o tre ore.
Così la due condizioni principali sono:
- Fai trading su qualsiasi mercato sottostante che desideri: azioni, forex, materie prime, criptovalute e molti altri
- Scegli tra orizzonti temporali di breve e lungo termine (tempi di scadenza)
Qual è il rendimento massimo (ritorno sull'investimento)?
Non tutti i broker offrono lo stesso rendimento massimo (ritorno sull'investimento) per un asset specifico. Ad esempio, il broker A offre un pagamento 90% per Bitcoin e il broker B offre 85%. La scelta migliore se vuoi fare trading solo con Bitcoin è il broker B.

La regola non scritta è quella le operazioni a breve termine hanno le vincite più alte mentre i pagamenti a lungo termine non sono così alti. Dalla mia esperienza, il rendimento per i conti standard è compreso tra 70% e 95%.
Ma se hai un tipo di Conto VIP, potresti avere rendimenti più elevati. Quasi tutti i broker offrono diversi tipi di conto collegati alla quantità di denaro depositata. Ad esempio, se depositi $3000 con IQ Option, otterrai lo stato dell'account VIP.

Per attirare i trader e animarli a depositare sempre di più, otterrai un pagamento più elevato con un livello di account migliore.
(Avviso di rischio: il tuo capitale può essere a rischio)
Tipi di trading disponibili nel trading di opzioni binarie
Quando le opzioni binarie sono state introdotte per la prima volta nel mercato, avevano un solo tipo di operazione, il che significava lo stesso. Questi erano "Alto e basso" / "Chiama e metti" o "Su e giù".
Con la crescita del numero di trader binari e la sua popolarità, sono stati proposti molti altri tipi di trading. Ecco alcuni dei tipi di trading binario più utilizzati.
#1 One Touch o No Touch
In questo tipo, hai tre cose tra cui scegliere. Il primo è l'asset in cui investirai i tuoi soldi, il secondo è il prezzo target e l'ultimo è il tempo di scadenza.
L'obiettivo di prezzo può essere impostato in qualsiasi momento, ma tieni presente che più lontana è la barriera impostata, maggiore sarà il rendimento. Se imposti l'obiettivo più vicino al punto corrente, che è più facile da raggiungere, il pagamento sarà inferiore.

Se il tuo asset raggiunge il target point impostato anche una volta prima della scadenza, otterrai il profitto. Prima di fare uno scambio, bisogna cercare due cose:
- Il raggiungimento dell'obiettivo di prezzo
Imposta l'obiettivo di prezzo diligentemente. Potrebbe essere in qualsiasi direzione e, con un'attenta analisi, giudicare il flusso del prezzo. Durante l'impostazione, presta attenzione al costo commerciale e al valore del pagamento.
- Il tempo di scadenza
Basta un tocco per darti un profitto, anche se il mercato va in una direzione diversa in seguito. Molte piattaforme offrono un tempo di scadenza fino a giorni, quindi imposta il tempo che ritieni sia sufficiente per raggiungere il punto di attivazione.
#2 Alto o basso

Il tipo più utilizzato e popolare è scegliere se l'asset andrà in alto o in basso alla scadenza. Qui, devi esaminare se l'asset di tua scelta finirà al di sopra del prezzo di esercizio o meno alla scadenza.
Se ritieni che selezionerà alto e, in caso contrario, seleziona basso. Il momento della conclusione dell'operazione può variare. Questo tipo di scambio è basilare ma presenta i suoi rischi. Pertanto, prima di effettuare qualsiasi operazione, esamina attentamente i movimenti dei prezzi.
#3 Intervallo di scambi
È anche noto come commercio di confine. In questo tipo di operazione, scegli un asset e fai trading entro l'intervallo di due punti attivati. Se il prezzo rimane tra il limite fino alla scadenza, vincerai e perderai se supera l'intervallo.
Ad esempio, il prezzo di esercizio di un asset è $50 e ritieni che salirà fino a $60. Fai trading nell'intervallo da $50 a $60. Se il prezzo del tuo asset rimanesse tra questo limite durante l'intera operazione, otterresti il tuo profitto. Se supera $60 o scende al di sotto di $50, perderai l'intero investimento.
#4 Trading a breve termine
A breve termine o 60 secondi di trading è utilizzato da molti broker e, vedendo l'aumento della sua popolarità, molti trader sono inclini a farlo.
Funziona come il commercio alto/basso con un tempo di scadenza di 60 secondi. Alcuni broker nel trading a breve termine offrono anche tempi di conclusione delle negoziazioni fino a pochi minuti.

#5 Trading a lungo termine
L'opposto del breve termine, questo tipo di scambio ti consente di impostare il limite di tempo fino a giorni, settimane o talvolta anche mesi.
La maggior parte dei principianti preferisce questo tipo perché a breve termine il commercio va veloce e devi essere sempre attivo e coerente mentre, a lungo termine, hai più tempo per sviluppare abilità e studiare i grafici.
(Avviso di rischio: il tuo capitale può essere a rischio)
#6 coppie
Come suggerisce il nome, questo tipo di scambio viene eseguito in coppia. Devi scegliere quale asset funzionerà meglio dell'altro alla scadenza del trade. Guadagnerai il profitto per il tuo giudizio corretto, e per quello sbagliato perderai.
L'abbinamento di valute e azioni è molto popolare. Ad esempio, nell'EUR/USD, credi che USD andrà più in alto dell'EUR e piazza la tua scommessa. Dopo la scadenza, l'USD ha sovraperformato l'EUR e, poiché la tua previsione era corretta, hai vinto. Nel caso opposto in cui l'EUR supera, perderai.
Anche se l'abbinamento scende ugualmente, vincerai fintanto che il tuo asset ha un valore più alto dell'altro.
#7 Scala
In questo tipo, il commercio è suddiviso in porzioni più piccole che vengono poi distribuite su intervalli diversi. Ogni volta che il prezzo di esercizio tocca il punto di attivazione, riceverai un bonus parziale.
La tua operazione è suddivisa in diversi prezzi di esercizio con tempi di scadenza variabili. Quando raggiungi il primo intervallo, riceverai un profitto e così via.
Ad esempio, stai negoziando ladder sulla coppia di valute USD/EUR, che ritieni salirà in alto. A mezzogiorno, il valore del tuo bene è $60. Hai scelto tassi di tre strike e tre diversi tempi di scadenza.
- Il 1° strike è fissato per il valore di $60.85 con un payout di 40%; l'ora di scadenza è 12:20.
- Il 2° strike è fissato per $70 con un payout di 55%; l'ora di scadenza è 12:40.
- Il 3° strike è impostato per $70.45 con un pagamento 70%; l'ora di scadenza è 13:00.
Per vincere questa scommessa, USD/EUR deve raggiungere $60.85 o superiore alle 12:20. In tal caso, otterrai il payout 40% e, successivamente, per ogni gradino salito, riceverai il suddetto profitto.
Ricorda che il valore della vincita cambierà in base alla differenza negli intervalli. Se il divario nei prezzi di esercizio è piccolo, otterrai una vincita inferiore perché comporta meno rischi e, per un divario ampio, il profitto aumenterà.
Spiegazione dei rischi del trading di opzioni binarie:
Senza dubbio - Le opzioni binarie sono uno strumento finanziario rischioso. Tuttavia, ci sono molti vantaggi che superano i rischi. Molti nuovi trader temono la perdita di tutto il denaro che investono in un trade. Certo, puoi perdere tutto il denaro che hai investito nella tua operazione, ma non di più. Molti altri prodotti finanziari funzionano in un altro modo, dove puoi perdere più di quanto hai investito.

Ci sono molti più vantaggi, ad esempio, che si ottiene un elevato guadagno patrimoniale, non importa quanto forte reagisca e si muova il mercato del trading di opzioni binarie. Il prezzo dell'asset scelto deve semplicemente salire o scendere al di sotto del tuo prezzo di esercizio e vinci. A molti trader, inclusi noi, piace questo prodotto finanziario perché è facile da capire e puoi realizzare molti profitti in poco tempo.
Investi solo denaro che puoi permetterti di perdere!
Trading di opzioni binarie: come iniziare
Se vuoi iniziare a fare trading di opzioni binarie ora, ci sono alcune cose che devi sapere e le risposte che potrebbero venire fuori. Cerchiamo di rispondere a tutti e di darti tutte le informazioni necessarie per iniziare. Questa sezione riguarda meno come negoziare le Opzioni Binarie, ma più cose oltre alle Opzioni Binarie stesse.
(Avviso di rischio: il tuo capitale può essere a rischio)
Dovresti usare un conto demo di Opzioni Binarie o no?
Molti di voi ci chiedono se è necessario prima fare trading tramite un conto demo oppure no. La nostra risposta chiara è: Sì, è necessario. Con un conto demo, puoi scoprire come si muove il mercato e come funziona il broker che hai scelto. Quasi tutti i broker affidabili offrono a conto demo con denaro virtuale che puoi ricaricare con un solo orologio.

Scopri di più sulla tua piattaforma di trading di opzioni binarie prima di investire i tuoi soldi veri. Puoi anche provare nuove strategie o creare la tua strategia di trading individuale attraverso un conto demo.
- Primo: conto demo.
- Secondo: strategia.
- Terzo: conto reale.
Come aprire il tuo primo conto reale
Devi soddisfare diversi criteri una volta che sei pronto per aprire il tuo primo conto reale. Sulla maggior parte delle piattaforme di trading, puoi fare trading senza verificare il tuo conto broker. Ma secondo noi dovresti fare il verifica prima di iniziare, così hai accesso illimitato a tutte le funzioni e ai metodi di deposito e prelievo.

Per il processo di verifica, hai bisogno dei tuoi dati personali reali (nome completo, compleanno, indirizzo, mail, numero di telefono) e alcuni documenti personali. Devi caricare ad esempio una copia del tuo passaporto e una bolletta o simili. Devi farlo per dimostrare che sei una persona reale.
Il processo di verifica richiede solo 24 ore nella maggior parte dei casi. Alcuni broker – non molti – non vogliono vedere alcun documento o verifica.
Di quanti soldi hai bisogno per fare trading con i binari?
La risposta a questa domanda dipende da come sei disposto a investire. Attieniti sempre alla tua gestione del rischio e del denaro. Molti broker offrono minimi di deposito bassi. Ad esempio, Quotex o IQ Option ti consente di iniziare a fare trading con solo $10.
Il limite superiore è quasi infinito. Dalle mie esperienze negli anni passati, è possibile guadagnare molti soldi con la giusta strategia di trading. Quindi non è necessario investire tutti i tuoi soldi quando inizi. Inizia lentamente e se la tua strategia si rivela eccezionale, deposita di più.
Quanto rischio per operazione?
Il termine “quanto” si riferisce a diversi fattori nel campo del trading di opzioni binarie. Denota rischi, impegno, tempo e denaro. È sempre sicuro farlo rischio non superiore a 1% dei tuoi fondi per operazione. Puoi proteggere il tuo capitale riducendo i rischi di trading. Perderai una piccola parte del tuo capitale anche se perdi operazioni a causa di molti errori.
Innanzitutto, devi impostare la percentuale del tuo capitale di trading in cui sarai disposto a mettere i tuoi soldi in gioco su un'operazione di opzioni binarie. La percentuale ideale deve essere 1% o 2% del tuo capitale di trading. Puoi arrivare fino a 5%, ma non è sicuro in tutte le occasioni.
È determinato dal tipo di offerta di opzioni binarie. Questo rischio 5% ti darà una dimensione di posizione maggiore per le operazioni di opzioni binarie standard. Potrai quindi calcolare il numero di contratti che puoi stipulare. È necessario calcolare i contratti per consentirvi di rimanere entro il limite del rischio.
- Un rischio elevato fino a 10% del conto di trading può comportare una rapida esplosione del conto
- Fai sempre trading con un rischio limitato, come 1% del conto di trading per operazione
- Un rischio limitato rimuoverà le tue emozioni durante il trading
(Avviso di rischio: il tuo capitale può essere a rischio)
Tutto sui metodi di deposito e prelievo:
Forse ti sei già chiesto quale Modalità di pagamento sono disponibili durante il trading di opzioni binarie. In passato, molti broker offrivano solo alcuni metodi di pagamento e prelievo speciali. Al giorno d'oggi, il mercato è facile da usare e le società di intermediazione offrono molti metodi di pagamento diversi.
Fatti sul deposito
- Molte piattaforme offrono un deposito minimo di $10
- Importo minimo commerciale: $1
- Possono essere scambiati anche importi elevati
- Il deposito minimo per un'operazione binaria dipende dal broker

Deposito e prelievo sono facili. La maggior parte dei broker non offre commissioni per depositare o prelevare i tuoi fondi. Molti di loro offrono fino a 20 diversi metodi di pagamento. È possibile capitalizzare sul tuo conto di trading in pochi secondi. I prelievi durano un po' di più, fino a 24 ore.
Alcuni dei principali metodi di pagamento offerti dai broker di opzioni binarie:
- Bonifico bancario
- Carte di credito (Master/VISA)
- Criptovalute (Bitcoin, Ethereum, Ripple e altro)
- E-Wallet (Skrill, Neteller, FasaPay, ePayments, Yandex e altri)
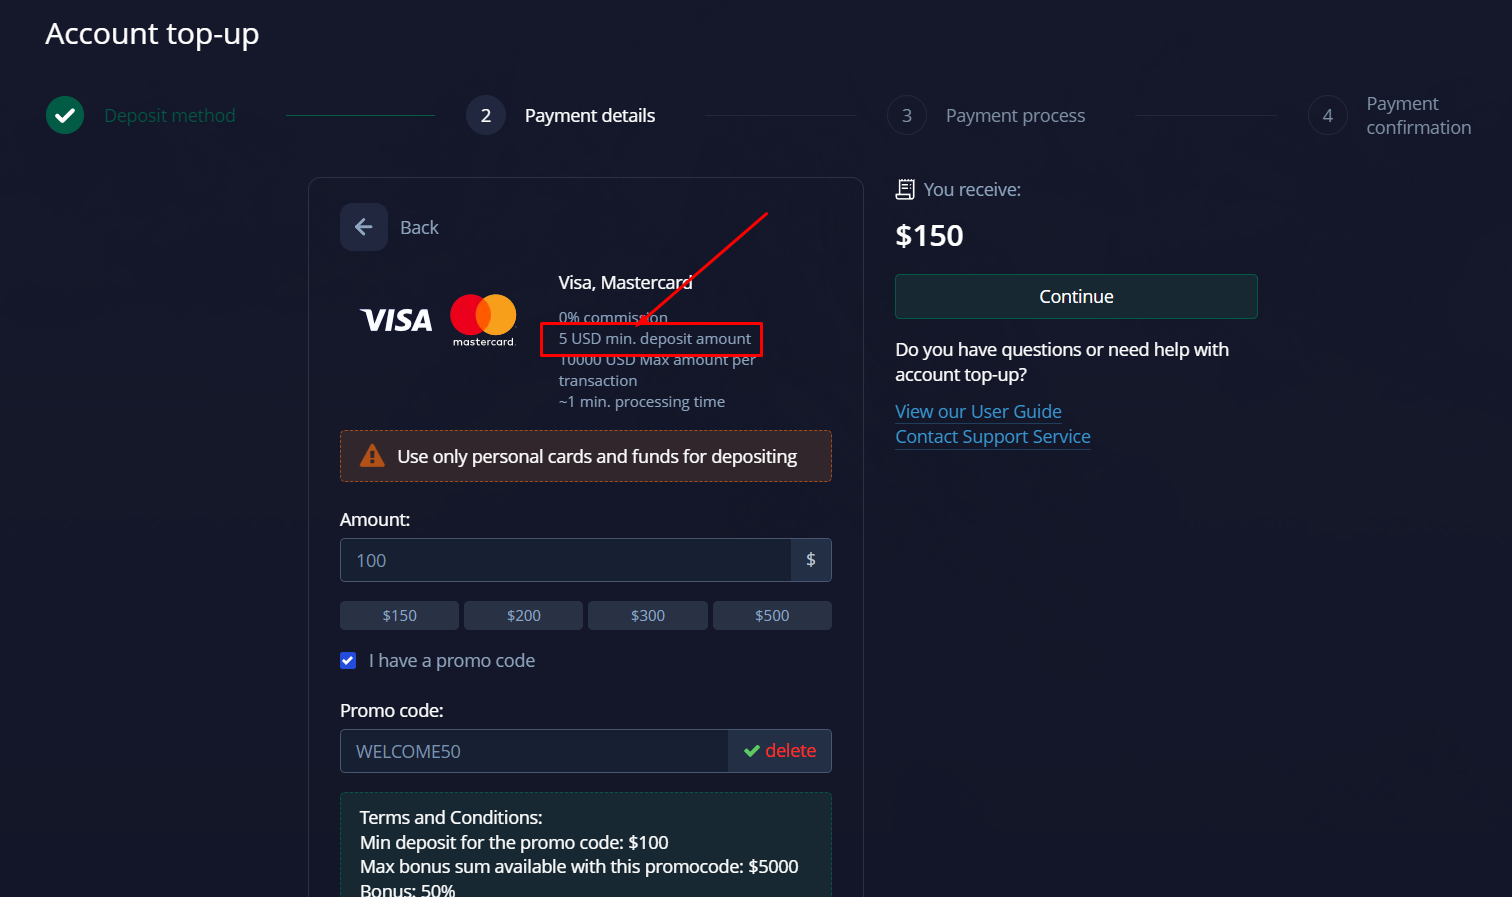
Ci sono bonus per i depositi?
Per attirare nuovi clienti, quasi tutti i broker di opzioni binarie offrono un bonus gratuito quando ricarichi il tuo account per la prima volta. Alcuni broker offrono persino un bonus ogni volta che depositi denaro. In entrambi i tempi può variare da 10%, 20%, 30%, 50% fino a anche 100%.
In altre parole: alcuni broker raddoppiano la tua quantità di denaro.

Tieni presente che il bonus non è completamente gratuito. Nella maggior parte dei casi, devi raggiungere un certo fatturato con il bonus prima di poter prelevare i tuoi fondi. Ad esempio, devi realizzare un fatturato di 30 volte il bonus che hai ottenuto. Il bonus non è obbligatorio. Quindi, se non sei d'accordo con le condizioni, spegnilo.
Ottieni un bonus di deposito gratuito di 50% su Quotex con il nostro codice promozionale "bobroker50“
Puoi utilizzare questo codice bonus solo iscrivendoti tramite il nostro sito web.
(Avviso di rischio: il trading comporta dei rischi)
Quanti soldi puoi guadagnare facendo trading di Opzioni Binarie?
Tocca a voi, quanti soldi guadagnerai scambiando opzioni binarie. La chiave per la tua carriera di successo come trader è una buona istruzione, gestione del rischio e una strategia professionale. Inoltre, la gestione del denaro deve essere buona.
A prima vista, è facile guadagnare con le opzioni binarie. Ma se approfondisci, sperimenterai che i mercati, soprattutto per i principianti, non sono così facili da capire. Siamo sicuri che il tuo successo non arriverà immediatamente.

È normale che ci voglia del tempo prima di vedere progressi e il tasso di vincita delle tue operazioni diventa sempre più alto. Più decisioni di trading prendi, meglio ottieni.
Lascia che ti diamo qualche approfondimento su quattro argomenti specifici che sono direttamente collegati al tuo successo come trader di opzioni binarie.
Formazione scolastica
È la regola più importante per i principianti: Educa te stesso prima di iniziare. Utilizza le sezioni educative offerte dalla maggior parte dei broker di opzioni binarie. Usa siti come il nostro, e video di YouTube, e leggi libri per conoscere il trading e i mercati finanziari. Usa gli strumenti di analisi tecnica per aumentare le tue capacità di trading. E, naturalmente, fare trading tramite il pratico conto di trading per apprendere i meccanismi dei mercati e delle attività.
Strategia
Una volta che conosci la teoria sul trading e sulle opzioni binarie, si arriva al trading reale e vedrai: Differisce molto dalla teoria. Il trading di un'opzione binaria richiede l'analisi dei grafici, l'analisi fondamentale e la sensibilità per i mercati e gli asset.

Così sviluppa il tuo strategia di trading, altrimenti farai saltare in aria il tuo account. Utilizza la conoscenza del nostro sito web come base e crea la tua strategia per ogni operazione binaria.
Ecco alcune delle principali strategie di trading che puoi dare un'occhiata e utilizzare per il tuo prossimo scambio di opzioni binarie:
- Strategia di 60 secondi
- Strategia del modello a candela
- Prossima strategia di previsione della candela
- Strategia MACD
- Strategia di ritracciamento di Fibonacci
Gestione del denaro
Molti dei commercianti al dettaglio che conosco hanno dovuto imparare quanto fosse reale gestione del denaro lavori. Ecco perché ti consigliamo di familiarizzare con esso prima di iniziare a fare trading.

A mio personale parere, non utilizzare mai più di 0,5 a 3% del saldo del tuo conto per un'operazione. Anche se hai sfortuna e una serie di sconfitte, non ti abbatterà. Se ti attieni rigorosamente alla tua gestione del denaro, puoi fare trading senza emozioni.
Segnali
Ne hai mai sentito parlare segnali di trading? I trader professionisti offrono configurazioni e segnali di trading che puoi copiare. Se è un trader affidabile, puoi fidarti di lui o di lei. Ma attenzione: ci sono molte truffe e segnali senza successo.
Imposta
Quando guadagni dei profitti sui mercati finanziari, la maggior parte delle volte devi pagare le tasse sulle plusvalenze. IL Regole fiscali sulle opzioni binarie sono diversi da paese a paese, ma dovresti assolutamente dargli un'occhiata se effettui transazioni finanziarie. Ti consigliamo di rivolgerti al tuo avvocato fiscale locale per verificare la tassazione sulle opzioni binarie. Dalla nostra esperienza, l'aliquota fiscale può variare da 0% fino a 30% o più sulle plusvalenze.
Conclusione e checklist: come negoziare opzioni binarie con strategie semplici
Devi essere consapevole delle truffe nel mercato delle opzioni binarie. Ma lo strumento finanziario in sé non è una truffa. Ti dà la possibilità di investire in opportunità a breve o lungo termine sul mercato. Pertanto puoi selezionare qualsiasi risorsa desideri e la funzionalità di un'opzione binaria è facile da capire.

Il mio consiglio onesto per te come trader professionista: È molto importante scegliere un broker buono e affidabile. Non registrarti con il primo broker che ti viene in mente. Controlla le recensioni, la Securities and Exchange Commission (SEC) e assicurati che non sia una truffa!
Fai attenzione a questo corto lista di controllo commerciale per principianti:
- Seleziona un broker affidabile
- Registrati e verifica il tuo account
- Usa l'account demo per accedervi
- Deposita denaro e passa al conto reale
- Scegli un asset o un mercato da negoziare
- Analizza il grafico
- Prevedere il movimento del prezzo (al rialzo o al ribasso)
- Scegli il tempo di scadenza (breve termine = vincita maggiore)
- Imposta l'importo del tuo investimento
- Effettua la chiamata (più alto) o metti (più basso)
- Utilizza un diario di trading, soprattutto se sei un principiante
Con questa piccola lista di controllo, ti abbiamo mostrato tutto ciò che devi sapere sul trading di Opzioni Binarie. Ti auguriamo il buona fortuna e buon trading!
(Avviso di rischio: il tuo capitale può essere a rischio)
FAQ – domande frequenti:
Puoi davvero guadagnare con le opzioni binarie?
Sì, è possibile guadagnare denaro con le Opzioni Binarie. Ma attenzione: l'80% dei trader perde i propri soldi. Per appartenere all'altro 20%, hai bisogno di una strategia di trading funzionante e di una gestione del denaro sensibile. Non negoziare troppi contratti multipli e utilizzare troppo capitale per uno scambio.
Quali sono i migliori broker per imparare le Opzioni Binarie?
Prima di tutto, acquisisci familiarità con lo strumento finanziario e il broker che hai scelto utilizzando un conto demo. Dopo aver sviluppato la tua strategia e esserti sentito a tuo agio con le tue decisioni, passa a un conto reale. Le piattaforme di trading online comuni sono Quotex, IQ Option, e Pocket Option.
Come si padroneggiano le opzioni binarie?
È importante capire come va il mercato. Pertanto devi sviluppare una strategia di trading, imparare l'analisi tecnica e utilizzare gli indicatori per analizzare il grafico di un asset. Usa libri, video, il nostro sito Web e molti altri strumenti educativi per entrare nel trading di opzioni binarie. Il processo di apprendimento non finisce mai.
Le Opzioni Binarie sono un buon investimento?
Quando capisci come funzionano le opzioni binarie e hai creato la tua promettente strategia di trading, le opzioni binarie sono un buon investimento, proprio come il trading Forex più noto, ad esempio. Ma tieni presente che non è privo di rischi.