Dalam panduan dari para ahli ini, Anda akan mempelajari segala sesuatu tentang perdagangan Opsi Biner. Kami akan memperkenalkan Anda pada dasar-dasarnya, menunjukkan cara kerja Perdagangan Biner, menjelaskan kepada Anda strategi perdagangan biner terbaik, dan menjawab semua pertanyaan tentang cara memperdagangkan Opsi Biner.

Definisi: Apa itu Binary Options?
Binary Options adalah instrumen keuangan yang memperoleh perhatian banyak pedagang dalam beberapa tahun terakhir. Anda dapat berdagang di pasar panjang atau pendek dalam jangka waktu tertentu. Hal khusus tentang Binary Options adalah:
Anda hanya memiliki dua pilihan sebagai pedagang.
Apakah Anda kehilangan semua uang Anda dengan satu pedagang atau Anda mendapatkan pembayaran tetap yang tinggi antara 75 dan 95 % uang Anda. Anda bertaruh pada pasar yang naik dan turun.
Sebagai instrumen keuangan, Binary Options sangat fleksibel – Anda dapat menggunakan periode waktu yang berbeda dan memperdagangkan hampir setiap aset. Jangka waktu biasanya mulai dari 5 detik dan naik hingga setidaknya satu jam. Jadi, Anda hanya memiliki dua kemungkinan cara untuk melakukan perdagangan:
- Panggilan / Lebih Tinggi: Perkiraan Anda adalah harga masa depan yang lebih tinggi (pasar naik)
- Letakkan / Turunkan: Perkiraan Anda adalah harga masa depan yang lebih tinggi (pasar naik)
Lanjutkan membaca untuk mengetahui informasi lebih rinci tentang cara memperdagangkan Binary Options. Pengetahuan yang Tepat adalah kunci keberhasilan yang berkelanjutan. Anda juga harus menyadari risiko yang timbul saat memperdagangkan Opsi Biner.
(Peringatan risiko: Modal Anda bisa berisiko)
Panduan langkah demi langkah: Cara memperdagangkan Binary Options
Di bagian berikut, kami akan menunjukkan kepada Anda cara trading secara detail. Ikuti lima langkah sederhana ini:
- Temukan broker yang dapat dipercaya
- Daftarkan akun perdagangan biner Anda
- Setor uang atau gunakan akun demo
- Pilih aset untuk diperdagangkan
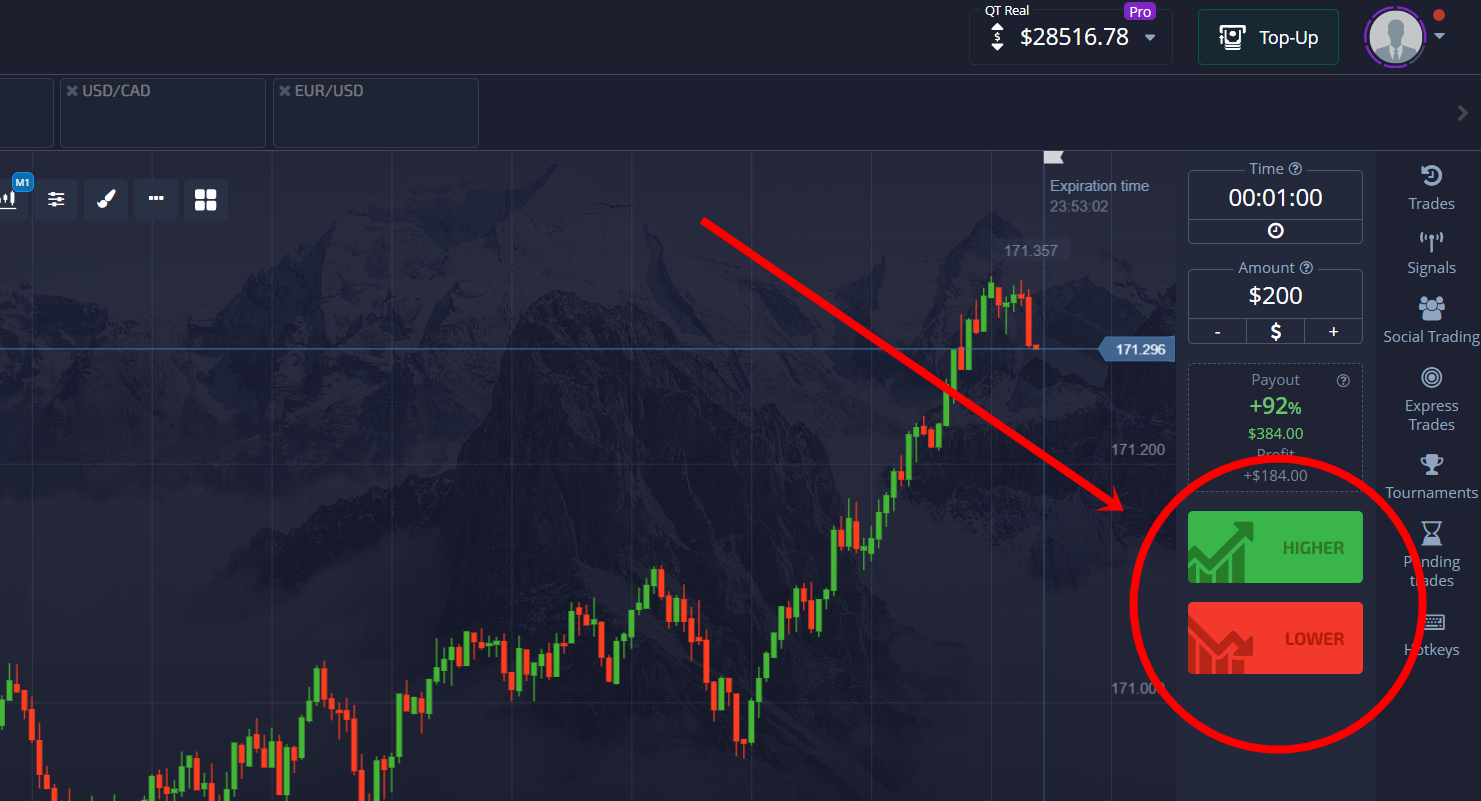
- Buat perkiraan: Harga naik atau turun?
- Pilih waktu kedaluwarsa
- Pilih jumlah investasi
- Mulai perdagangan dan tunggu sampai habis masa berlakunya
Mari kita bahas secara detail setiap langkahnya.
1. Temukan broker Opsi Biner yang dapat dipercaya
Di bagian selanjutnya, kami akan menjelaskan lebih lanjut kepada Anda cara kerja perdagangan Opsi Biner. Tapi pertama-tama, ldan jawablah pertanyaan broker mana yang terbaik untuk diajak berdagang. Tidak semua broker online atau broker Forex menawarkan perdagangan Biner sehingga Anda harus mencari perusahaan yang menawarkan instrumen keuangan ini.
Pada tabel di bawah, Anda dapat melihat tiga yang paling disukai Broker Opsi Biner. Ini adalah broker yang memenuhi banyak persyaratan berbeda yang kami tetapkan saat menguji semua broker. Mereka aman, memberikan keuntungan tinggi bagi Anda sebagai pedagang, dan berlokasi di seluruh dunia. Dengan setiap broker, Anda dapat membuka akun demo biner gratis untuk memulai tanpa risiko.
- Menerima klien internasional
- Pembayaran tinggi 95%+
- Platform profesional
- Setoran cepat
- Perdagangan Sosial
- Bonus gratis
- min. setor $10
- $10.000 demo
- Platform profesional
- Keuntungan tinggi hingga 95%
- Penarikan cepat
- sinyal
- Setoran minimum $10
- Akun demo gratis
- Pengembalian tinggi hingga 100% (jika prediksi benar)
- Platformnya mudah digunakan
- dukungan 24/7
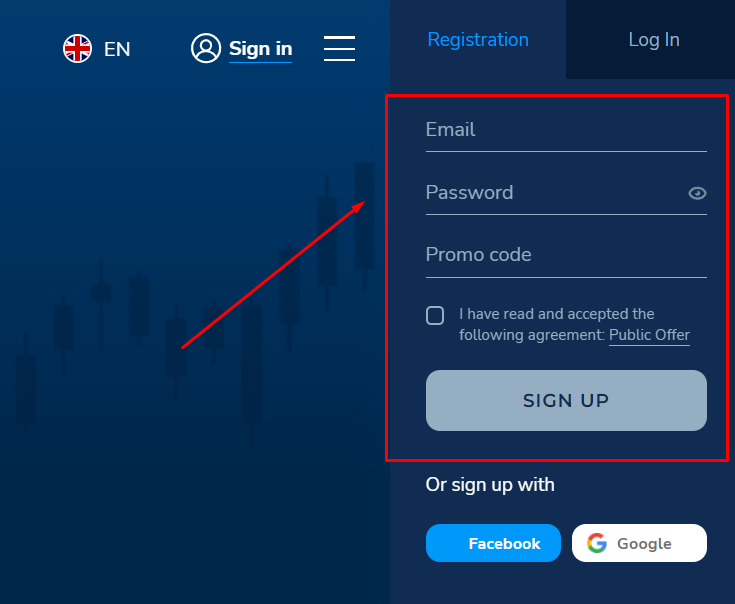
2. Daftarkan akun perdagangan Anda
Setelah memilih broker biner Anda, Anda perlu mendaftar untuk akun perdagangan Anda. Anda memerlukan email dan kata sandi yang aman. Selain itu, sebagian besar Anda dapat mendaftar melalui profil dan jaringan sosial.
(Peringatan risiko: Modal Anda bisa berisiko)
3. Setor uang atau gunakan akun demo
Sekarang Anda memiliki 2 pilihan: apakah Anda menggunakan akun demo untuk berlatih atau langsung memulai trading dengan uang sungguhan. Selalu disarankan untuk memulai dengan akun demo karena perdagangan Opsi Biner berisiko dan Anda bisa kehilangan uang yang Anda investasikan dengan sangat cepat. Platform memungkinkan Anda beralih antara akun nyata dan demo dalam hitungan detik.
Anda tidak tahu apa akun demo seperti? Mereka adalah akun investor ritel yang (kebanyakan) memiliki semua fungsi akun live – tetapi mereka hanya memiliki uang virtual di dalamnya yang dapat Anda tambahkan secara gratis kapan pun Anda mau.

4. Pilih aset dasar
Saat Anda memperdagangkan saham, misalnya, Anda terbatas pada satu aset. Hal yang baik tentang Binary Options adalah Anda bebas memilih aset dasar. Anda dapat memilih antara pasar Forex, Saham, Pasar komoditas dengan aset seperti emas atau minyak, Mata Uang Kripto, indeks saham, dan banyak lagi.
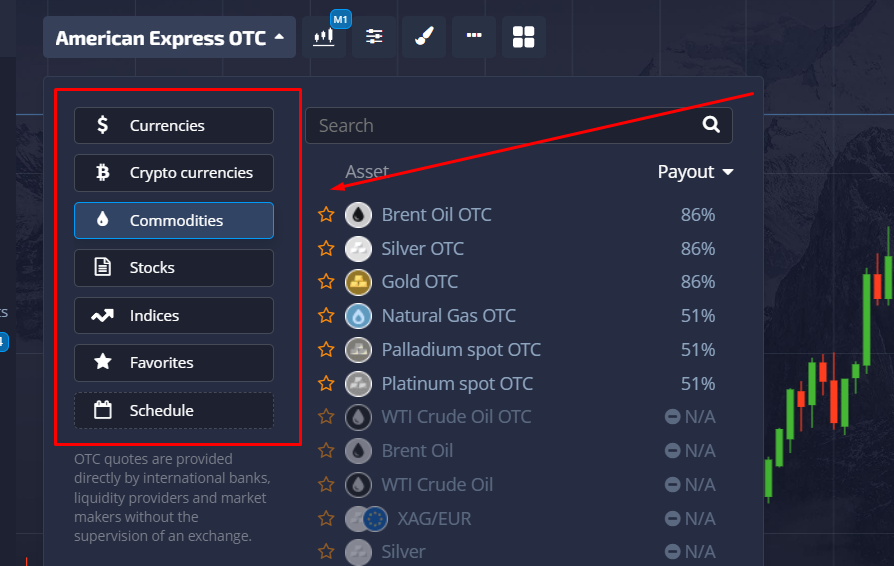
Apa pun aset yang Anda sukai, memperdagangkannya melalui Binary Options selalu bekerja dengan cara yang sama. Proses yang ditunjukkan di bawah ini selalu persis sama. Jika Anda baru dalam perdagangan Binary Options, kami sarankan Anda memulai dengan akun perdagangan latihan di mana Anda dapat berdagang dan berlatih tanpa risiko.
(Peringatan risiko: Modal Anda bisa berisiko)
5. Buat perkiraan dengan strategi – harga naik atau turun?
Setelah Anda memilih aset dasar atau pasar dasar (misalnya pasar valas), Anda siap untuk pergi. Pertanyaan utamanya adalah: Apakah harga aset akan naik atau turun di masa depan? Anda harus untuk ramalan ini. Untuk mendapatkan jawaban atas pertanyaan ini, Anda harus mengidentifikasi tren pasar dan menggunakan indikator untuk menganalisis aset dasar.

Sangat penting untuk memiliki strategi perdagangan yang tepat untuk memperoleh keuntungan yang maksimal. Gunakan analisis teknis untuk mendapatkan ide trading dan kembangkan strategi trading Anda sendiri. Anda juga dapat menggunakan berbagai alat pendidikan yang ditawarkan oleh banyak broker Binary Options.
6. Pilih waktu kedaluwarsa
Setiap kontrak Binary Options berakhir setelah waktu yang ditentukan (tanggal kedaluwarsa). Jadi dalam prediksi Anda apakah harga pasar akan naik atau turun, Anda harus mempertimbangkan waktu kedaluwarsa. Anda dapat mengaturnya di berkisar antara 5 detik atau berjam-jam, pilihan ada di tangan Anda. Anda lihat: Dimungkinkan untuk memperdagangkan Opsi Biner jangka panjang atau jangka pendek.

Setelah Anda memutuskan arahnya - atas atau bawah - dan waktu kedaluwarsa, Anda selangkah lagi untuk menempatkan perdagangan. Hanya untuk mengingatkan Anda tentang dua opsi yang Anda miliki:
- Panggilan (Lebih Tinggi): Harga naik di waktu kedaluwarsa Anda
- Masukan (Bawah): Harga turun di waktu kedaluwarsa Anda
7. Pilih jumlah investasi
Langkah terakhir sebelum Anda dapat menempatkan perdagangan Anda adalah untuk menetapkan jumlah investasi. Beberapa broker membatasi ini pada jumlah tertentu yang seringkali tergantung pada level akun Anda.

Misalnya, jika Anda memiliki akun pemula, Anda hanya dapat berdagang dengan $500. Tetapi dengan akun VIP, Anda dapat berdagang hingga $5000 dalam satu perdagangan.
Hati-hati: Investasi Anda adalah jumlah uang yang bisa Anda hilangkan. Jika prediksi Anda salah, semua uang Anda hilang.
8. Mulai perdagangan dan tunggu hingga habis masa berlakunya
Jika Anda menetapkan jumlah investasi, klik Naik / Panggil atau Bawah / Put untuk menempatkan perdagangan. Beberapa broker ingin Anda memverifikasi perdagangan, jadi Anda harus melakukan klik lagi. Sekarang saatnya menunggu sampai perdagangan Anda berakhir. Beberapa broker menawarkan untuk tutup perdagangan sebelum waktu kedaluwarsa habis – ini memungkinkan Anda untuk mengurangi dampak dari keputusan yang salah dengan menutup perdagangan saat mencapai harga tertentu.

Jika Anda benar dan harga pasar bergerak ke arah yang benar di bawah atau di atas harga kesepakatan Anda, Anda akan mendapatkan a pembayaran antara 75-95% dari investasi Anda. Hasil tergantung pada broker dan aset dasar yang Anda pilih.
(Peringatan risiko: Modal Anda bisa berisiko)
Contoh kerugian pada perdagangan Binary Options:
Anda akan memahami dasar-dasar kerugian Binary Options berkat contoh ini.
Misalkan Anda telah memilih pasar yang mendasari di mana Anda ingin memperdagangkan Binary Options. Pasar ini akan memungkinkan Anda untuk memilih komoditas favorit Anda, indeks, dll.
Binary Options yang Anda pilih untuk diperdagangkan akan memiliki harga kesepakatan. Ini juga akan memiliki waktu kedaluwarsa yang memutuskan apakah Anda menang atau kalah.
Tergantung pada preferensi Anda, Anda memilih opsi panggilan atau put. Misalkan harga strike aset yang mendasarinya adalah $75. Penilaian Anda yang baik memberi tahu Anda bahwa harga aset akan kedaluwarsa pada harga yang lebih tinggi dari $75. Mari kita asumsikan bahwa Anda mengharapkannya berhenti di $100.
Pada saat kadaluwarsa, harga aset dasar berdiri di 0. Dengan demikian, prediksi yang Anda gunakan untuk menempatkan perdagangan ini menjadi tidak berharga. Karena celah dalam penelitian Anda, Anda kehilangan uang dan dengan demikian menyaksikan kerugian Binary Options.
Contoh keuntungan pada perdagangan Binary Options:
Hal sebaliknya akan terjadi jika Anda benar, dan harga naik hingga $ 100. Harga kesepakatan Anda adalah $ 75, dan sekarang harga berada di atasnya. Ketika waktu kadaluarsa berakhir, Anda akan mendapat keuntungan dari hasil opsi biner. Investasi sebesar $ 1.000 dapat bernilai $ 1.800 dengan hasil 80% pada broker Opsi Biner Anda!
Istilah dasar yang digunakan dalam Binary Options untuk boneka
Saat memulai perdagangan Binary Options, Anda akan menemukan banyak istilah yang mungkin tidak Anda kenal tetapi penting untuk membuat perdagangan yang sukses. Berikut adalah terminologi dasar yang harus diketahui setiap trader.
- Aset: Salah satu kata yang paling sering digunakan dalam dunia trading adalah 'aset'. Ini adalah saham, indeks, komoditas, atau mata uang yang mendasari yang Anda pilih untuk diperdagangkan.
- Makelar: Ini adalah faktor agen yang melaluinya kesepakatan dibuat.
- waktu kedaluwarsa: Ini adalah tanggal atau waktu ketika perdagangan berakhir.
- Instrumen keuangan: Instrumen keuangan berarti kontrak dengan beberapa nilai moneter dan terdiri dari pembeli dan penjual.
- Analisis fundamental: Ini adalah pemeriksaan aset berdasarkan faktor geografis, politik, dan ekonomi makro.
- In-The-Money: Banyak broker menggunakan istilah ini untuk menampilkan hasil perdagangan Anda. Ini berarti bahwa prediksi Anda benar, dan Anda akan mendapatkan hasilnya.
- Batas: Untuk menjaga tempat Anda tetap terbuka ke pasar, deposit diperlukan di akun perdagangan Anda, yang dikenal sebagai margin.
- Panggilan Margin: Ini terjadi ketika akun Anda berada di bawah jumlah pemeliharaan yang diperlukan oleh broker. Untuk menghindarinya, tambahkan dana ekstra untuk menopang kerugian yang sedang berjalan.
- Harga Pemogokan: Ini adalah tingkat di mana aset dapat dibeli atau dijual, atau pada tingkat ini, Anda dapat melakukan opsi beli atau jual.
- Uang Habis: Ini adalah kebalikan dari in-the-money. Ini ditunjukkan ketika hasilnya bertentangan dengan opsi yang Anda pilih, artinya prediksi Anda salah, dan Anda kehilangan uang.
- Tingkat keuntungan: Ini adalah persentase pengembalian yang akan Anda dapatkan setelah panggilan yang benar.
- Analisis teknis: Pemeriksaan pasar dengan memperhatikan catatan perdagangan sebelumnya dan pergerakan grafik harga.
Perdagangan Binary Options: Apakah aman atau tidak?
Pertanyaan yang sangat penting untuk dijawab adalah keamanan instrumen keuangan atau broker seperti Nadex (North American Derivatives Exchange). Berdagang Opsi Biner aman, tetapi Anda memerlukan broker yang tepat. Itu harus dapat diandalkan, dapat dipercaya, dan diatur. Dalam tinjauan Broker Opsi Biner kami, kami membahas Pro dan Kontra dari sepuluh broker yang menguntungkan kami, yang teregulasi dan tidak teregulasi. Baca artikel untuk membahasnya secara mendetail.
Lebih aman jika Anda berdagang dengan broker teregulasi daripada yang tidak teregulasi!
Kami melakukan banyak penelitian saat menulis semua artikel ini dan dapat mengatakan bahwa broker teregulasi tidak pernah menipu Anda sebagai klien. Agar adil: Kebanyakan broker yang tidak diatur tidak curang juga. Tapi tidak pernah 100 % aman dengan sebagian besar perusahaan kecil dan tidak dikenal ini.
Jadi kesimpulannya, apakah Perdagangan Binary Options aman? Ya. Gunakan broker teregulasi jika Anda ingin memulai perdagangan Binary Options. Jangan pernah percaya secara membabi buta dan lakukan riset sendiri sebelum Anda mendaftar ke broker dan menyetor uang. Selain itu, Anda dapat mengandalkan informasi kami.

Ada sebuah segelintir regulator yang aman dan terkenal. Jika broker pilihan Anda diatur oleh salah satu perusahaan dan institusi ini, itu pertanda baik:
Perlu diketahui juga jika lembaga terpercaya seperti Commodity Futures Trading Commission (CFTC), National Futures Association (NFA), atau terutama Securities and Exchange Commission (SEC) mengungkapkan keprihatinan.
(Peringatan risiko: Modal Anda bisa berisiko)
Platform dan broker Opsi Biner: Cara menggunakannya
Ada banyak Platform Opsi Biner yang tersedia, dan Anda harus mencari platform yang tidak hanya aman tetapi juga menawarkan fungsi yang Anda inginkan untuk berdagang secara efektif. Hal baiknya adalah saat ini hampir semua broker menawarkan fungsi yang sama seperti mobile trading atau perangkat lunak pembuatan grafik yang modern dan fleksibel. Peluang untuk berdagang melalui aplikasi seluler penting jika Anda ingin berdagang di mana pun Anda berada.

Jika Anda seorang pemula, sepertinya begitu sulit untuk mempelajari cara memperdagangkan Binary Options dengan platform baru dan tidak dikenal. Banyak platform menawarkan begitu banyak fungsi sehingga dapat membingungkan Anda. Tetapi beberapa broker juga menawarkan materi pendidikan. Video tutorial, panduan langkah demi langkah, atau bahkan dukungan pelanggan individu melalui surat, telepon, atau obrolan untuk menjawab pertanyaan terperinci Anda.
Indikator dan alat:
Setiap platform bahkan menawarkan beberapa indikator dan alat teknis, jenis grafik yang berbeda seperti grafik candlestick yang paling umum, dan banyak hal lainnya untuk menganalisis grafik Anda. Beberapa broker bahkan memberi Anda akses gratis dan langsung ke berita ekonomi. Anda dapat menggunakannya untuk mendapatkan informasi terkini setiap saat dan bereaksi terhadap berita yang berdampak pada aset yang Anda perdagangkan.

Satu kata lagi tentang indikator: Mereka sangat penting saat berdagang Binari. Kami sarankan Anda membiasakan diri dengan yang paling penting. Baca artikel tertaut untuk mempelajari lebih lanjut tentang cara menggunakan MACD, RSI, dll.
(Peringatan risiko: Modal Anda bisa berisiko)
Apakah platform perdagangan Binary Options menawarkan perdagangan seluler?
Untuk bereaksi terhadap pasar di mana pun Anda berada Anda membutuhkan broker yang menawarkan perdagangan seluler. Jadi satu-satunya hal yang Anda butuhkan untuk berdagang adalah internet. Perdagangan seluler adalah peluang bagus untuk meningkatkan keuntungan Anda, yang tidak dimiliki oleh pedagang Binary Options pada masa itu.

Sebagian besar broker menawarkan perdagangan seluler, dan banyak dari mereka telah mengembangkan aplikasi khusus untuk berdagang di ponsel cerdas Anda. Anda dapat mengunduhnya di App Store (iOS) atau Play Store (Android). Jika broker menawarkan aplikasi seluler, biasanya ia melakukannya untuk kedua sistem umum. Ini memungkinkan Anda untuk berdagang 24 jam sehari, 7 hari seminggu, di mana pun Anda berada.
Perdagangan Binary Options di meja
Tapi: Sebagian besar dari Anda, saya yakin, dan itulah yang saya sukai, lebih baik berdagang di meja dengan komputer Anda. Mengapa? Anda memiliki lebih banyak alat untuk menganalisis grafik dan a gambaran yang lebih baik jika Anda memiliki satu atau lebih monitor dan bukan hanya layar ponsel cerdas kecil Anda.
(Peringatan risiko: Modal Anda bisa berisiko)
Ketentuan perdagangan Opsi Biner:
Kamu adalah sepenuhnya bebas untuk memperdagangkan aset dasar apa pun yang dapat Anda bayangkan – dan broker Anda menawarkan. Tidak masalah jika Anda memilih saham, komoditas, forex, atau crypto, prosesnya selalu sama. Sebagian besar broker yang kami uji memberi Anda kesempatan untuk memperdagangkan lebih dari 100 aset berbeda.

Itu waktu kedaluwarsa berbeda dari broker ke broker. Tetapi kebanyakan dari mereka menawarkan waktu kedaluwarsa mulai dari 5 detik. Batas atas kebanyakan satu jam atau tiga jam.
Sehingga dua syarat utama adalah:
- Perdagangkan pasar dasar apa pun yang Anda inginkan: saham, forex, komoditas, cryptocurrency, dan banyak lagi
- Pilih antara jangka waktu pendek dan jangka panjang (waktu kedaluwarsa)
Seberapa tinggi hasil maksimum (laba atas investasi)?
Tidak setiap broker menawarkan hasil maksimum yang sama (pengembalian investasi) untuk aset tertentu. Misalnya, broker A menawarkan pembayaran 90% untuk Bitcoin, dan broker B menawarkan 85%. Pilihan yang lebih baik jika Anda hanya ingin berdagang Bitcoin adalah broker B.

Aturan tidak tertulisnya adalah perdagangan jangka pendek memiliki pembayaran tertinggi sementara pembayaran jangka panjang tidak terlalu tinggi. Dari pengalaman saya, hasil untuk akun standar adalah antara 70% dan 95%.
Tetapi jika Anda memiliki jenis Akun VIP, Anda mungkin mendapatkan hasil yang lebih tinggi. Hampir semua broker menawarkan jenis akun berbeda yang terkait dengan jumlah uang yang Anda setorkan. Misalnya, jika Anda menyetor $3000 dengan IQ Option, Anda akan mendapatkan status akun VIP.

Untuk menarik pedagang dan menghidupkan mereka untuk menyetor lebih banyak dan lebih banyak, Anda akan mendapatkan pembayaran yang lebih tinggi dengan tingkat akun yang lebih baik.
(Peringatan risiko: Modal Anda bisa berisiko)
Jenis perdagangan tersedia dalam perdagangan Binary Options
Ketika opsi biner pertama kali diperkenalkan di pasar, mereka hanya memiliki satu jenis perdagangan, yang artinya sama. Ini adalah 'Tinggi dan Rendah' / 'Panggil dan Pasang' atau 'Atas dan Bawah.'
Dengan pertumbuhan jumlah pedagang biner dan popularitasnya, banyak jenis perdagangan lain yang diusulkan. Berikut adalah beberapa jenis perdagangan biner yang paling banyak digunakan.
#1 Sekali Sentuh atau Tanpa Sentuh
Dalam tipe ini, Anda memiliki tiga hal untuk dipilih. Pertama adalah aset di mana Anda akan menginvestasikan uang Anda, kedua adalah target harga, dan terakhir adalah waktu kedaluwarsa.
Target harga dapat ditetapkan kapan saja tetapi perlu diingat bahwa semakin jauh batasan yang ditetapkan, semakin banyak keuntungan yang didapat. Jika Anda menetapkan target lebih dekat ke titik saat ini, yang lebih mudah dijangkau, pembayarannya akan lebih sedikit.

Jika aset Anda mencapai titik target yang ditetapkan bahkan sekali sebelum waktu kedaluwarsa, Anda akan mendapatkan keuntungan. Sebelum melakukan perdagangan, ada dua hal yang harus diperhatikan-
- Tercapainya target harga
Tetapkan target harga dengan rajin. Itu bisa ke segala arah dan, dengan analisis yang cermat, menilai aliran harga. Saat mengatur, perhatikan biaya perdagangan dan nilai pembayaran.
- Waktu kedaluwarsa
Yang diperlukan hanyalah satu sentuhan untuk memberi Anda keuntungan, bahkan jika pasar bergerak ke arah yang berbeda sesudahnya. Banyak platform menawarkan waktu kedaluwarsa hingga beberapa hari, jadi atur waktu yang menurut Anda cukup untuk mencapai titik yang dipicu.
#2 Tinggi atau rendah

Jenis yang paling banyak digunakan dan populer adalah memilih apakah aset akan naik atau turun pada waktu kedaluwarsa. Di sini, Anda harus memeriksa apakah aset pilihan Anda akan berakhir di atas harga kesepakatan atau tidak pada saat kadaluwarsa.
Jika Anda yakin akan memilih tinggi, dan jika tidak, pilih rendah. Waktu penghentian perdagangan dapat bervariasi. Jenis perdagangan ini bersifat mendasar namun memiliki risiko tersendiri. Oleh karena itu, sebelum melakukan perdagangan apa pun, periksalah pergerakan harga secara menyeluruh.
#3 Rentang perdagangan
Ini juga dikenal sebagai perdagangan batas. Dalam jenis perdagangan ini, Anda memilih aset dan berdagang dalam kisaran dua titik yang dipicu. Jika harga tetap di antara batas hingga kedaluwarsa, Anda akan menang, dan Anda kalah jika melewati kisaran tersebut.
Misalnya, harga kesepakatan suatu aset adalah $50, dan Anda yakin bahwa harga tersebut akan naik hingga $60. Anda berdagang di kisaran $50 hingga $60. Jika harga aset Anda tetap berada di antara batas ini selama seluruh perdagangan, Anda akan mendapatkan keuntungan. Jika melebihi $60 atau turun di bawah $50, Anda akan kehilangan seluruh investasi.
#4 Perdagangan jangka pendek
Jangka pendek atau Perdagangan 60 detik digunakan oleh banyak pialang, dan melihat peningkatan popularitasnya, banyak pedagang cenderung ke arah itu.
Ini bekerja seperti perdagangan tinggi/rendah dengan waktu kedaluwarsa 60 detik. Beberapa broker dalam perdagangan jangka pendek juga menawarkan waktu penghentian perdagangan hingga beberapa menit.

#5 Perdagangan jangka panjang
Kebalikan dari jangka pendek, jenis perdagangan ini memungkinkan Anda untuk mengatur batas waktu hingga berhari-hari, berminggu-minggu, atau kadang-kadang bahkan berbulan-bulan.
Kebanyakan pemula lebih menyukai jenis ini karena dalam jangka pendek perdagangan berjalan cepat, dan Anda harus aktif dan konsisten sepanjang waktu sedangkan, dalam jangka panjang, Anda mendapatkan lebih banyak waktu untuk mengembangkan keterampilan dan mempelajari grafik.
(Peringatan risiko: Modal Anda bisa berisiko)
#6 Pasang
Seperti namanya, jenis perdagangan ini dilakukan secara berpasangan. Anda harus memilih aset mana yang akan berkinerja lebih baik daripada yang lain pada akhir perdagangan. Anda akan mendapatkan keuntungan untuk penilaian Anda yang benar, dan untuk yang salah, Anda akan kalah.
Pasangan mata uang dan saham sangat populer. Misalnya, dalam EUR/USD, Anda yakin bahwa USD akan lebih tinggi dari EUR dan memasang taruhan Anda. Setelah kedaluwarsa, USD mengungguli EUR, dan karena prediksi Anda benar, Anda menang. Dalam kasus sebaliknya di mana EUR naik, Anda akan kalah.
Bahkan jika pasangannya sama-sama turun, Anda akan menang selama aset Anda memiliki nilai lebih tinggi dari yang lain.
Tangga #7
Dalam jenis ini, perdagangan dipecah menjadi bagian-bagian yang lebih kecil yang kemudian tersebar pada interval yang berbeda. Setiap kali harga kesepakatan menyentuh titik yang dipicu, Anda akan menerima sebagian bonus.
Perdagangan Anda dibagi menjadi harga kesepakatan yang berbeda dengan waktu kedaluwarsa yang bervariasi. Ketika Anda mencapai interval pertama, Anda akan menerima beberapa keuntungan dan seterusnya.
Misalnya- Anda memperdagangkan pasangan mata uang USD/EUR, yang Anda yakini akan naik. Pada siang hari, nilai aset Anda adalah $60. Anda memilih tarif tiga teguran dan tiga waktu kedaluwarsa yang berbeda.
- Teguran pertama ditetapkan untuk nilai $60.85 dengan pembayaran 40%; waktu kedaluwarsa adalah 12:20.
- Pemogokan ke-2 ditetapkan untuk $70 dengan pembayaran 55%; waktu kedaluwarsa adalah 12:40.
- Teguran ke-3 ditetapkan untuk $70.45 dengan pembayaran 70%; waktu kedaluwarsa adalah 13:00.
Untuk memenangkan taruhan ini, USD/EUR harus mencapai $60.85 atau lebih pada 12:20. Jika itu terjadi, Anda akan mendapatkan pembayaran 40%, dan selanjutnya, untuk setiap anak tangga yang Anda naiki, Anda akan menerima keuntungan yang disebutkan.
Ingat bahwa nilai pembayaran akan berubah sesuai dengan perbedaan interval. Jika selisih harga kesepakatan kecil, Anda akan mendapatkan pembayaran yang lebih sedikit karena risikonya lebih kecil, dan untuk selisih yang besar, keuntungan akan meningkat.
Penjelasan risiko perdagangan Opsi Biner:
Tanpa keraguan - Pilihan Biner adalah instrumen keuangan yang berisiko. Namun demikian, ada banyak keuntungan yang melebihi risikonya. Banyak trader baru takut kehilangan semua uang yang mereka investasikan dalam satu trading. Tentu, Anda bisa kehilangan semua uang yang Anda tempatkan dalam perdagangan Anda – tetapi tidak lebih. Banyak produk keuangan lainnya bekerja dengan cara lain, di mana Anda bisa kehilangan lebih dari yang Anda investasikan.

Ada lebih banyak keuntungan, misalnya, Anda mendapatkan hasil aset yang tinggi tidak peduli seberapa kuat pasar perdagangan opsi biner bereaksi dan bergerak. Harga aset pilihan Anda hanya perlu naik atau di bawah harga kesepakatan Anda dan Anda menang. Banyak trader termasuk kami menyukai produk keuangan ini karena mudah dipahami dan Anda dapat menghasilkan banyak keuntungan dalam waktu singkat.
Hanya menginvestasikan uang yang Anda mampu untuk kehilangan!
Perdagangan Binary Options: Cara memulai
Jika Anda ingin memulai perdagangan Binary Options sekarang, ada beberapa hal yang perlu Anda ketahui dan jawaban yang mungkin muncul. Kami mencoba menjawab semuanya dan memberi Anda semua informasi yang Anda butuhkan untuk memulai. Bagian ini kurang tentang bagaimana memperdagangkan Binary Options tetapi lebih banyak tentang hal-hal selain Binary Options itu sendiri.
(Peringatan risiko: Modal Anda bisa berisiko)
Haruskah Anda menggunakan akun demo Binary Options atau tidak?
Banyak dari Anda bertanya kepada kami apakah perlu berdagang terlebih dahulu melalui akun demo atau tidak. Jawaban jelas kami adalah: Ya, itu perlu. Dengan akun demo, Anda dapat mempelajari bagaimana pasar bergerak dan bagaimana broker pilihan Anda bekerja. Hampir semua broker terpercaya menawarkan a akun demo dengan uang virtual yang dapat Anda isi ulang hanya dengan satu jam.

Pelajari tentang platform perdagangan Opsi Biner Anda sebelum Anda menginvestasikan uang nyata Anda. Anda juga dapat mencoba strategi baru atau membentuk strategi trading individual Anda sendiri melalui akun demo.
- Pertama: akun demo.
- Kedua: Strategi.
- Ketiga: Akun nyata.
Cara membuka akun nyata pertama Anda
Anda harus memenuhi kriteria yang berbeda setelah Anda siap membuka yang pertama akun asli. Di sebagian besar platform perdagangan, Anda dapat berdagang tanpa memverifikasi akun broker Anda. Tapi menurut kami, Anda harus melakukan verifikasi sebelum memulai, jadi Anda memiliki akses tak terbatas ke semua fungsi dan metode deposit dan penarikan.

Untuk proses verifikasi, Anda memerlukan data pribadi Anda yang sebenarnya (nama lengkap, tanggal lahir, alamat, surat, nomor telepon) dan beberapa dokumen pribadi. Anda harus mengunggah misalnya salinan paspor Anda dan tagihan utilitas atau sejenisnya. Anda harus melakukan ini untuk membuktikan bahwa Anda adalah orang yang nyata.
Proses verifikasi hanya membutuhkan waktu 24 jam dalam banyak kasus. Beberapa broker – tidak banyak – tidak ingin melihat dokumen atau verifikasi apa pun.
Berapa banyak uang yang Anda perlukan untuk berdagang Biner?
Jawaban atas pertanyaan ini tergantung pada bagaimana Anda bersedia berinvestasi. Selalu berpegang pada risiko dan manajemen uang Anda. Banyak broker menawarkan minimum deposit yang rendah. Misalnya, Quotex atau IQ Option memungkinkan Anda memulai trading hanya dengan $10.
Batas atas hampir tidak ada habisnya. Dari pengalaman saya beberapa tahun terakhir, itu mungkin untuk mendapatkan banyak uang dengan strategi perdagangan yang tepat. Jadi tidak perlu menginvestasikan semua uang Anda saat memulai. Mulailah dengan lambat dan jika strategi Anda ternyata luar biasa, setor lebih banyak.
Berapa besar risiko per perdagangan?
Istilah “berapa banyak” mengacu pada beberapa faktor dalam bidang perdagangan opsi biner. Ini menunjukkan risiko, usaha, waktu, dan uang. Itu selalu aman untuk dilakukan risiko tidak lebih dari 1% dana Anda per perdagangan. Anda dapat melindungi modal Anda dengan mengurangi risiko perdagangan Anda. Anda akan kehilangan sebagian kecil modal Anda bahkan jika Anda kehilangan perdagangan karena banyak kesalahan.
Pertama, Anda perlu mengatur persentase modal perdagangan Anda sehingga Anda bersedia mempertaruhkan uang Anda pada satu perdagangan opsi biner. Persentase yang ideal harus 1% atau 2% dari modal trading Anda. Anda dapat naik ke 5%, tetapi ini tidak aman di semua kesempatan.
Hal ini ditentukan oleh jenis kesepakatan opsi biner. Risiko 5% ini akan memberikan ukuran posisi yang lebih besar kepada Anda untuk perdagangan opsi biner standar. Anda kemudian dapat menghitung jumlah kontrak yang dapat Anda ambil. Anda perlu menghitung kontrak agar Anda tetap berada dalam batas risiko Anda.
- Risiko tinggi hingga 10% pada akun trading dapat mengakibatkan akun meledak dengan cepat
- Selalu berdagang dengan risiko terbatas, seperti 1% akun perdagangan per perdagangan
- Risiko yang terbatas akan menghilangkan emosi Anda saat berdagang
(Peringatan risiko: Modal Anda bisa berisiko)
Semua tentang metode deposit dan penarikan:
Mungkin Anda sudah bertanya pada diri sendiri yang mana cara Pembayaran tersedia saat memperdagangkan Opsi Biner. Di masa lalu, banyak broker hanya menawarkan beberapa metode pembayaran dan penarikan khusus. Saat ini, pasar ramah pengguna dan perusahaan pialang menawarkan banyak metode pembayaran yang berbeda.
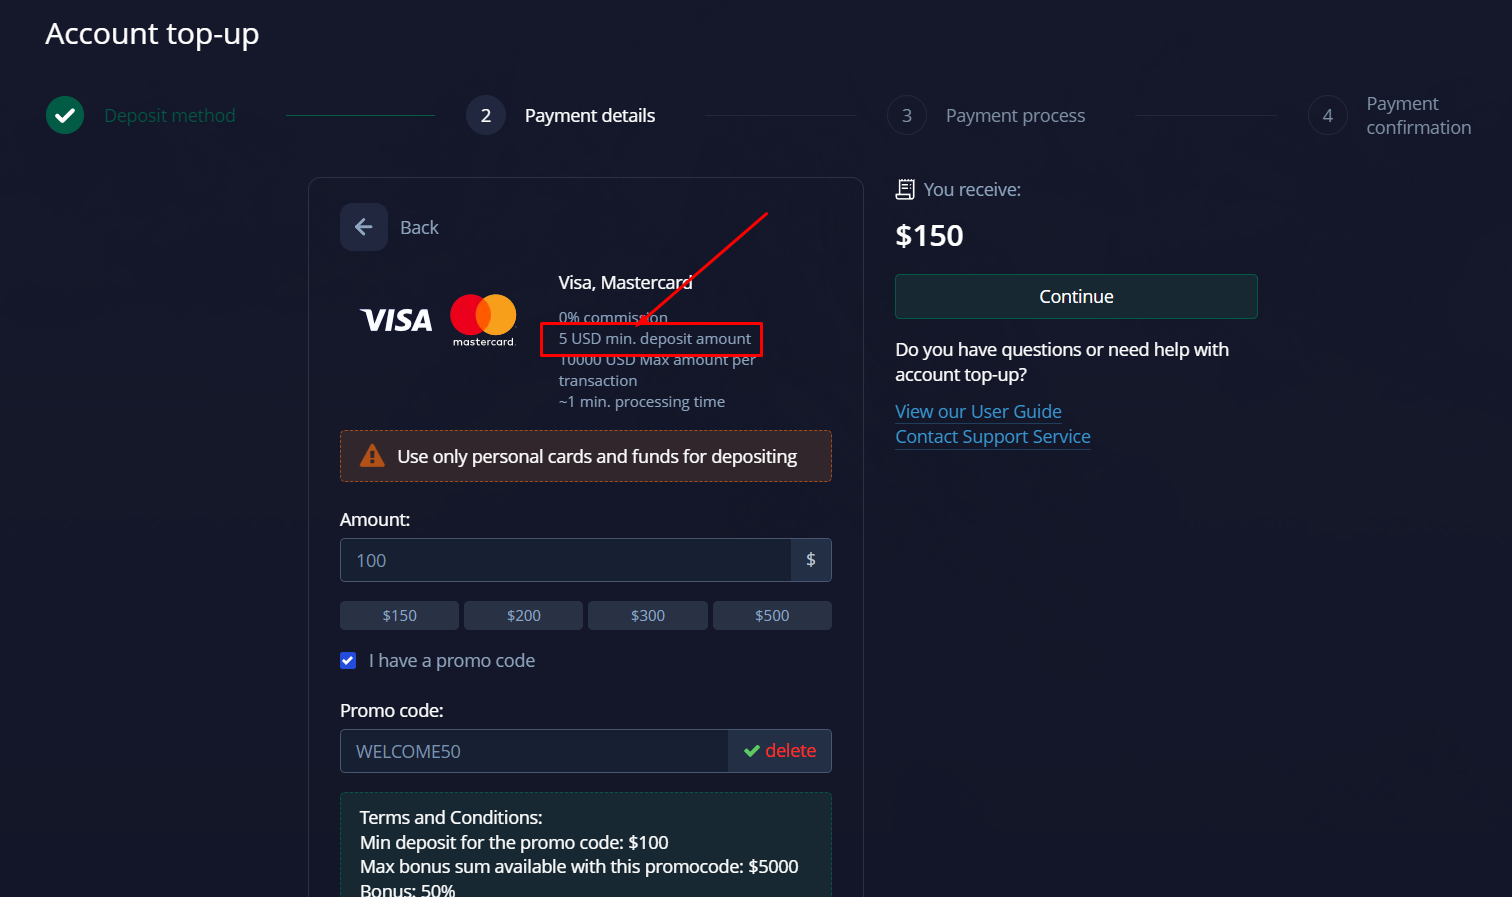
Fakta tentang setoran
- Banyak platform menawarkan setoran minimum $10
- Jumlah perdagangan minimum: $1
- Jumlah tinggi dapat diperdagangkan juga
- Setoran minimum untuk perdagangan Biner tergantung pada broker

Deposit dan penarikan mudah. Sebagian besar broker tidak menawarkan biaya apa pun untuk menyetor atau menarik dana Anda. Banyak dari mereka menawarkan hingga 20 metode pembayaran yang berbeda. Dimungkinkan untuk memanfaatkan akun perdagangan Anda dalam hitungan detik. Penarikan berlangsung sedikit lebih lama, hingga 24 jam.
Beberapa metode pembayaran utama yang ditawarkan oleh broker Binary Options:
- Transfer uang antar bank
- Kartu Kredit (Master/VISA)
- Cryptocurrency (Bitcoin, Ethereum, Ripple, dan lainnya)
- Dompet Elektronik (Skrill, Neteller, FasaPay, ePayments, Yandex, dan lainnya)
Apakah ada bonus untuk deposit?
Untuk menarik pelanggan baru, hampir semua broker Opsi Biner menawarkan sebuah bonus gratis saat Anda mengisi ulang akun Anda untuk pertama kalinya. Beberapa broker bahkan menawarkan bonus setiap kali Anda menyetor uang. Di kedua waktu, dapat bervariasi dari 10%, 20%, 30%, 50% hingga bahkan 100%.
Dengan kata lain: Beberapa broker menggandakan jumlah uang Anda.

Sadarilah fakta bahwa bonus tidak sepenuhnya gratis. Dalam kebanyakan kasus, Anda harus mencapai omset tertentu dengan bonus sebelum Anda dapat menarik dana Anda. Misalnya, Anda perlu melakukan turnover 30x dari bonus yang Anda dapatkan. Bonusnya tidak wajib. Jadi jika Anda tidak baik dengan kondisi, matikan.
Dapatkan bonus deposit gratis 50% di Quotex dengan kode promosi kami “bobroker50“
Anda hanya dapat menggunakan kode bonus ini dengan mendaftar melalui situs web kami.
(Peringatan risiko: Perdagangan melibatkan risiko)
Berapa banyak uang yang dapat Anda hasilkan dengan memperdagangkan Binary Options?
Terserah kamu, berapa banyak uang yang akan Anda peroleh dengan memperdagangkan Opsi Biner. Kunci kesuksesan karir Anda sebagai trader adalah pendidikan yang baik, manajemen risiko, dan strategi profesional. Selain itu, pengelolaan uang Anda harus baik.
Pada pandangan pertama, itu mudah menghasilkan uang dengan Opsi Biner. Namun jika Anda mendalaminya lebih jauh, Anda akan merasakan bahwa pasar, terutama bagi pemula, tidaklah mudah untuk dipahami. Kami yakin, kesuksesan Anda tidak akan datang secara instan.

Itu normal bahwa dibutuhkan beberapa waktu sampai Anda melihat kemajuan dan tingkat kemenangan perdagangan Anda semakin tinggi. Semakin banyak keputusan perdagangan yang Anda buat, semakin baik yang Anda dapatkan.
Biarkan kami memberi Anda beberapa wawasan lagi tentang empat topik spesifik yang terkait langsung dengan kesuksesan Anda sebagai pedagang Binary Options.
Pendidikan
Ini adalah aturan paling penting untuk pemula: Mendidik diri sendiri sebelum memulai. Gunakan bagian pendidikan yang ditawarkan sebagian besar broker Binary Options. Gunakan situs web seperti milik kami, dan video YouTube, dan baca buku untuk belajar tentang perdagangan dan pasar keuangan. Gunakan alat analisis teknis untuk meningkatkan keterampilan trading Anda. Dan tentu saja berdagang melalui akun latihan untuk mempelajari mekanisme pasar dan aset.
Strategi
Setelah Anda mengetahui teori tentang perdagangan dan Binary Options itu datang ke perdagangan nyata dan Anda akan melihat: Sangat berbeda dengan teori. Memperdagangkan Opsi Biner memerlukan analisis grafik, analisis fundamental, dan perasaan terhadap pasar dan aset.

Jadi kembangkan sendiri strategi perdagangan, jika tidak, Anda akan meledakkan akun Anda. Gunakan pengetahuan situs web kami sebagai dasar dan buat strategi Anda sendiri untuk setiap perdagangan Biner.
Berikut adalah beberapa strategi perdagangan utama yang dapat Anda lihat dan gunakan untuk perdagangan Opsi Biner Anda berikutnya:
- Strategi 60 detik
- Strategi pola kandil
- Strategi prediksi candle berikutnya
- Strategi MACD
- Strategi Fibonacci Retracement
Manajemen keuangan
Banyak pedagang eceran yang saya kenal harus belajar betapa nyatanya manajemen keuangan bekerja. Itu sebabnya kami menyarankan untuk membiasakan diri dengannya sebelum Anda memulai trading.

Menurut pendapat saya pribadi, jangan pernah menggunakan lebih dari 0,5 hingga 3% dari saldo akun Anda untuk satu perdagangan. Bahkan jika Anda memiliki nasib buruk dan kekalahan beruntun, itu tidak akan membuat Anda jatuh. Jika Anda berpegang teguh pada pengelolaan uang Anda, Anda dapat berdagang tanpa emosi.
sinyal
Pernahkah Anda mendengar tentang sinyal perdagangan? Pedagang profesional menawarkan pengaturan dan sinyal perdagangan yang dapat Anda salin. Jika itu adalah pedagang yang andal, Anda bisa mempercayainya. Tapi hati-hati: Ada banyak penipuan dan sinyal yang gagal.
Pajak
Saat Anda memperoleh sejumlah keuntungan di pasar keuangan, sering kali Anda harus membayar pajak capital gain. Itu Aturan pajak Opsi Biner berbeda dari satu negara ke negara lain, tetapi Anda harus memperhatikannya jika Anda melakukan transaksi keuangan. Kami merekomendasikan mengunjungi pengacara pajak setempat Anda untuk memeriksa perpajakan pada Opsi Biner. Berdasarkan pengalaman kami, tarif pajak dapat berkisar dari 0% hingga 30% atau lebih atas capital gain.
Kesimpulan dan daftar periksa: Cara memperdagangkan Binary Options dengan strategi sederhana
Anda harus waspada terhadap penipuan di pasar Binary Options. Tetapi instrumen keuangan itu sendiri bukanlah scam. Ini memberi Anda kesempatan untuk berinvestasi dalam peluang jangka pendek atau jangka panjang di pasar. Oleh karena itu Anda dapat memilih aset apa pun yang Anda inginkan dan fungsionalitas Binary Option mudah dipahami.

Saran jujur saya kepada Anda sebagai trader profesional: Sangat penting untuk memilih broker yang baik dan dapat diandalkan. Jangan mendaftar dengan broker pertama yang terlintas dalam pikiran. Periksa ulasan, Komisi Sekuritas dan Bursa (SEC), dan pastikan, itu bukan scam!
Hati-hati dengan yang pendek ini daftar periksa perdagangan untuk pemula:
- Pilih broker yang dapat dipercaya
- Daftar dan verifikasi akun Anda
- Gunakan akun demo untuk masuk ke dalamnya
- Setor uang dan beralih ke akun nyata
- Pilih aset atau pasar untuk diperdagangkan
- Analisis grafiknya
- Memprediksi pergerakan harga (naik atau turun)
- Pilih waktu kedaluwarsa (jangka pendek = pembayaran lebih tinggi)
- Tetapkan jumlah investasi Anda
- Tempatkan panggilan (lebih tinggi) atau put (lebih rendah)
- Gunakan jurnal trading, terutama jika Anda seorang pemula
Dengan daftar periksa kecil ini, kami telah menunjukkan kepada Anda semua yang perlu Anda ketahui tentang perdagangan Binary Options. Kami berharap Anda semoga sukses dan selamat berdagang!
(Peringatan risiko: Modal Anda bisa berisiko)
FAQ – pertanyaan yang sering diajukan:
Bisakah Anda benar-benar menghasilkan uang dengan Binary Options?
Ya, itu mungkin untuk mendapatkan uang dengan Binary Options. Namun perlu diketahui: 80% pedagang kehilangan uang mereka. Untuk menjadi bagian dari 20% lainnya, Anda memerlukan strategi perdagangan yang berfungsi dan pengelolaan uang yang sensitif. Jangan berdagang terlalu banyak banyak kontrak dan menggunakan terlalu banyak modal untuk satu perdagangan.
Broker mana yang terbaik untuk mempelajari Binary Options?
Pertama-tama, kenali instrumen keuangan dan broker pilihan Anda melalui akun demo. Setelah Anda mengembangkan strategi Anda sendiri dan merasa nyaman dengan keputusan Anda, beralihlah ke akun nyata. Platform perdagangan online yang umum adalah Quotex, IQ Option, dan Pocket Option.
Bagaimana Anda menguasai Binary Options?
Penting untuk memahami bagaimana pasar berjalan. Oleh karena itu Anda harus mengembangkan strategi perdagangan, mempelajari analisis teknis dan menggunakan indikator untuk menganalisis grafik suatu aset. Gunakan buku, video, situs web kami, dan banyak lagi alat pendidikan untuk masuk ke perdagangan Binary Options. Proses belajar tidak pernah berhenti.
Apakah Binary Options merupakan investasi yang bagus?
Ketika Anda memahami, bagaimana Opsi Biner bekerja dan menciptakan strategi perdagangan Anda yang menjanjikan, Opsi Biner adalah investasi yang bagus, seperti halnya perdagangan Forex yang lebih terkenal misalnya. Tetapi ketahuilah bahwa itu tidak bebas risiko.