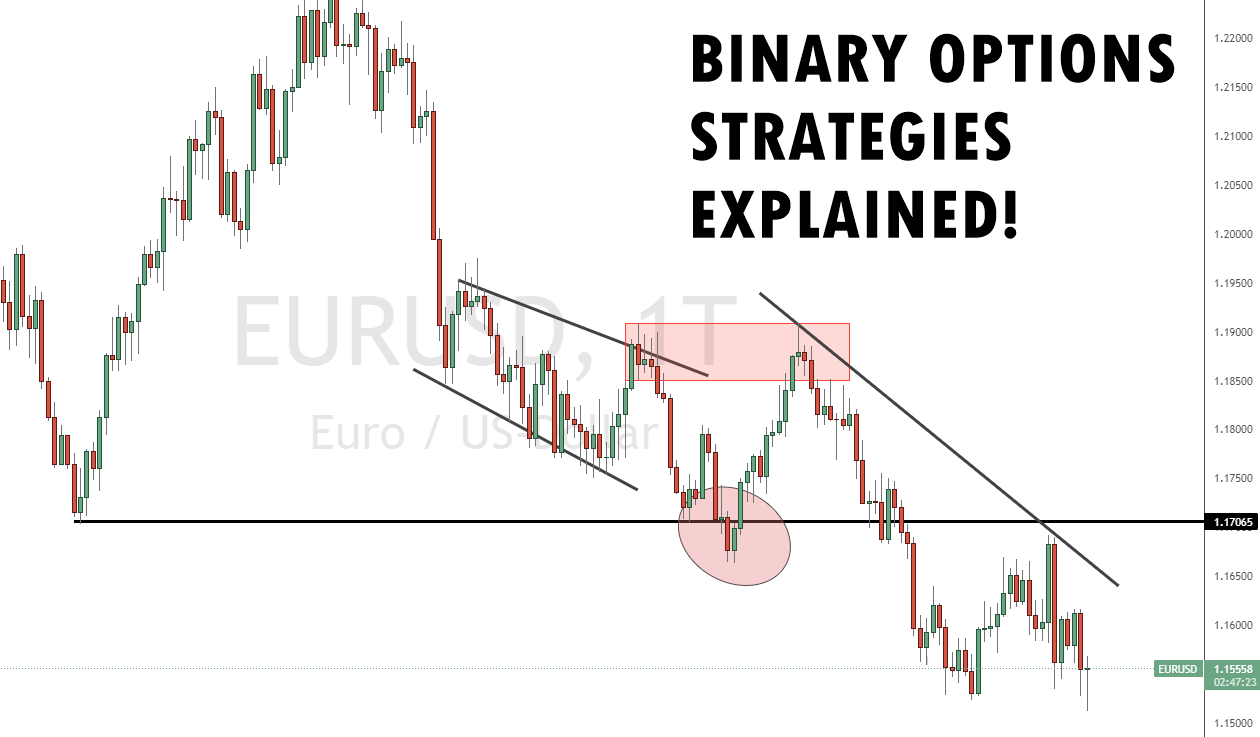
Neste site, mostraremos nossas 6 melhores estratégias de opções binárias. Eles atingiram taxas superiores a 70%. Você pode usá-lo facilmente em qualquer período de tempo, como 60 segundos ou mais. Além disso, é possível utilizar a estratégia Martingale para melhorar seus resultados. O melhor é chamado de “Estratégia de fuga falsa”. Funciona em todos os ativos e em todos os prazos. Aprenda a negociar lucrativamente em alguns momentos. Veja a foto abaixo para as primeiras impressões.
Se você operar apenas neste estilo de negociação, é possível ganhar muito dinheiro. Nos próximos capítulos, daremos mais informações para você vencer o mercado!
Lista das 6 melhores estratégias de negociação de opções binárias:
- Estratégia de fuga falsa
- Siga a Estratégia de Tendências
- A Estratégia Arco-Íris
- A Estratégia Candlestick
- A Estratégia de Índice de Fluxo de Dinheiro
- A Estratégia da Tartaruga
Uma previsão errada pode fazer você perder uma quantia considerável de dinheiro. Portanto, é essencial estabelecer certas estratégias binárias para gerir riscos e dinheiro. A seguir mencionadas estão as principais estratégias de negociação:
1. Estratégia de fuga falsa
A estratégia False Breakout é a maneira mais precisa de negociar nos mercados. Fugas de negociação não funcionam muito bem. Nós o testamos muitas vezes no passado (mostraremos a você o motivo pelo qual ele não funciona bem abaixo). Depois de um rompimento, o mercado volta na maior parte do tempo.
Tudo que você tem a fazer: é procurar um nível (alto/baixo ou suporte/resistência) e esperar que o mercado quebre o nível. Se o mercado voltar, você pode operar vendido (put) e comprado (call).
Falha Falsa: O mercado rompe um máximo/mínimo ou suporte/resistência e volta ao nível, permanecendo abaixo/superior do nível. Suporte/resistência é mais do que uma máxima/baixa consecutiva. Você pode usar este método em qualquer período de tempo e com qualquer ativo/mercado. É universal. Veja a foto abaixo!

Veja nosso vídeo sobre esta estratégia binária:

Ao carregar o vídeo, você concorda com a política de privacidade do YouTube.
Saber mais
(Aviso de risco: seu capital pode estar em risco)
Por que essa Estratégia de Opções Binárias funciona tão bem?
Para esta pergunta, é importante ter mais conhecimento. Em altos e baixos, há muitos stop-losss de outros traders no mercado. Os traders profissionais usam esse conhecimento para obter alta liquidez para suas próprias posições. Eles desistem ou abrem uma negociação onde há alta liquidez. Na maioria dos casos, eles vão fingir essa fuga, ou o mercado vai virar por causa de posições fechadas.
Existem muitos traders que negociarão essas fugas. Algoritmos são programados e acionados para fazê-los perder dinheiro.
Fatos:
- Stop-Loss são acionados com um rompimento
- Muitos stop-loss significam maior liquidez
- Este conhecimento é usado para abrir ou fechar grandes posições
- O mercado vai mudar na maioria dos casos
- Às vezes, é uma reviravolta curta e, às vezes, a tendência muda completamente
Quais níveis são os melhores para negociação?
Novos altos e baixos são os melhores níveis para esta melhor estratégia de negociação binária! Com várias altas seguidas, é mais provável que o mercado rompa esse nível. Pesquise novos e novos máximos. Para obter os melhores resultados, o nível deve ser criado no dia atual. Veja a foto abaixo.

Além disso, os melhores níveis receberam o V-Form. Mostraremos a imagem abaixo. O V-Form é visto claramente por muitos outros traders no mercado. Eles colocam seus stop loss nesses níveis. Além disso, é possível negociar a forma em V como suporte e resistência. Preferimos esperar pelo falso rompimento do V-Form. Funciona com uma alta taxa de acerto e você pode facilmente ganhar dinheiro negociação de opções binárias.
(Aviso de risco: seu capital pode estar em risco)

Quando escolher sua entrada? - Para Leigos
Os traders arriscados abrem uma posição diretamente no oposto do rompimento. Em nossa opinião, existe uma maneira melhor de obter bons resultados. Na imagem abaixo, mostraremos as entradas exatas. Selecione o nível nos mercados. Se o mercado passar de nível, você pode abrir a negociação. É tão simples quanto parece. Às vezes, você precisará de 2 a 3 negociações para obter lucro. É por isso que dobramos o valor do investimento se perdermos uma negociação.
Informação adicional: Você pode esperar por uma vela fechando abaixo / acima do nível de fuga para obter uma confirmação melhor
Qual prazo posso usar para esta estratégia de opções binárias?
Você pode usar qualquer período de tempo para esta melhor estratégia para opções binárias. O tempo não importa para sua análise. Apenas o preço do ativo importa. Nenhum trader profissional se preocupa com o tempo. Você verá que os timeframes pequenos são mais difíceis de negociar porque você tem que prestar mais atenção ao mercado. Você tem que reagir muito mais rápido do que em prazos mais altos. Em conclusão, apenas o preço do ativo importa.

Veja outro vídeo com um exemplo exato do falso rompimento:
Ao carregar o vídeo, você concorda com a política de privacidade do YouTube.
Saber mais
2. Siga a estratégia de tendências
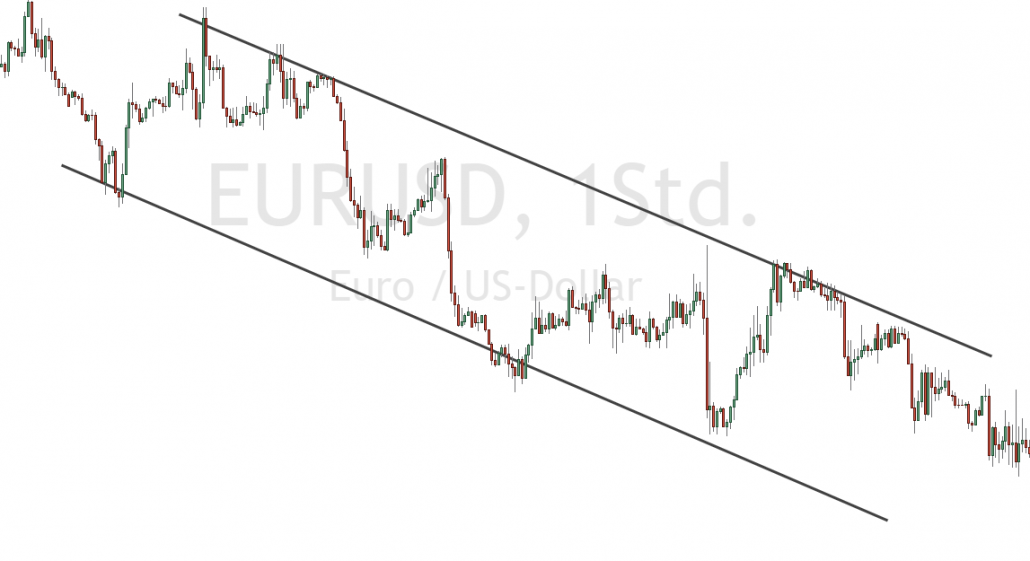
Esta é uma das melhores estratégias de negociação binária para iniciantes. Esse estratégia de seguir tendência pode ser aplicado em qualquer lugar, independentemente do valor da negociação ou do mercado. Primeiro, você deve estudar o gráfico de negociação e o padrão de linhas. Você deve ter observado que eles costumam andar em zigue-zague. Pode parecer um trabalho fácil, mas requer prática.
Primeiro, é melhor se familiarizar com os gráficos de negociação e suas tendências em aplicativos de negociação de demonstração antes de negociar seu dinheiro em um mercado em tempo real.
Uma vez que você aprenda a ler o padrão, será fácil prever se o preço do ativo será alto ou baixo. No entanto, esta melhor estratégia binária não é muito confiável para negociações curtas. Para aplicar esta melhor estratégia de opção binária, você deve estudar o gráfico e ver o movimento das linhas.
Se a linha está subindo, os preços estão subindo e vice-versa. Se a linha for horizontalmente reta, encontre outra opção para negociar seu dinheiro.
É essencial ter conhecimento prático, prática nos sites de negociação de demonstração e ter uma ideia clara.
(Aviso de risco: seu capital pode estar em risco)
3. A estratégia do arco-íris

O uso desta estratégia de opções binárias mais precisa deve ser feito em combinação com a estratégia de notícias. Primeiro, você deve conhecer a natureza do mercado em que está negociando. Então, depois de saber sobre a tendência em curso, você pode começar a usar essa estratégia. Esta é uma estratégia forte que aumenta as chances de acertar as previsões e vencer.
Esta melhor estratégia de negociação binária usa sinais básicos para fazer previsões confiáveis sobre o preço do ativo.
A estratégia arco-íris é um padrão que inclui o uso de várias médias em ações com períodos variados. Cada um desses períodos é identificado com uma cor diferente.
As médias móveis são usadas para reconhecer as mudanças de preço. As médias móveis com muitos períodos reagem lentamente às mudanças de preços e as médias móveis com poucos períodos reagem rapidamente.
Se você observar um forte movimento no gráfico de ativos, as médias móveis são mais propensos a passar de uma direção lenta para uma direção rápida em tendências em tempo real.
A média que se mover mais rápido será colocada mais próxima do preço do ativo, a segunda mais próxima será a segunda mais rápida e a terceira mais próxima do preço será a terceira média móvel mais rápida e assim por diante.
Quando você observa que as inúmeras médias móveis são colocadas no padrão, conforme discutido acima, você pode dizer um movimento durável no preço em uma direção determinada. Portanto, quando você encontrar esse padrão e tendência, negocie seu dinheiro imediatamente, pois este é um momento favorável.
Você pode escolher quantas médias deseja usar. A maioria dos bons traders usa três médias móveis.
Se as médias móveis são posicionadas de forma que a linha mais curta esteja acima da média móvel média e a mais longa abaixo da linha média ou média móvel. Você deve negociar com a queda dos preços dos ativos.
Depende de você determinar o número de médias móveis em um período. Portanto, é recomendável usar um duplex de períodos que você usou anteriormente em cada média móvel.
Essa mudança no número de períodos usados em diferentes médias móveis fornecerá índices confiáveis, que, por sua vez, fornecerão sinais precisos.
Para iniciantes, é aconselhável usar a proporção de 5, 10, 15, 20 e assim por diante.
Etapas que você pode seguir para obter a ordem correta:
- Negocie imediatamente - depois de atingir um padrão desejado ou familiar após a última média móvel ser posicionada, é o momento certo para investir seu dinheiro.
- Pratique a paciência – se você quiser testar a melhor estratégia para opções binárias e evitar ir all-in, aguarde um período. Dessa forma, você pode verificar se o sinal o ajudou a fazer a previsão certa ou não.
- Aguarde 2 a 3 períodos - esta etapa dá a você uma sensação de segurança, especialmente quando você está negociando uma grande quantia de dinheiro e não quer arriscar depender de apenas um período. Você espera de dois a três períodos ou até mais de acordo com seu desejo.
- Leve o seu tempo para entender a tendência do gráfico de ativos e, em seguida, faça uma jogada. No entanto, não espere mais do que três períodos. Após três períodos, o mercado pode começar a mudar e novas tendências podem surgir.
(Aviso de risco: seu capital pode estar em risco)
4. A estratégia de velas

Steve Nison introduziu a estratégia de formação de velas binárias em um de seus livros no ano de 1991. Um bom trader deve saber ler gráficos de ativos.
Depois de entender seus padrões e movimentos, será fácil prever o próximo movimento do ativo nos gráficos. Por exemplo, há uma formação de padrão nos gráficos de ativos chamada de formação de velas. Os padrões formados pelas linhas subindo e descendo aparecem como castiçais.
A linha superior é o preço mais alto, chamado montanha, e a linha inferior é o preço mais baixo, chamado vale. Não há uma formação específica nesta estratégia, mas há algumas que você deve aprender a identificar e ler para negociar melhor.
Para aplicar esta estratégia de negociação de opções binárias, você deve observar o gráfico e o padrão de preços por um tempo. Você notará alguma formação de padrão repetida. Então, você pode usar seu conhecimento e experiência para prever se a linha vai subir ou cair.
(Aviso de risco: seu capital pode estar em risco)
5. A estratégia do Índice de Fluxo de Dinheiro

Esta melhor estratégia de opções binárias é benéfica se você planeja jogá-la rapidamente, digamos 5 minutos. Sim, essa estratégia funciona tão rapidamente. É rápido e eficaz.
Sendo um negociante de negociação de opções binárias, você deve estar ciente de que o mercado de negociação não é aleatório no curto prazo. Outro benefício dessa estratégia é que você economiza muito tempo. Se você jogar em 5 minutos, poderá fazer mais negociações por dia.
No entanto, essa negociação de opções binárias de curto prazo estratégias são necessárias gestão de risco e análise técnica. Você deve saber que os preços das ações não mudam em 5 minutos, independentemente de a empresa estar indo bem ou mal no mercado. Portanto, a estratégia do índice de fluxo de dinheiro economiza tempo, mas também inclui muitos riscos.
A única coisa que muda o preço do ativo em um curto período é a demanda e a oferta. Esses dois fatores determinam se o preço do ativo vai subir ou cair em um período conciso.
Para dominar essa estratégia e ganhar dinheiro a cada 5 minutos com Opções Binárias, você deve aprender análise técnica. Isso o ajudará a entender se os outros traders estão vendendo ou comprando. Depois de entender isso, será fácil usar a estratégia das IMFs com o indicador do índice de fluxo de dinheiro.
Indicador de índice de IMFs - o indicador informa a relação entre o ativo vendido e o número do ativo adquirido. O valor geralmente está entre 0-100.
Vamos agora entender como funciona o indicador do índice de fluxo de dinheiro:
- O número 0 – indica que muitos traders ativos planejam vender o ativo.
- O número 50 - indica que um número igual de negociadores ativos deseja comprar e vender o ativo.
- O número 100 - indica que todos os traders ativos na plataforma desejam comprar o ativo.
Agora que você entende a relação entre o índice do indicador MFI e os negociantes que planejam comprar ou vender o ativo, será fácil para você escolher uma opção e garantir o seu dinheiro. Além disso, você pode estimar facilmente o movimento do preço do ativo depois de entender a demanda e a oferta.
Em palavras mais simples, se o número de comerciantes que compram um ativo é muito maior do que o número de comerciantes que vendem o mesmo ativo. Haverá menos comerciantes para forçar o preço dos ativos para cima. Como resultado, a demanda e o preço cairão.
Da mesma forma, se o número de comerciantes que vendem um ativo for maior do que o número de comerciantes que o compram, a oferta diminuirá e os preços aumentarão.
A seguir mencionadas estão as maneiras pelas quais você pode usar o índice MFL para sua próxima previsão precisa:
- Se o índice de fluxo de dinheiro for superior a 80. Isso significa que muitos comerciantes compram o ativo e os preços podem cair.
- Se o índice de fluxo de dinheiro for menor que 20. Isso significa que muitos negociantes vendem o ativo e os preços tendem a subir.
Esta melhor estratégia para negociar opções binárias funciona melhor por um curto período. Os comerciantes geralmente usam essa estratégia para jogar apostas de 5 minutos. A longo prazo, é difícil prever o processo por meio dessa estratégia, pois ela vai aos extremos. Portanto, evite usar essa estratégia para negociações de longo prazo.
(Aviso de risco: seu capital pode estar em risco)
6. A Estratégia da Tartaruga

Esta é uma das melhores estratégias de opções binárias entre os comerciantes. Como o nome sugere, essa estratégia utiliza o movimento dos preços dos ativos nos últimos vinte dias. Em seguida, use esses dados para prever o próximo hit; pode ser alto ou baixo. Essa estratégia fornece dois sinais:
- O sinal de compra - quando o movimento do preço atual é superior às barras / linhas dos últimos 20 dias.
- O sinal de venda - quando o movimento do preço atual é inferior às barras / linhas dos últimos 20 dias.
Esta é uma das melhores estratégias de negociação de opções binárias e pode ser usada facilmente por iniciantes. No entanto, o resultado da estratégia da tartaruga foi misto. As estratégias de negociação ajudam o trader a identificar os sinais; nenhum deles promete ser 100% preciso.
O que é uma estratégia de Opções Binárias?
Uma estratégia de Opções Binárias é um método de negociação usado para prever o movimento do preço de um ativo subjacente específico e determinar se deve comprar ou vender um ativo subjacente específico. Opção binária.
A estratégia de Opções Binárias deve seguir regras rígidas do seu plano de negociação. Uma estratégia pode ser ajustada a qualquer período de tempo, mercado ou plataforma de negociação que ofereça negociação binária. Sem uma estratégia de Opções Binárias você negocia às cegas no mercado e seus lucros e perdas são gerados aleatoriamente.
Por que você precisa de uma estratégia de opções binárias?
As estratégias de opções binárias podem ser métodos diferentes para negociar no mercado. Em primeiro lugar, uma Estratégia de Opções Binárias não tem de ser difícil. É possível ganhar dinheiro com ideias e métodos simples. Portanto, é importante utilizar regras estritas para negociar no mercado. O erro mais comum é não seguir as próprias regras! Além disso, uma boa estratégia reduz as negociações emocionais e irracionais.
A maioria dos traders perde seu dinheiro porque negocia sem um método e estratégia comprovados. Os traders avançados sabem como o mercado funciona e praticam muito seus próprios métodos. Você tem que aprender e obter um maior conhecimento do mercado. Pela nossa experiência, não é fácil aprender a negociar com sucesso em um horizonte de tempo curto. No artigo a seguir, daremos a você regras estritas para negociar nos mercados e mostraremos como as estratégias funcionam com facilidade e sucesso.
Razões para usar uma estratégia de negociação de opções binárias:
- A implementação de ações sem planejamento ou estratégias adequadas está sujeita ao fracasso. Portanto, é crucial fazer uma estratégia antes de negociar seu dinheiro em qualquer plataforma.
- É com dinheiro de verdade que você está lidando. Para ser um operador de mercado bem-sucedido, você deve saber onde está investindo seu dinheiro.
- Nunca trate o comércio como mero jogo se você se esforça para ser um bom operador. Não confie em suposições. Dessa forma, você só perderá seu dinheiro.
- O uso de estratégias fornece fortes sinais sobre o movimento dos preços dos ativos. No entanto, você só pode usar a situação para obter um lucro enorme se entender a tendência e prever corretamente.
- Isso evita que você tome decisões impulsivas e emocionais.
- Depois de desenvolver a melhor estratégia para opção binária que funcione para você, você pode dominá-la e modificá-la para obter lucro a longo prazo.
- Usar estratégias de gerenciamento de dinheiro para decidir quanto dinheiro você vai investir em negociações pode evitar que perca seu dinheiro de forma irresponsável. Já que a ganância e a culpa podem facilmente manipulá-lo para tomar ações espontâneas.
Fundamentos de uma estratégia de negociação de opções binárias de sucesso
Antes de entrar em campo, você deve conhecer dois parâmetros básicos das estratégias de negociação de opções binárias - o valor da negociação e o sinal. Vamos entender esses dois parâmetros em detalhes:
#1 O sinal
Um sinal é basicamente um movimento no mercado ou uma indicação se os preços vão subir ou cair. É mais como um instinto depois de observar a tendência acontecendo ao seu redor. O Signal ajuda você a identificar melhor o próximo passo. Claramente, isso ajuda você a prever se os preços vão subir ou cair.
Existem certas maneiras pelas quais você pode identificar um sinal. A seguir estão algumas maneiras:
- Ficar atualizado
A negociação está relacionada aos negócios e ao mercado. Portanto, para ser bom em negociação, você deve ter um conhecimento decente da ação ou do mercado de ações, notícias do setor e informações fornecidas ao público pelo CEO. Tudo isso pode ajudá-lo a prever se o preço dos recursos aumentará ou diminuirá.
- Levantamento Técnico
Este é um método em que você mantém as notícias do mercado de lado e observa atentamente o gráfico de negociação. É uma abordagem mais centralizada. Você lê cuidadosamente o gráfico e analisa eventos do passado para prever o futuro.
É complicado, mas mais confiável. Você não precisa ir all-in; existem muitos aplicativos de negociação de demonstração disponíveis on-line, onde você pode praticar e aprimorar suas habilidades de previsão. Depois que seu cérebro se acostumar com o padrão de negociação, será fácil entender a tendência dos preços subirem ou descerem.
#2 Montante de investimento
É crucial decidir a quantidade de dinheiro que você irá negociar. Ser impulsivo ou administrar mal o dinheiro só resultará em prejuízo. Desenvolver um estratégia para gerenciar seu dinheiro para reduzir riscos via Opções Binárias. Aqui estão as duas estratégias de gerenciamento de dinheiro mais usadas e confiáveis – uma abordagem baseada em porcentagem e martingale.
- Abordagem baseada em porcentagem
Nesse método, você decide qual porcentagem do seu capital deseja negociar. Para iniciantes, recomendamos começar com 1% ou 2%. Por exemplo, você tem $ 50.000 em sua conta bancária. Então, você decide negociar 1% dele, que é $ 500. Esta é uma maneira segura de gerenciar seu dinheiro e reduzir riscos potenciais.
Essa abordagem é um pouco complicada e apresenta riscos se você não tiver experiência. Mas é bom estar familiarizado com todas as abordagens possíveis. Aqui você dobra a negociação am
Testando se uma estratégia de negociação binária funciona para você
Então, qual é a melhor estratégia binária? Há um grande número de variações que você encontrará na internet. Cada um deles parecerá viável até que você o teste. Diferentes traders percebem os sinais de maneira diferente. Identificar qual estratégia funciona melhor para você ajudará você a ganhar dinheiro a longo prazo.
Nenhum aplicativo ou pessoa pode dizer quais estratégias de opções binárias funcionarão melhor para você. É trabalho de um trader testar diferentes estratégias de negociação e moldá-las à sua maneira para tirar o máximo proveito delas. A negociação binária requer previsões precisas. Exige domínio de estratégias para vencer. O uso incorreto de qualquer estratégia ou sinais confusos acabará levando você a perder dinheiro.
Evite usar dinheiro real para testar novas estratégias. Além disso, certifique-se de estabelecer limites e ter uma estratégia para administrar seu dinheiro.
Encontre os prazos certos para as estratégias de opções binárias:
Qual período de tempo é o melhor para negociar Opções Binárias com estratégias? - Os corretores oferecem a você negociar 30 segundos, 60 segundos, 5 minutos ou até 24 horas de expiração na negociação binária. Pela nossa experiência, você pode usar as estratégias discutidas em todos os prazos que desejar. É sempre o mesmo, o prazo não importa.

Mas podemos recomendar ficar longe de prazos de 30 segundos ou 60 segundos se você for um iniciante, porque você precisa de habilidades muito altas para fazer execuções comerciais rápidas.
Gestão de dinheiro para o melhor sucesso
O gerenciamento de dinheiro pertence a todas as estratégias de opções binárias. Sem a gestão de dinheiro certa, você vai perder tudo. A maioria dos traders comete esse erro. Pessoalmente, preferimos arriscar 1 – 5% do saldo da nossa conta de negociação em uma opção binária. Assim, você pode perder algumas negociações sem destruir completamente sua conta. A gestão do dinheiro também depende do trader. Alguns traders são muito agressivos e gastam muito dinheiro para investir. No final, você deve decidir por si mesmo quanto dinheiro deseja arriscar.
Alguns comerciantes usam 10% ou mais do saldo da conta para negociação. Por exemplo, se você obteve 4 negociações perdedoras (isso acontece) seguidas, o saldo da sua conta é menos 40%. Em nossa opinião, é insano usar esse risco.
A maioria dos traders profissionais usa um risco de 0,5 – 1,5% de sua carteira para uma negociação. Pela minha experiência, você terá emoções difíceis ao perder uma grande quantia de dinheiro em um horizonte de tempo curto ou em algumas negociações.
Em primeiro lugar, parece um processo difícil investir apenas 1% ou menos de seu portfólio, mas com uma estratégia de negociação estável e contínua, você ganhará muito dinheiro no futuro. Por exemplo, se você tiver um lucro de 2% todos os dias, a conta crescerá muito em algumas semanas.
Martingale para a estratégia de opções binárias de fuga falsa
Para obter melhores resultados, você pode usar o popular “Estratégia Martingale”. Se você perder seu comércio, você pode dobre seu investimento ou use mais de 2,3x do último investimento na próxima negociação. Isso é muito arriscado, mas com uma estratégia de sucesso, é uma boa maneira de trabalhar. Na minha opinião, apenas os comerciantes experientes devem usar “Martingale”.
Um martingale pode explodir sua conta em algumas negociações. Só usamos quando nos sentimos muito seguros para a próxima negociação e recomendamos isso.
- Use uma gestão de dinheiro sensata (preferimos arriscar 1-5% por negociação)
- Martingale é uma boa maneira para comerciantes experientes (dobre o valor da negociação se você perder)
Atenção às notícias do mercado
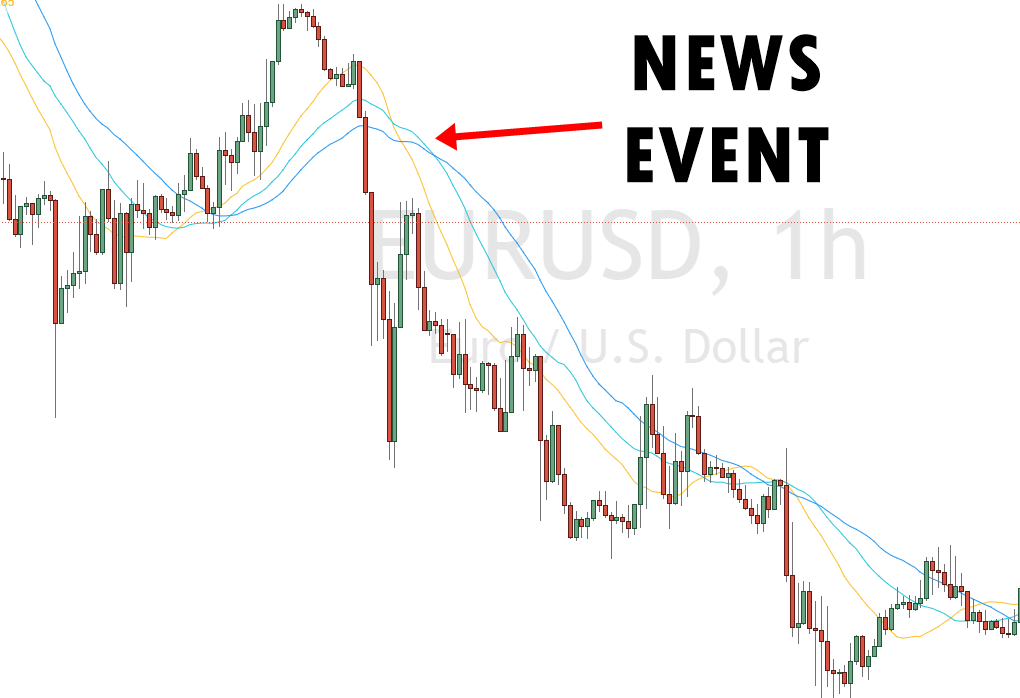
Outro ponto de negociação bem-sucedida são as notícias econômicas do mercado (foto abaixo). Muitos traders usam essas notícias econômicas para negociar no mercado. Na nossa opinião, é como jogar porque você não sabe o resultado da notícia. Além disso, você demora muito para reagir rapidamente quando a notícia aparece. Os pedidos são acionados em menos de 0,01 segundos. Existem programas de negociação automática que são mais rápidos que você!
Em conclusão, não é uma boa ideia comercializar notícias econômicas. Meu conselho para você: pare de negociar 10 minutos antes e depois das notícias. A volatilidade é muito alta e, na maioria dos casos, o mercado pulará direto na tela. O mercado não se importa com os números porque eles já estão precificados.
Usamos as notícias econômicas de www.investing.com. Você receberá as notícias certas 0,1 segundo depois de serem divulgadas.

Comece – Use um bom corretor binário para sua estratégia
Na tabela abaixo, você encontra as melhores Corretoras de Opções Binárias. É muito importante usar um corretor com um bom software de gráficos. Você deve analisar os castiçais/gráfico em busca de falsos rompimentos. É inútil negociar uma estratégia de sucesso para um corretor ruim porque talvez ele não pague o seu lucro. Nós testamos o melhores corretores de opções binárias e os recomendou em nosso site.
Você pode crie uma conta demo para praticar este novo método de negociação nos mercados. Nossos corretores recomendados oferecem uma conta gratuita e ilimitada. As condições são as mesmas do modo de dinheiro real.
Outro ponto relevante é o software de negociação para a execução de suas negociações. Você deve analisar o gráfico da melhor maneira possível. Use o castiçal ou o gráfico de linhas. Recomendamos a versão castiçal. As ferramentas de desenho são oferecidas pela plataforma e você pode começar em poucos segundos.
Fatos para um bom corretor:
- Regulamento
- Conta de demonstração gratuita
- Alto lucro de ativos
- Plataforma de negociação flexível
- Bom atendimento e suporte ao cliente
Os corretores abaixo oferecem o maior rendimento e as plataformas mais funcionais para sua negociação:
Mais de 100 mercados
- Min. depósito $10
- $10,000 demo
- Plataforma profissional
- Lucro alto até 95%
- Retiradas rápidas
- Sinais
Mais de 100 mercados
- Aceita clientes internacionais
- Pagamentos elevados 95%+
- Plataforma profissional
- Depósitos rápidos
- Negociação Social
- Bônus grátis
Mais de 300 mercados
- Depósito mínimo $10
- Conta de demonstração gratuita
- Alto retorno até 100% (no caso de uma previsão correta)
- A plataforma é fácil de usar
- Suporte 24/7
Mais de 100 mercados
- Min. depósito $10
- $10,000 demo
- Plataforma profissional
- Lucro alto até 95%
- Retiradas rápidas
- Sinais
a partir de $10
(Aviso de risco: negociar é arriscado)
Mais de 100 mercados
- Aceita clientes internacionais
- Pagamentos elevados 95%+
- Plataforma profissional
- Depósitos rápidos
- Negociação Social
- Bônus grátis
a partir de $50
(Aviso de risco: negociar é arriscado)
Mais de 300 mercados
- Depósito mínimo $10
- Conta de demonstração gratuita
- Alto retorno até 100% (no caso de uma previsão correta)
- A plataforma é fácil de usar
- Suporte 24/7
a partir de $10
(Aviso de risco: seu capital pode estar em risco)
Conclusão das melhores estratégias de opções binárias:
Para ter sucesso na negociação de opções binárias, a longo prazo, você deve praticar as estratégias repetidamente. Além de usar as estratégias, você deve ter paciência e evitar ações impulsivas. Usar qualquer estratégia uma vez não trará lucros. Testar, tentar e repetir é a única maneira de dominar as táticas de negociação.
Não desista de uma estratégia e opte por uma nova toda vez que tiver uma perda. Isso só vai te confundir, e você nunca será capaz de tirar o melhor proveito de uma estratégia.
Em vez disso, atenha-se a uma estratégia e aprenda a hora certa de usá-la. Também é importante descobrir o momento em que você deve evitar o uso de certas estratégias. No entanto, se sua estratégia não estiver funcionando, você deve reconsiderá-la e fazer uma nova. É bom seguir o conselho de um especialista ao fazer uma estratégia binária.
Agora que você leu algumas das melhores estratégias de negociação de opções binárias, encontre aquela que você entendeu bem e teste-a hoje. Então, entre em ação e comece a ganhar dinheiro hoje!
(Aviso de risco: seu capital pode estar em risco)
Perguntas frequentes:
Qual é a melhor estratégia de negociação de opções binárias?
Não existe uma estratégia específica que possa ser a melhor para todos os traders. Diferentes estratégias funcionam para diferentes traders. Portanto, você deve experimentar e testar estratégias variadas para descobrir o que funciona para você. No entanto, ter um bom conhecimento do mercado e aprender análises técnicas o ajudará a ter sucesso.
Qual é o valor mínimo necessário para negociar opções binárias?
De onde vem o dinheiro do lucro?
Não há fonte externa de dinheiro nas plataformas de negociação binária. O dinheiro está sendo girado. Por exemplo, dois traders investiram uma quantia de $100. Um comerciante ganhou enquanto o outro perdeu.
O dinheiro perdido por aquele corretor será transferido para aquele que ganhou, dependendo do percentual de lucro dado pelo corretor aos seus corretores. Alguma porcentagem do dinheiro perdido irá para o corretor.
Qual é o valor máximo que a negociação de opções binárias pode ganhar?
A resposta a essa pergunta depende da quantidade de dinheiro que está sendo negociada. Por exemplo, um trader investiu $1000 e a porcentagem de lucro fornecida pelo corretor é 60%. Nesse caso, a vitória resultaria em $600 adicional.
No total, você terá $1600. No entanto, se você falhar, perderá todo o seu dinheiro, ou seja, $1000. Não há um valor máximo fixo que pode ser ganho por meio de opções de negociação. Depende da quantidade de dinheiro negociada e do número de vitórias.
As estratégias de negociação de opções binárias funcionam?
As estratégias de negociação binária não podem prometer sucesso 100%. Uma vez que as estratégias de negociação apenas fornecem um sinal para prever seu próximo movimento. As estratégias de negociação não dizem exatamente se o preço do ativo vai subir ou cair. No entanto, boas práticas e conhecimento do ativo aumentarão suas chances de ganhar.
Veja minhas outras estratégias de negociação aqui:
- Explicação do padrão ABCD para opções binárias: Como negociar o padrão gráfico
- Average True Range: Como usar o indicador ATR com Opções Binárias
- Melhores estratégias de negociação de indicadores MACD para opções binárias
- Estratégia de indicadores ATR de opções binárias
- Estratégia de negociação de Bandas de Bollinger de Opções Binárias
- Estratégia de breakout de opções binárias
- Gráficos de Candlestick de Opções Binárias – Melhores padrões e estratégias
- Estratégia de negociação do indicador CCI de opções binárias
- Estratégia de composição de opções binárias: você pode se tornar um bilionário?
- Estratégia de coeficiente de correlação de opções binárias
- Estratégia de duplicação de opções binárias
- Estratégia de hedge de opções binárias: como proteger seus lucros
- Estratégia de negociação do Canal Keltner de Opções Binárias
- Tutorial de estratégia de gráfico de linhas de opções binárias
- Estratégia de negociação de longo prazo de opções binárias
- Estratégia de atração de mercado de opções binárias
- Estratégia de opções binárias Martingale explicada
- Estratégia de gerenciamento de dinheiro de opções binárias explicada
- Opções binárias próxima estratégia de previsões de velas
- Estratégia de negociação de gama de opções binárias explicada
- Estratégia de pirâmide reversa de opções binárias
- Estratégia de negociação de reversão de tendência de opções binárias
- Estratégia de negociação de linha de tendência de opções binárias explicada
- Estratégia de risco zero para opções binárias: isso é possível?
- Comprando o mergulho com opções binárias – estratégia de negociação explicada
- Estratégia de negociação de levantamento de capital para opções binárias
- Estratégia de negociação de opções binárias EUR/USD
- Estratégia de padrões de cabeça e ombros com opções binárias
- Como negociar opções binárias com estratégias de ação de preço?
- Como negociar padrões de borboleta com opções binárias
- Como negociar fugas falsas com opções binárias
- Como negociar altas mais altas com opções binárias
- Como negociar altos e baixos mais baixos com opções binárias
- Como negociar mínimos mais baixos com opções binárias
- Como usar padrões harmônicos para negociar opções binárias?
- Como usar a retração de Fibonacci para opções binárias - Estratégia
- Várias estratégias de análise de período de tempo com opções binárias
- Estratégia de negociação de intervalo aberto para opções binárias
- Estratégia de pontos dinâmicos para negociação binária
- Tutorial do indicador de taxa de mudança Negociação de opções binárias – Estratégias
- Estratégia de negociação de suporte e resistência para opções binárias
- As melhores estratégias de opções binárias de 5 minutos em detalhes
- O padrão de copo e alça na negociação de opções binárias
- Negociação de opções binárias em dias de folha de pagamento não agrícola