- Komisyoncu
- ücretler
- Depozito
- Para çekme
Pocket Option incelemesi 2023 – Bu bir aldatmaca mı, değil mi? – Komisyoncunun testi
- Uluslararası müşterileri kabul eder
- Yüksek ödemeler 95%+
- Profesyonel platform
- Hızlı para yatırma
- Sosyal Ticaret
- ücretsiz bonuslar
Pocket Option bir aldatmaca mı yoksa güvenilir bir şirket mi? – Gerçek incelememden öğrenin. İleri düzey bir yatırımcı olarak sizin için İkili Opsiyon komisyoncusunu kontrol ettim. Paranızı Pocket Option ile ikili opsiyon piyasasına yatırmaya değip değmeyeceğini okuyun ve en iyi bilgiyi Pocket Option incelememden alın.
(Risk uyarısı: Sermayeniz risk altında olabilir)
Pocket Option hakkında kısa bilgiler:
| ⭐ Derecelendirme: | (5 / 5) |
| ⚖️ Düzenleme: | Uluslararası Finansal Piyasa İlişkileri Düzenleme Merkezi (IFMRRC), Mwali Uluslararası Hizmetler Otoritesi (Lisans T2023322) (Resmi hükümet yetkilisi yok) |
| 💻 demo hesap: | ✔ (mevcut, sınırsız) |
| 💰 Minimum depozito | 50$ |
| 📈 Minimum ticaret: | 1$ |
| 📊 Varlıklar: | Hisse Senetleri, Forex, Endeksler, Kripto Para Birimleri ve Emtialar dahil 100+ |
| 📞 Destek: | 7/24 telefon, sohbet, e-posta |
| 🎁 Bonus: | Para yatırma bonusu mevcut. Ne kadar çok para yatırırsanız, bonusunuz o kadar yüksek olur |
| ⚠️ Teslim olmak: | 90%+'ya kadar |
| 💳 Para yatırma yöntemleri: | Banka Kartları, e-ödemeler ve kripto para birimleri; içermek Skrill, Neteller, ADV Cash, WebMoney, Payeer, Perfect Money Kripto Para Birimleri, Bitcoin, Litecoin, Ripple ve daha fazlası |
| 🏧 Para çekme yöntemleri: | Kartlar, e-ödemeler ve kripto para birimleri; Skrill, Neteller, ADV Cash, WebMoney, Payeer, Perfect Money Kripto Para Birimleri, Bitcoin, Litecoin, Ripple ve daha fazlasını içerir |
| 💵 Ortaklık programı: | Mevcut |
| 🧮 Ücretler: | Para yatırma ücreti yok, para çekme ücreti yok, hareketsizlik ücreti yok ve işlem ücreti yok! |
| 🌎Diller: | Skrill, Neteller, ADV Cash, WebMoney, Payeer, Perfect Money Kripto para birimleri, Bitcoin, Litecoin, Ripple ve daha fazlasını içeren kartlar, e-ödemeler ve kripto para birimleri |
| 🕌 İslami hesap: | Pocket Option'de takassız, İslami bir hesap var! |
| 📍 Merkez: | 2017 – 2023 Majuro, NA – Marshall Adaları'nda, 2023'ten itibaren Kosta Rika Cumhuriyeti'nde |
| 📅 Kuruluş yeri: | 2017 |
| ⌛ Hesap etkinleştirme süresi: | 24 saat içinde |
Bu yazımda sizi tanıtacağım bilmen gereken her şey ikili opsiyon komisyoncusu hakkında. Güvenilir bir komisyoncu mu? Ticaret koşulları nelerdir, minimum depozito nedir? Göstergeler mevcut mu? Pocket Option uygulaması aracılığıyla işlem yapabilir misiniz? Broker hangi hesap türlerini sunuyor? Başlamak için kullanabileceğiniz bir ikili demo hesabı var mı? Tüm bu soruların ve daha fazlasının cevabını öğrenmek için okumaya devam edin.
(Risk uyarısı: Sermayeniz risk altında olabilir)
Pocket Option nedir? – Şirket sundu
Pocket Option uluslararası bir İkili Opsiyon komisyoncusu. Orada (ikili opsiyon piyasası) yükselen veya düşen piyasalarda yüksek bir ödeme (getiri) şansı ile bahis oynayabilirsiniz. Pocket Option, Gembell Limited'e ait olan ve Mareşal Adaları'nda yerleşik bir komisyoncudur. 86967 numaralı tescilli bir şirkettir. Ayrıca, komisyoncu IFMRRC tarafından düzenlenir.
İlk bakışta Pocket Option'nin web sitesi çok güzel ve net görünüyor. Doğrudan tüccarlarına ne sunduklarını görebilirsiniz. 100'den fazla farklı varlıkla İkili Opsiyon olarak işlem yapın (90%+). Tüccarlar için olası 10000 kombinasyon var. Bir komisyoncu ile ticarete başlamak çok kolaydır. Birkaç saniye içinde yeni bir hesap açabilirsiniz. Ayrıca, platformu uygulamak için ücretsiz bir demo hesabı sunuyorlar.
İncelememin tamamını bu YouTube videosunda izleyin:

Videoyu yükleyerek YouTube'un gizlilik politikasını kabul etmiş olursunuz.
Daha fazla bilgi edin
Pocket Option'nin Gerçekleri:
- Konum Mareşal Adaları'nda
- IFMRRC ve Mwali Uluslararası Hizmetler Otoritesi tarafından düzenlenmektedir
- Yüksek verim 90%+
- Kullanıcı dostu ticaret platformu
- 100'den fazla varlık
- Ücretsiz Demo Hesabı
(Risk uyarısı: Sermayeniz risk altında olabilir)
Pocket Option'nin artıları ve eksileri
Pocket Option, 5 üzerinden tam 5 yıldız alarak test ettiğimiz en iyi ikili brokerlerden biridir. Platform düzenlenmiş, saygın ve birçok özellik sunuyor. Tüm ödemeler zamanında yapılır, cazip bonuslar vardır ve ticaret platformunun kullanımı çok kolaydır. Pocket Option'nin artıları ve eksileri şunları içerir:
Avantajlar:
- Yüksek para yatırma bonusu mevcuttur
- Birçok ticaret göstergesi
- Kullanıcı dostu arayüz
- Ücretsiz demo hesabı
- Uluslararası Finansal Piyasa İlişkileri Düzenleme Merkezi (IFMRRC) gözetiminde
- Sosyal Ticaret
- ücretsiz bonuslar
Dezavantajları:
- İkili opsiyonlar genellikle yüksek düzeyde riskle ilişkilendirilir.
- Sınırlı ticaret boyutu
- Tüm göstergeler mevcut değil
Pocket Option düzenlenmiş mi? – Yönetmeliğe Genel Bakış
Pocket Option'yi tanıdıktan sonra şu soruya cevap verelim: Pocket Option regüle ediliyor mu? Dolandırıcılığı ve para kaybını önlemek için güvenilir ve denetlenen bir komisyoncuyla anlaşmak önemlidir. Pocket Option ile herhangi bir hükümet tarafından denetlenmeyen bir komisyoncuyla çalışırsınız. Ayrıca, iki faktörlü kimlik doğrulaması yoktur.
Ancak: tarafından düzenlenir. Uluslararası Finansal Piyasalar İlişkileri Düzenleme Merkezi, Ayrıca şöyle bilinir IFMRRC. Ayrıca Mwali Uluslararası Hizmet Otoritesi'nden yeni bir lisans da aldı.

Ancak genel olarak ikili opsiyon ticaretinin yüksek riski nedeniyle Malezya, Nijerya, Amerika Birleşik Devletleri ve Yeni Zelanda gibi ülkeler Pocket Option'yi yasakladı. Ayrıca tüm Avrupa'da yasaklanmıştır, ancak yine de ücretsiz demo hesabı için kayıt olabilirsiniz.
Not: Resmi bir hükümet yetkilisi Pocket Option'yi düzenlememektedir. Düzenlemeye ihtiyaç duyulan ülkelerde Pocket Option çalışamaz.
Pocket Option ile ilgili düzenleyici uyarılar
Düzenleyici otoriteler tarafından Pocket Option hakkında farklı uyarılar bulunmaktadır. Çoğunlukla Pocket Option'nin belirli bir ülkede lisanssız olarak faaliyet gösterdiği belirtiliyor. Örneğin, FCA bir uyarı yayınladı 2021 yılında firmanın İngiltere'de izinsiz olarak hizmet verdiğini açıkladı. 2022 yılında Pocket Option “KIRMIZI Liste”de yer aldı CFTC'den. Brokerın ABD müşterilerinden lisans olmadan para kabul ettiği belirtiliyor.

Ancak Pocket Option'nin web sitesini kontrol edersek, altbilgide ABD, İngiltere ve daha fazla ülkede hizmet verilmediğini belirten küçük bir bildirim bulacağız. Broker bu ülkelerden müşteri kabul etmemektedir. Geçmişte kuralları ihlal edip etmediklerini söylemek zor ama şimdilik düzenleyici kuralların farkında olduklarını görebilirsiniz.
Pocket Option güvenli mi değil mi?
Harika hizmetler sunmak ve düzenleyici sertifikaları göstermek, Pocket Option'nin gerçek bir komisyoncu olarak sahip olduğu tek özellik değildir. Aynı zamanda endişeyi de dikkate alır. Günümüzde yaygın olan çeşitli güvenlik sorunları. Farklı güvenlik politikaları önerir ve aynı zamanda anlaşmazlık durumunda müşterilerini zararlardan korur.
Dan beri IFMRRC aynı zamanda uyum ortağı olduğu düzenlemesinin arkasındaki otorite ise, başarısız bir çözüm sırasında müşterilerine tazminat teklif edebilir. Bir Pocket Option tüccarı, soruna tatmin edici bir çözüm bulamazsa doğrudan IFMRRC'ye hak talebinde bulunabilir. Ayrıca tazmin fonlarını tacirin zararını tazmin etmek için kullanacaktır.
Bu komisyoncu ayrıca her tüccarı güvence altına alır daha önce belirtildiği gibi birden çok politika aracılığıyla. O içerir:
- Alım satım detaylarının ve kişisel bilgilerin güvenliğini katı bir gizlilik politikası ile garanti edin
- Ödeme politikası yoluyla tüccar hesaplarının sorumluluğunu almak
- Tüccar şeffaflığını sağlamak için yasa dışı mali aklamaya ve KYC politikasına karşı bir önlem olarak AML politikası sunmak
- Giriş ve para çekme işlemlerinizi 2 faktörlü kimlik doğrulama ile güvence altına alın
Bu tür tüm güvenlik önlemleri sahte bir komisyoncu ile düşünülemez. Sahte bir komisyoncunun amacına aykırı olacaktır. Yani, bunlar gerçek bir komisyoncu olmanın sağlam kanıtlarıdır.
| Düzenleme: | IFMRRC tarafından düzenlenir (Lisans numarası TSRF RU 0395 AA Vv0207), Mwali Uluslararası Hizmetler Otoritesi (Lisans T2023322) |
| SSL: | Evet |
| Veri koruması: | Evet |
| 2 faktörlü kimlik doğrulama: | Evet |
| Düzenlemeye tabi ödeme yöntemleri: | Evet, mevcut |
| Negatif bakiye koruması: | Evet |
(Risk uyarısı: Sermayeniz risk altında olabilir)
Trustpilot hakkında incelemeler – Sahte mi bunlar?
Pocket Option hakkında araştırma yapmak Trustpilot'taki 4,0 yıldız derecelendirmesinden haberdar olmanızı sağlayacaktır. Trustpilot, piyasadaki en güvenilir inceleme platformlarından biridir çünkü sahte incelemelerle manipüle edilmesi pek mümkün değildir. Ancak derecelendirmelerin sahte olma ihtimali her zaman küçük bir ihtimaldir, sizin için detaylı olarak kontrol ettim.

Gördüğünüz gibi olumlu derecelendirmelerin çoğunluğu 5 yıldızlı derecelendirmelerden oluşuyor; 4 yıldızlı, 3 yıldızlı ve 2 yıldızlı derecelendirmeler var. 1 yıldız derecelendirmesi söz konusu olduğunda derecelendirme miktarı artar. 1 yıldız derecelendirmeleri, para ödeyemeyen veya Pocket Option'nin fiyatları manipüle ettiğini söyleyen hayal kırıklığına uğramış tüccarlardan geliyor. Çoğunlukla OTC-Trading'den bahsediliyor.
OTC Trading hafta sonu bir algoritma tarafından yapılır. Binaryoptions.com'de bu varlıkların alım satımını önermiyoruz çünkü fiyat hareketlerinin geleceğini pek tahmin edemezsiniz. Para çekme sorunları çoğunlukla yatırımcıların yanlış ödeme yöntemlerini kullanması, 3. taraf hesapları kullanması veya hesaplarını doğrulamaması nedeniyle ortaya çıkıyor.
Genel olarak Trustpilot'taki değerlendirmeler bana iyi görünüyor. Bir ticaret komisyoncusu olarak yalnızca iyi değerlendirmeler almak neredeyse imkansızdır çünkü kötü bir stratejiyle ticaret yaparak para kaybeden yatırımcılar iş hakkında olumsuz yorumlarda bulunacaktır!
Pocket Option'deki tüccarlar için koşulların gözden geçirilmesi
Düzenleme sorusunu cevapladıktan sonra, platforma ve ticaret hizmetlerine geçelim.
ile gerçek para yatırmaya başlayın. hesabınızda 50$'lik küçük bir depozito. Ayrıca, her varlık için minimum bahis tutarı olarak yalnızca 1$ kullanabilirsiniz. Komisyoncu size 10.000$ ücretsiz Pocket Option demo hesabı da sağlar. Böylece yeni platformda ticaret yapabilirsiniz.

Bu Pocket Option'ye gerçek para yatırmak çok kolay çünkü size 50'den fazla farklı ödeme yöntemi sunuyorlar (bununla ilgili daha fazla bilgiyi aşağıda bulabilirsiniz). Sonuçta, sizden bir depozito veya ödeme için komisyon almazlar. Ödeme sistemi günde 24 saat çalışır.
Bir İkili Opsiyonun normal varlık karı, 80 – 97% arası hangi çok yüksek diğer broker ile karşılaştırıldığında. Bazen yatırım yaptığınız varlığa bağlıdır. Minimum 60 saniyelik işlemler ve maksimum 4 saatlik işlemler arasından seçim yapın. Size birçok farklı zaman ufku sunarlar. İşlemlerin yürütülmesi çok basit ve hızlıdır. Tecrübelerime göre, bir işlemi açarken veya kapatırken herhangi bir sorun yok. Vade süresi bitmeden bir opsiyon satmak mümkündür. Bu, bu broker için büyük bir avantajdır.

Varlık çeşitliliği çok yüksektir. Arasında seçim yapmak Hisse Senetleri, Forex, Endeksler, Kripto Para Birimleri ve Emtialar. Sonuç olarak, Pocket Option'nin koşulları ve teklifleri diğer brokerlerin en iyi yönleriyle karşılaştırıldı.
Koşullar:
- Yüksek verim 80-95%
- 50 farklı ödeme yöntemi
- 50$ depozito ile ticarete başlayın
- İşlem başına yalnızca 1$'ye ihtiyacınız var
- Pocket Option'de de OTC Varlıkları ticareti yapın (7/24 ticarete izin verir)
(Risk uyarısı: Sermayeniz risk altında olabilir)
Pocket Option'de işlem yapmanın maliyeti nedir?
Gölgeli bir komisyoncu ile uğraşırken ödemeniz gereken yüksek ücretleri ve gizli maliyetleri hiç duydunuz mu? Endişeye gerek yok: Pocket Option ile güvendesiniz, ikili opsiyon komisyoncusu güvenilir olmayan herhangi bir ücret talep etmeyecektir.

hadi bir hızlı genel bakış nın-nin Pocket Option'de işlem yapmanın maliyeti nedir?:
| Ücret: | Miktar: |
|---|---|
| Depozito ücretleri | $0 |
| para çekme ücretleri | $0 |
| Hareketsizlik ücretleri | / |
| Ticaret ücretleri | $0 |
| Forex işlem ücretleri | / |
| Hisse senedi alım satım ücretleri | / |
| ETF işlem ücretleri | / |
| Kripto ticaret ücretleri | / |
| Plan ücretlerinden tasarruf | / |
Gördüğünüz gibi, herhangi bir ücret yok, İster ticaret için, ister para yatırmak ve çekmek için.
(Risk uyarısı: Sermayeniz risk altında olabilir)
Pocket Option ticaret platformunun gözden geçirilmesi
Bence Pocket Option çok iyi bir ticaret platformu sunuyor. Görünüşe göre bağımsız olarak programlamışlar. Deneyimlerime göre, bu platformda işlem yapmak çok rahat hissettiriyor. Piyasada neler olduğunu net bir şekilde görebilirsiniz. Ayrıca, platform çok özelleştirilebilir. Farklı Pocket Option göstergeleri veya grafik türleri kullanabilirsiniz.
Not: MetaTrader 5 platformunu Pocket Option ile de kullanabilirsiniz.

Arasında seçim yapın 100 farklı varlık ve grafiği analiz edin. Bundan sonra, bir alım veya satım opsiyonu ile bir ticaret açabilirsiniz. Pocket Option'nin en iyi yatırımcılarını kopyalamak için sosyal ticaret işlevini kullanın ve onların karlarını sizin kazancınıza çevirin.
Bilgisayar veya uygulama üzerinden ticaret yapın. Akıllı telefonunuzdaki akıllı uygulama ile dünyanın her noktasından ticaret yapmak mümkün. Son olarak, ticaret platformu incelememde 5 yıldız alıyor. Tasarımını ve işlevlerini çok beğendim.

Platform, Pocket Option incelememizde sorunsuz çalışır ve profesyonelce programlanmıştır. Kullanırken herhangi bir hata veya gecikme yoktur. Ayrıca uygulama Android ve Apple iOS için de mevcuttur. Bu da bir başka büyük avantaj çünkü çoğu broker bir IOS uygulaması sunmuyor.
Ayrıca, uygulama web sürümü gibi çok sorunsuz çalışır. Sonuç olarak, komisyoncunun ticaret platformu yararlıdır l esnek olduğu için her tüccar için.
Ticaret platformu hakkında gerçekler:
- Farklı grafik türleri
- Farklı zaman dilimleri (günlük grafiğe kadar 5 saniyelik grafik)
- Ücretsiz göstergeler ve analiz araçları
- Tüccarlar için özelleştirilebilir ve kullanıcı dostu
- Sosyal Ticaret, Sinyaller ve Turnuvalar
- İşlemlerin çok hızlı yürütülmesi
(Risk uyarısı: Sermayeniz risk altında olabilir)
MetaTrader 5
bu MetaTrader 5, Pocket Option'de mevcuttur ve tüm forex yatırımcıları için dünyaca ünlü bir platformdur. Hesap kontrol panelinize gidebilir ve MT5'i ücretsiz olarak indirebilirsiniz. MT5'te komisyon olmadan değişken spreadlerle 30'dan fazla döviz çifti ve 40 farklı varlık mevcuttur.

Ticaret avantajları: Pocket Option göstergeleri
İkili opsiyon ticareti yapmak istiyorsanız, çok yakında tanıyacaksınız: Piyasaları eğilimleri ve yapıları ile analiz etmek için teknik göstergeler kullanmanız gerekir. Bu “ticaret avantajları” olmadan; başarılı olmak zordur. Pocket Option, ticaret yazılımında çok çeşitli göstergeler sunar.

şuna bir göz atalım 13 en iyi gösterge Pocket Option'de mevcuttur:
- #1 RSI
- #2 Stokastik Osilatör
- #3 CCİ
- #4 Bollinger Bantları
- #5 Donchian Kanalı
- #6 Hareketli ortalamalar
- #7 Fraktal
- #8 Girdap
- #9 Hızlandırıcı Osilatör
- #10 Ortalama gerçek aralık
- #11 OSMA
- #12 Momentum göstergesi
- #13 Fiyat değişim oranı
Bunlar, ikili opsiyon komisyoncularının sunduğu 30'dan fazla teknik göstergeden yalnızca on üçüdür. Daha detaylı bilgi almak istiyorsanız ve bunları kullanmayı öğren, ilgili makalemizi okuyun 13 en iyi Pocket Option göstergesi.
(Risk uyarısı: Sermayeniz risk altında olabilir)
Pocket Option Uygulaması ile mobil ticaret
Bütün gün bilgisayar başında masa başında oturan türden biri değilseniz, Pocket Option uygulamasını tavsiye edebilirim. Brokerin mobil uygulaması ile nerede olursanız olun ticaret becerilerinizi gösterebilirsiniz.


Şunun için kullanılabilir: Android akıllı telefonlar ve iPhone'lar için. Tabii ki, iOS veya Android çalıştıran tabletlerle de kullanabilirsiniz. Play Store veya App Store'dan indirin, verilerinizle giriş yapın ve telefonunuz veya tabletiniz üzerinden işlem yapmaya başlayın.
Tarayıcı sürümünde bulunan her işlev Pocket Option uygulamasında da mevcuttur.
Uygulama basit olduğundan, mobil ticaret için iyi çalışıyor. Arayüzün kurulumu daha hızlıdır ve alım satım işlemi yüksek veya düşük seçeneklerle aynıdır. Ayrıca, uygulama ücretsizdir, ve tüccarlar herhangi bir ek masraf ödemek zorunda değildir. bu iOS uygulamanın iOS 11 veya üzeri bir sürüme ihtiyacı var ve Android uygulamanın Android 4.4 veya üzeri olması gerekir.

(Risk uyarısı: Sermayeniz risk altında olabilir)
Pocket Option'de nasıl işlem yapılır:
Pocket Option için kullanılabilir yükselen veya düşen piyasalara bahis yapın. Platformdaki bir varlığın fiyatının yönü için bir tahmin yapın. Forex, Hisse Senetleri, Kriptolar ve daha fazlası olabilir. Her zaman İkili Opsiyonların bir sona erme süresi vardır. İster kısa vadeli ister uzun vadeli olsun, farklı zaman ufuklarında işlem yapabilirsiniz. Süre bitiminden sonra işlem otomatik olarak kapatılır.

#1 Sipariş vermek
İşlem panelinde işlem tutarı ve satın alma süresi gibi ayarları yapabilirsiniz. Yapabilirsiniz ticaretinizi yapın burada fiyatın yükselip yükselmeyeceğini tahmin ederken. Daha yüksek olan fiyat yeşil bir düğme ile görüntülenecektir; fiyat düşerse, kırmızı bir düğme ile görünecektir.
Öncelikle, uygulamadaki emtialar, döviz çiftleri, hisse senetleri, döviz çiftleri vb. gibi yüzlerce varlıktan varlık seçmelisiniz. Adını yazarak veya kategori arasından seçim yaparak varlıkları arayabilirsiniz. Uygulamada şunları yapabilirsiniz: herhangi bir varlığı favori olarak ekleyin, ve varlık yüzdesi yükseldikçe kârınız artacaktır.
Kurmak dijital ticaretin satın alma süresi, satın alma süresi menüsüne dokunmanız ve tercih edilen bir seçeneği seçmeniz gerekir. Ticarette son kullanma zamanı satın alma zamanıdır. + 30 saniye. Ayrıca, Sona Erme süresi seçeneğinde gerekli süreyi de ayarlayabilirsiniz.

Uygulamada, İşlem Tutarı bölümündeki + veya – düğmesine dokunarak işlem tutarını değiştirebilirsiniz. Strike fiyat ayarlarının yardımıyla, ödeme yüzdesini ayarlayarak mevcut değerden daha yüksek veya daha düşük bir fiyata işlem yapabilirsiniz. Ödeme oranları, grev ve piyasa fiyatları arasındaki farka bağlıdır..
Ayrıca Grafikler aracılığıyla fiyat hareketini değerlendirin ve tahmininizi oluşturun. Fiyatın yükselmesini bekliyorsanız, YUKARI veya Aksi halde Aşağı seçeneğine basın. Emri verdikten sonra sonuç doğru veya yanlış olarak görünecek, doğru tahmin ise ticari kazanç sağlayacaktır. Bir işlemi iptal etmek için İşlemler bölümüne gidebilirsiniz. ve istediğiniz ticareti kapatın.
#2 Ekspres ticaret yapma
Ekspres ticaret birden fazla ticari varlıkta meydana gelen çeşitli olaylara bağlı olan bir tahmindir. Ekspres ticaret modunda, yeşil veya kırmızı düğmeye her dokunuş, ticarete tahmininizi ekleyebilir. O zaman tüm işlemlerin tahmini çoğalır ve böylece Dijital Ticaretten daha yüksek kar elde edilir.
İçin Ekspres ticaret, basın Ekspres düğmesi Pocket Option uygulamasında. Ardından varlık türünü seçin ve farklı varlıklar üzerinde iki tahmin yapın. Bundan sonra, Ekspres ticareti yapın.
Görmek için açılan siparişler, Ekspres seçeneğini seçin ve Aç düğmesine basın. Kapatılan emirleri görüntülemek için panelde Kapalı sekmesini seçmelisiniz.
#3 İşlemleri izleme
bu Pocket Option uygulaması aktif ticaret oturumlarını görüntüleme olanağına sahiptir. seçmek zorundasın İşlem düğmesi, ve mevcut oturum için işlemleri gösteren bir açılır menü görünecektir. İsterseniz açık işlemleri görüntüleyin, devam eden tüm işlemleri görmek için İşlemler bölümüne dokunun.

görmek istersen işlem seansınız için kapalı işlemler, aynı İşlem Bölümüne gidebilir ve Kapalı işlemler düğmesine dokunabilirsiniz. Canlı işlem geçmişini görüntülemek için Daha fazla seçeneğini belirleyebilirsiniz.
#4 Bekleyen işlemler
Kullanıcıların bunu yapmasını sağlayan bir özelliktir. gelecekte belirli bir zamanda alım satım yapmak veya belirli bir varlık fiyatı bir seviyeye ulaştığında. Kaybı önlemek için bekleyen bir işlemi yerleştirmeden önce bile kapatabilirsiniz. Zamana göre alım satım emri vermek için, varlığı seçmeli ve alım satım yapmak istediğiniz tarih ve saati ayarlamalısınız.
Tutarı ekledikten ve sipariş verdikten sonra, izlemek Geçerli sekme aracılığıyla. Emri varlık fiyatına göre vermek istiyorsanız, varlığı seçin ve gerekli açık fiyatı ve ödeme yüzdesini ayarlayın. Ardından miktarı seçin ve sipariş verin. Bekleyen herhangi bir siparişi iptal etmek için yapmanız gerekenler kapat düğmesine dokunun bekleyen siparişler sekmesinde.
(Risk uyarısı: Sermayeniz risk altında olabilir)
Örnek: Kripto ticareti nasıl yapılır (Bitcoin, 90%)
Bu Pocket Option incelemesinde size bir örnek vereceğim. Eğer sen Bitcoin'de bir ticaret açın 1000$ miktarı ile, 1900$ ödeme kazanacağınız piyasaların doğru tahminini yaparsınız. 900$, kâr ve 1000$, bahis tutarınızın geri dönüşüdür. Yatırım yapmak için hiçbir gizli ücret yoktur.
Daha açık hale getirmek ve size ikili opsiyon ticaretini nasıl yapacağınızı ayrıntılı olarak açıklamak için, YouTube kanalımı ziyaret edebilirsiniz.
benim tam görmek Pocket Option ticareti öğretici video burada:
Videoyu yükleyerek YouTube'un gizlilik politikasını kabul etmiş olursunuz.
Daha fazla bilgi edin
(Risk uyarısı: Sermayeniz risk altında olabilir)
Sosyal Ticaret – Diğerlerinden ikili opsiyon ticaretini otomatik olarak kopyalayın
Pocket Option, komisyoncunun en iyi yatırımcılarını kopyalamanızı sağlar. Her şeyden önce, sosyal ticaretin yalnızca canlı bir hesapta çalıştığını bilmek önemlidir. Menüyü aç "sosyal ticaret” ve şu anda en iyi tüccarları görüyorsunuz. Onlara tıklayıp profillerini izleyebilirsiniz (aşağıdaki resim).
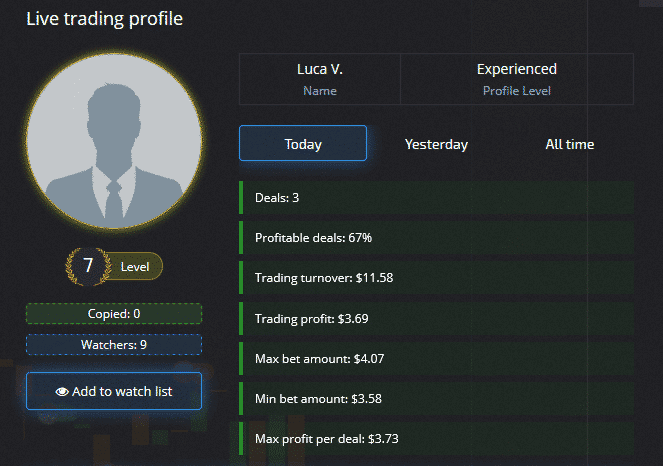
Tüccarı bir "izleme listesine" ekleyebilir ve onu belirli bir süre takip edebilirsiniz. Yeterince iyi olduğunu düşünüyorsanız, tek tıkla kopyalayabilirsiniz. Bence, tüm zamanların esnafını analiz etmek önemlidir. Bir sosyal ticaret kullanıcısı genel olarak yüksek bir kazanma oranına sahipse, ekstra kar elde etmenin iyi bir yoludur. Pocket Option'de tüm profili ve işlem stilini görmek tüccarlar için büyük bir avantajdır.
Pocket Option'de ticaret hesabınızı nasıl açarsınız?
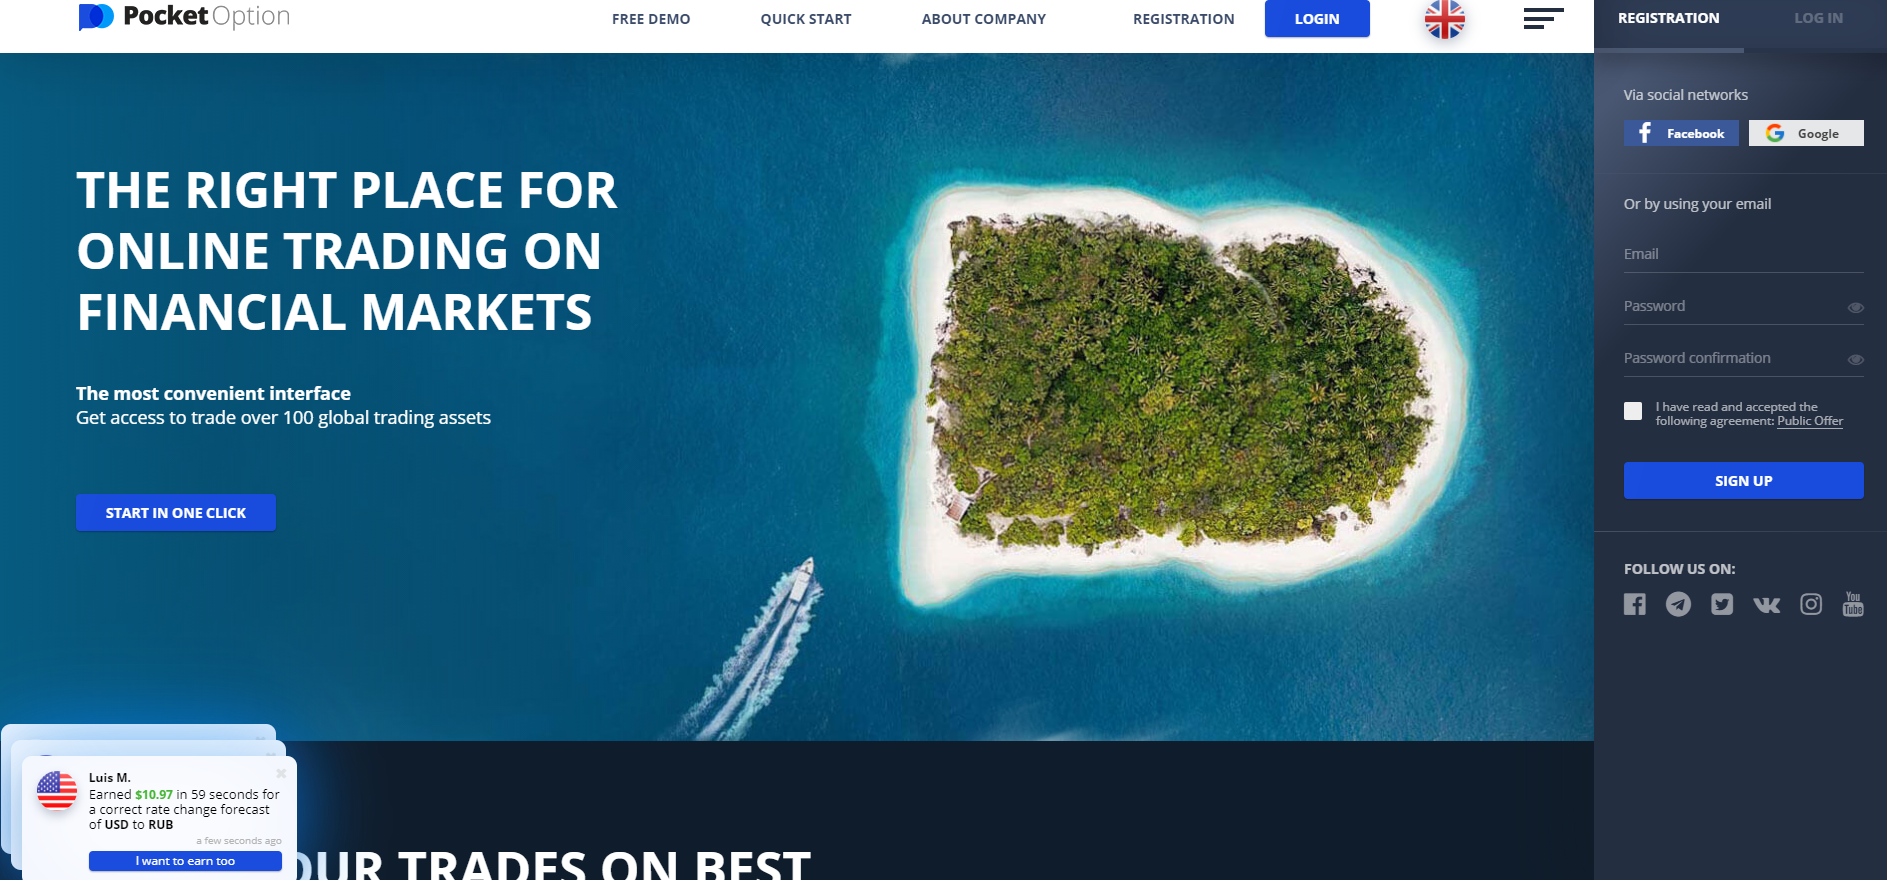
Yeterince okudun mu ve okumak istiyorsun Pocket Option'de kendi hesabınızı açın ticaret becerilerinizi kanıtlamak için? Tamam, hadi bunu yapalım – çok kolay. Oraya ulaşmak için sadece birkaç tıklama gerekiyor. Şu basit adımları izleyin:
- Ana sayfayı ziyaret edin ve “TEK TIKLAMA İLE BAŞLAYIN” önünüzde görünen düğme
- Tıklamak “DEMO TİCARETİNE DEVAM ET” ilk başta demo hesabını kullanmak için
- Yeterince pratik yaptıktan sonra, "Kayıt" sol alt köşedeki düğme
- Şimdi hesabınızı oluşturmak için üç yöntemden (e-posta, Google veya Facebook aracılığıyla) birini seçin.
- Gerekli tüm bilgileri doldurun
(Risk uyarısı: Sermayeniz risk altında olabilir)
Aşağıdaki ekran görüntüleri size ilk üç adım – hesabınızı kaydetmenizi sağlayan kayıt formuna bu şekilde ulaşırsınız.


Kayıt işlemini tamamladığınızda, ticarete başlayabilirsiniz. Bazı özellikler için hesabınızı doğrulamanız gerekir. Bunu nasıl yapacağınızı bu makalenin ilerleyen bölümlerinde göstereceğim.
(Risk uyarısı: Sermayeniz risk altında olabilir)
Pocket Option hesap türleri:
Var Pocket Option'nin sunduğu birkaç farklı hesap türü. Aşağıdaki tabloda her birine ayrıntılı olarak bakalım:
| Hesap türleri: | Özellikler: |
|---|---|
| demo hesap | sanal para, $10000'e kadar istediğin zaman doldur |
| acemi tüccar | hesap bakiyesi: $100'den az maksimum işlem tutarı: $1000 |
| acemi tüccar | tüm acemi tüccar puanları artı: hesap bakiyesi: $100 – $1000 kristal piyangoya erişim, ekspres siparişler, ticaret başarıları |
| deneyimli tüccar | tüm acemi tüccar puanları artı: hesap bakiyesi: $1000 – $5000 2% ile karlılığı artırın |
| usta tüccar | tüm deneyimli tüccar puanları artı: hesap bakiyesi: $5000 – $15000 maksimum işlem tutarı: $2000 4% ile karlılığı artırın para çekme önceliği |
| profesyonel tüccar | tüm ana tüccar puanları artı: hesap bakiyesi: $15000 – $50000 maksimum işlem tutarı: $3000 6% ile karlılığı artırın Personel Müdürü |
| uzman tüccar | tüm profesyonel tüccar puanları artı: hesap bakiyesi: $50000'den maksimum işlem tutarı: $5000 8% ile karlılığı artırın para çekme işlemleri için yüksek öncelik premium hediyeler kişisel indirimler |
| MT5 Forex | ile başlayan tüm aşamalar için kullanılabilir. Tecrübeli Kaldıraç: 1:10'dan 1:1000'e kadar dalgalı spread: 1.1 pipten itibaren |
(Risk uyarısı: Sermayeniz risk altında olabilir)
Pocket Option'de bir demo hesabı kullanabilir misiniz?
Ücretsiz sunar demo hesap herkesin ikili opsiyon ticaretine başlaması için. Demo hesabı, Pocket Option'de gerçek yatırımlar yapmaya başlamadan önce eğitim için kullanılabilir. Sadece tek bir tıklama ile platformda sanal para ile işlem yapabilirsiniz. Sanal para ile pratik ticaret için kayıt veya depozito gerekmez. Pek çok tüccar, gerçek parayla başlamadan önce ilk deneyimlerini demo hesapta alır. Herkesin demo hesabında platformu denemesini tavsiye ederim – Pocket Option incelememin her bir kelimesini okusanız bile ;-)

bu ikili demo hesabı dır-dir 10.000$ sanal para ile sınırsız. İsterseniz tek tıkla şarj edebilirsiniz. biraz para kaybetmek. Biraz deneyim kazandıktan ve öğrendikten sonra İkili Opsiyon ticareti başarıyla gerçek para kullanarak doğrudan ticarete başlayabilirsiniz.
- Ücretsiz ve sınırsız hesap
- Alıştırma yapmanın ve ticaret yapmayı öğrenmenin en iyi yolu
(Risk uyarısı: Sermayeniz risk altında olabilir)
Pocket Option işlem hesabınızın özellikleri
Pocket Option hesabınıza nasıl giriş yapacağınıza ve nasıl doğrulayacağınıza daha yakından bakalım. Pocket Option platformunun tüm işlevlerini deneyimlemek istiyorsanız doğrulama önemli bir adımdır.
Pocket Option hesabınıza nasıl giriş yapılır
Halihazırda bir Pocket Option hesabı oluşturduysanız, giriş çok kolay. Pocketoption.com üzerinden komisyoncunun web sitesini ziyaret edin veya Google üzerinden komisyoncuyu arayın. Web sitesine yönlendirildikten sonra sağ üst köşeyi izleyin. “Pocket Option Oturum aç” üzerine tıklayın.

E-posta adresinizi ve şifrenizi girin, reCAPTCHA'yı yapın ve "GİRİŞ YAP"a basın. İsterseniz, bilgilerinizi kaydedebilir ve oturumunuz açık kalabilirsiniz.
(Risk uyarısı: Sermayeniz risk altında olabilir)
Pocket Option doğrulaması: Hesabınızı nasıl doğrularsınız
Tüm Pocket Option işlevlerine erişmek için şunları yapmanız gerekir: Hesabınızı doğrulayın. Bu birkaç adım alır, ancak yapılması kolaydır.
Şu doğrulama adımlarını izleyin:
- Hesabınıza giriş yapın
- Kişisel hesap ayarlarınızı açın (profil)
- Bir kimlik belgesinin kanıtını hazırlayın (örneğin, kimliğinizin, pasaportunuzun veya ehliyetinizin taranması)
- Belgeyi yükleyin
- Doğrulama sürecini takip edin

bir girmek zorundasın adres kanıtı ilave olarak. Banka mektubu veya elektrik faturası gibi belgeler kullanabilirsiniz. Hesabı yöneten kişinin adının olması önemlidir. Dikkatli olun: Belge kırpılmamalı ve tüm önemli bilgiler açıkça görülebilmelidir.
(Risk uyarısı: Sermayeniz risk altında olabilir)
Para yatırma ve çekme için mevcut ödeme yöntemleri
Pocket Option'nin iyi yanı, Para yatırma ve çekme için 50 farklı ödeme yöntemi.

bu minimum depozito 50$'dir. Kartları, e-ödemeleri veya kripto para birimini kullanabilirsiniz. Herhangi bir komisyon almazlar ve 24 saatlik zaman ufku içinde para çekme işlemi gerçekleşir. bu minimum para çekme miktarı 10$'dir.

Ödeme yöntemleri hakkında gerçekler:
- Minimum para yatırma 50$ ve minimum para çekme 10$
- Elektronik yöntemlerle anında para yatırma
- Kredi kartları
- Skrill, Neteller, ADV Nakit, WebMoney, Payeer, Mükemmel Para
- Kripto para birimleri, Bitcoin, Litecoin, Ripple ve daha fazlası
- Komisyon ve ücret yok
(Risk uyarısı: Sermayeniz risk altında olabilir)
Pocket Option'ye nasıl para yatırılır
Ticarete başlamak istiyor musunuz? Kayıt ve doğrulama işleminden sonra yapmanız gereken ilk şey: depozito. Süreci anlamak çok kolaydır. Pocket Option web sitesini açın. Giriş yaptıktan sonra kontrol panelinizi görebilirsiniz. Sayfanın üst kısmındaki “DOLDUR” düğmesine tıklayın.

Artık farklı ödeme yöntemlerinden birini seçebilirsiniz. Minimum depozito $50'dir. Bir ödeme yöntemi seçtikten sonra görüntülenen adımları izleyin.

Her şey yolunda giderse, hesabınıza para yatırılır (minimum depozito: $50). Şimdi ticarete başlayabilirsiniz!
(Risk uyarısı: Sermayeniz risk altında olabilir)
Para yatırma bonusu var mı?
Evet! Pocket Option teklifleri para yatırma bonusları yeni müşteriler çekmek ve mevcut müşterilere de biraz kredi vermek. Bir ödeme yöntemi seçerseniz, ne kadar para yatırma bonusu alacağınızı görebilirsiniz. Ne kadar para yatırmak istediğinize bağlı.

Örneğin, Hesabınıza $ 5,000 yüklerseniz ekstra 43%, yani $2,150 alırsınız. Yani para yatırma işleminden sonra hesap bakiyeniz $7150 olacaktır.
(Risk uyarısı: Sermayeniz risk altında olabilir)
Pocket Option'den nasıl para çekilir
Sonuç olarak, ilk testler Pocket Option incelememizde komisyoncu ile para çekme başarılılar Para çekme ve mevduat sistemi çok iyi çalışıyor. Ayrıca Pocket Option, depozito veya kayıplarınız için maksimum 10% tutarında geri ödeme sunar.

Daha fazla bilgi için gerçek bir hesap açın. Ayrıca gerçek para ile işlem yapmaya başlamadan önce hesabınızı doğrulamanız gerektiğini de belirtmeliyim. Aracı, doğrulanmamış hesaplara ödeme yapmaz.
Bonus sistemi ve ödüllerin testi
Aşağıdaki resimde gördüğünüz gibi Pocket Option size bir bonus sistemi sunuyor. Ek para kazanmak için çok çeşitli seçenekler var. Daha büyük bir hesap almak için bir para yatırma veya para yatırma bonusu kullanın. Buna ek olarak, risksiz işlemler, geri ödemeler veya promosyon kodları sunarlar.

İşlem hacminiz yüksekse ödüllendirilirsiniz. sana verirler “Mücevherler” ödül dükkanında kullanabileceğiniz. Ödül mağazasında, ek bonuslar satın almak için bazı seçenekler vardır.
Bonus sistemi iyi mi?
İlk defa bu kadar büyük bir bonus sistemini farklı seçeneklerle görüyorum. Ancak her bonusun bir koşula bağlı olduğunu unutmayın. Öte yandan, hesabınızdaki simgeye tıklayarak istediğiniz zaman bonusu iptal edebilirsiniz. Aktif bir bonusunuz varsa para tutulmaz. Ödeme almak için bonusunuzun x50 cirosunu yapmanız gerekir.
Bonus sistemi hakkında gerçekler:
- Para Yatırma Bonusu
- Para Yatırma Bonusu
- Risksiz işlemler
- Nakit para
- Bonus için Taşlar
- Daha fazla kâr için güçlendiriciler
(Risk uyarısı: Sermayeniz risk altında olabilir)
Pocket Option tüccarları için destek ve servis
bu destek tüccarlar için güvenilir ilişkiler kurmak çok önemlidir. Komisyoncu hızlı sunar, Pocket Option incelememizde sorumlu sohbet desteği.

Ayrıca, telefon ve e-posta desteği aldılar. Destek farklı dillerde çalışır. Buna göre, AB'de bir ajanları var (Çek).
Destekle ilgili gerçekler:
- 7/24 destek
- Telefon, E-posta ve Sohbet Hizmeti
- 5'ten fazla farklı dilde destek
- ücretsiz eğitim merkezi
- Analiz ve eğitim
| Destek: | Operasyon zamanı: | Telefon: | E-posta: |
|---|---|---|---|
| Telefon, Sohbet, E-posta | 24/7 | +44 20 8123 4499 | [email protected] |
Ücretsiz eğitim: Pocket Option ile ticaret nasıl öğrenilir
Yeni başlayanlar ve ileri düzey tüccarlar için bir platformdaki büyük eğitim bölümü. Eğitim videolarını izleyin veya Pocket Option uzmanlarından yeni stratejiler okuyun. Nasıl çalıştığını ayrıntılı olarak açıklıyorlar. Gerçek parayla işlem yapmadan önce daha fazla bilgi edinmek önemlidir.
(Risk uyarısı: Sermayeniz risk altında olabilir)
Pocket Option'de alım satım sinyalleri
Piyasaları kendi başınıza analiz edecek vaktiniz yoksa, her iki şekilde de nasıl kar elde edebileceğinize dair birçok seçenek var. Kopya ticaret bunlardan biridir, ancak sinyaller de bulmada çok yardımcı olur. çalışabilen ve çok para kazanmanıza izin veren ticaret kurulumları.

Ancak her ikili opsiyon komisyoncusu bu tür alım satım sinyalleri sunmaz. Pocket Option ile ilgili iyi olan şey: Bunları sunuyor sinyaller. Hesabınızı ve işlem masanızı açın ve ekranın sağ tarafındaki "Sinyaller" düğmesine tıklayın.
Artık sistem tarafından üretilen tüm sinyalleri görebilirsiniz. Birini kopyalamak istiyorsanız, “Sinyali kopyala”ya tıklamanız yeterlidir.

Tüm sihir bu - şimdi sinyale göre bir ticaret yaptınız. Bu, ticaret becerilerinizi geliştirmenize yardımcı olabilir. Sinyaller açıkken Pocket Option, ticaret robotları değiller!
Pocket Option nerede kullanılabilir?
Pocket Option ticaret platformlarını dünyanın her ülkesinde kullanamayacağınızı fark etmiş olabilirsiniz. hadi bir Mevcut ve yasaklı tüm ülkelere hızlı bir bakış.
(Risk uyarısı: Sermayeniz risk altında olabilir)
Mevcut ülkeler listesi:
Pocket Option ile ticaret yapabileceğiniz ülkeler şunlardır:
- Çin
- Hindistan
- Japonya
- Malezya
- İran
- Rusya
- Sırbistan
- Güney Kore
- Brezilya
- Tayland
- hindi
- BAE
- ve daha fazlası
tamamını görün Pocket Option ülke listesi burada!
Ne yazık ki, ikili opsiyonlarla ticareti tamamen yasaklayan bazı ülkeler var.
Yasaklı ülkeler listesi:
Pocket Option ile ticaret yapamayacağınız ülkeler şunlardır:
- Avrupa Birliği'ne üye olan tüm ülkeler
- İsrail
- Japonya
- Birleşik Krallık
- Amerika Birleşik Devletleri
Pocket Option alternatifleri nelerdir?
Pocket Option, en az diğer iki en iyi ikili aracımız kadar iyi performans gösterir. Pocket Option'ye 5 üzerinden tam 5 yıldız verebiliriz çünkü komisyoncu denetlenir, yüksek getiri ve bonuslar sunar, mükemmel ve zengin özelliklere sahip bir arayüze sahiptir ve birçok kullanıcı arasında popülerdir.
Pocket Option, ikili ticaret söz konusu olduğunda endüstri standardı olarak kabul edilebilir. Karşılaştırmalarımızda sahip olduğumuz en iyi brokerlerden biridir.
| 1. Pocket Option | 2. Olymp Trade | 3. IQ Option | |
|---|---|---|---|
| Değerlendirme: | 5/5 | 5/5 | 5/5 |
| Düzenleme: | IFMRRC | Uluslararası Finans Komisyonu | / |
| Dijital Seçenekler: | Evet | Evet | Evet |
| Dönüş: | 93%+'ya kadar | 90%+'ya kadar | 100%+'a kadar |
| Varlıklar: | 100+ | 100+ | 300+ |
| Destek: | 24/7 | 24/7 | 24/7 |
| Avantajlar: | 30 saniyelik işlemler sunar | 100% bonusu mevcut | CFD ve forex ticareti de sunar |
| Dezavantajları: | Daha yüksek minimum depozito | En yüksek getiri değil | Her ülkede mevcut değil |
| ➔ Pocket Option ile kaydolun | ➔ Olymp Trade incelemesini ziyaret edin | ➔ IQ Option incelemesini ziyaret edin |
Daha fazla gör alternatifler diğer brokerler arasındaki karşılaştırmamızda:
- Pocket Option vs Binomo
- IQ Option vs Pocket Option
- Deriv vs Pocket Option
- Quotex vs Pocket Option
- Olymp Trade ve Pocket Option
- Expert Option ve Pocket Option
- Exnova'ya karşı Pocket Option
Pocket Option bir ortaklık programı sunuyor mu?
Evet, Pocket Option bir ortaklık programı sunar komisyonculara yeni tüccarlar getirmek isteyen tüm tüccarlar için. Kar, Pocket Option'den elde edilen gelirin 80%'sine kadar olabilir. Ortak olarak ek gelir elde etmek için birçok fırsat var.

Sosyal medya, web siteleri, youtube veya diğer reklam türleri aracılığıyla yeni tüccarları çekebilir ve ortak URL'niz aracılığıyla kaydolmalarını sağlayabilirsiniz. Yönlendirilen tüccar ticaret yapmaya ve yatırım yapmaya başlarsa, komisyoncudan komisyon olarak para kazanırsınız.
(Risk uyarısı: Ticaret risk içerir)
Pocket Option incelememin sonucu: Güvenilir bir komisyoncu mu yoksa dolandırıcı mı?
Pocket Option incelememin sonucu: Pocket Option, güvenilir bir İkili Opsiyon komisyoncusu gibi görünüyor. Tüccarlar için yüksek kazanç sağlayan çok çeşitli farklı varlıklar vardır. İkili Opsiyonlar platformda çok basit ve anlaşılması kolaydır. Daha fazla soru için büyük eğitim merkezini kullanabilirsiniz. Bana göre, ticaret platformu dünyanın en iyilerinden biridir çünkü onu hızla özelleştirebilirsiniz. Üstelik çok kullanıcı dostudur ve orada ticaret yapmak çok rahat hissettirir.

Para çekme ve para yatırma işlemleri için birçok farklı ödeme yönteminiz var. 5 dakikadan daha kısa sürede hesap açmak sorun değil. 50$ başlangıç bakiyesi ile gerçek para ticareti yapmaya başlayabilirsiniz. Bu, her tüccar için iyi bir değerdir. Ayrıca, büyük mevduatlar da kabul edilir. Pocket Option'nin tek dezavantajı, bir finans kurumunun gerçek bir düzenlemesinin olmamasıdır. Sonuç olarak, deneyimlerime göre, bu komisyoncu çok faydalı olabilir.
Pocket Option'nin avantajları:
- Yüksek varlık karı 96%+
- 100+ varlık
- Hızlı ve güvenilir destek
- sosyal ticaret
- Birçok farklı ödeme yöntemi
- Hiçbir gizli ücret
- Mükemmel ticaret platformu
- Düşük minimum depozito
- Para çekmek kolaydır
Pocket Option gerçekten iyi bir bonus programı ve ticaret için güvenilir platform incelememde En iyi ticaret platformlarından biridir.
(Risk uyarısı: Sermayeniz risk altında olabilir)
Sık Sorulan Sorular (SSS)
Pocket Option düzenlenir mi?
Evet, IFMRRC olarak da bilinen Uluslararası Finansal Piyasa İlişkileri Düzenleme Merkezi ve Mwali Uluslararası Hizmetler Otoritesi tarafından düzenlenmektedir. Ancak finansal piyasalar için resmi bir hükümet yetkilisi yok.
Pocket Option iyi bir komisyoncu mu?
Benim açımdan Pocket Option güvenilir bir broker. Demo hesabı kullanabilir, herhangi bir ücret ödemeden işlem yapabilir, ücret ödemeden para yatırıp çekebilir ve yüksek ödeme (96%+) sayesinde çok para kazanabilirsiniz. Ek olarak, platform iyi bir destek ve sosyal ticaret de sunar.
Pocket Option ABD'de mevcut mu?
Hayır, ne yazık ki Pocket Option, CFTC tarafından düzenlenmediğinden ABD'li yatırımcılar tarafından kullanılamaz. Ancak ABD'li yatırımcılar yine de ücretsiz bir demo hesabı oluşturabilirler.
Pocket Option güvenli mi?
Pocket Option, yapabileceğiniz yasal ve güvenli bir komisyoncudur. ikili opsiyon ticareti. Paranız güvende ve para çekmek çok kolay.
Pocket Option'nin çekilmesi ne kadar sürer?
Pocket Option'deki ödeme genellikle çok hızlıdır. Platformu test ettiğimizde para hemen ertesi gün hesaptaydı. Ancak para çekme işlemi 5 güne kadar sürebilir. Bu, seçilen para çekme yöntemine ve haftanın gününe bağlıdır.
Elektronik cüzdanlara ve kredi kartlarına para çekme işlemleri genellikle hızlıdır. Banka veya banka havalesi 4-5 iş günü sürer ve kripto para çekme işlemleri ortalama 2-3 iş günü sürer.
Pocket Option'de para kazanabilir misiniz?
Evet, mümkün Pocket Option'de para kazanın. Bunu tam zamanlı olarak yapan ve bunu yaparak bir servet kazanan birçok insan var. Ancak, madalyonun her zaman iki yüzü vardır. Kayıplar da vermesi pek olası değil.
Genel olarak, uygun bir ticaret stratejisi seçmek ve doğru zamanda doğru işlemleri yapmakla ilgilidir. Başarılı olursanız Pocket Option ile çok para kazanabilirsiniz. Ne kadar para kazanabileceğiniz konusunda bir üst sınır yoktur.
Pocket Option'de OTC anlamına mı geliyordu?
OTC, Pocket Option'de Tezgah Üstü anlamına gelir. Bunlar, hafta sonu alım satımı yapılabilecek varlıklar ve grafiklerdir. Gerçek borsa tablolarından farkı, varlığın kapalı olması durumunda borsada işlem görmemesidir. Öyleyse Pocket Option'de OTC çizelgeleri kullanılır.