Стратегия восстановления Фибоначчи отлично подходит для трейдеров, поскольку она используется для прогнозирования потенциальных уровней поддержки и сопротивления на основе процентных значений последовательности Фибоначчи. В этой статье мы расскажем больше о его использовании и эффективности.

Хорошо знать:
- Ретрейсмент Фибоначчи используется для прогнозирования потенциальных уровней поддержки и сопротивления на основе процентных значений последовательности Фибоначчи.
- Инструмент не является надежным из-за волатильного характера рынков и субъективного расположения его линий, что может привести к различным интерпретациям трейдерами.
- Его лучше всего использовать на сильно трендовых рынках, и он требует от трейдеров рисовать процентные линии на графиках, чтобы спекулировать на точках входа и выхода из сделок.
- Хотя это и полезно, трейдерам не следует полагаться только на ретрейсмент Фибоначчи и следует учитывать его ограничения при использовании его вместе с другими инструментами и в рамках более широкой торговой стратегии.
Что вы прочтете в этом посте
Что такое инструмент восстановления Фибоначчи?
Ретрейсмент Фибоначчи — это надежный инструмент технического анализа, который обычно используется для понимания природы рынка бинарных опционов. Этот технический индикатор столь же функционален как MACD и индикатор скользящей средней.
Одна вещь, которая делает инструмент коррекции Фибоначчи особенным, - это его история. Этот инструмент основан на тысячелетних математических наблюдениях. С помощью этого инструмента трейдеры могут прогнозировать области поддержки и потенциальные цели для сопротивления.
В последнее время коррекция Фибоначчи стала популярным инструментом среди трейдеров, поскольку помогает разработать простой и легкий стратегия торговли бинарными опционами. Используя этот индикатор, любой трейдер может отслеживать цену актива или бинарных опционов на графике зависимости цены от времени.
Роль технических индикаторов и сила коррекции Фибоначчи
Можно быстро торговать бинарными опционами, поскольку это зависит от простого предложения «да» или «нет». Трейдеры могут определить предложение, понимая рынок, будучи в курсе финансовых новостей и отслеживая ценовые тенденции.
Но как можно предсказать движение рынка бинарных опционов, если оно волатильно по своей природе? Ответ - технические индикаторы. Торговые индикаторы можно рассматривать как математическое значение, используемое на графиках и диаграммах для понимания рыночных моделей.
Технические индикаторы помогают трейдеру получить лучшее представление о рынке, чтобы он мог войти или выйти из сделки с огромной прибылью. Индикаторы разделены на четыре категории: импульс, волатильность, тренд и объем.
Вы можете легко найти технический индикатор для себя, так как существует множество вариантов. Однако, если вы хотите использовать индикатор, который может помочь вам предсказать будущий разворот цены, вам следует выбрать коррекцию Фибоначчи.
Этот показатель не для всех. Однако при правильном использовании можно точно предсказать будущее движение цены актива.
Но насколько надежен этот торговый инструмент? Какие у него недостатки? И как это может помочь в торговле бинарными опционами? Что ж, чтобы найти ответы на эти и другие вопросы, вы можете продолжить читать этот пост.
Чем отличаются уровни коррекции Фибоначчи?

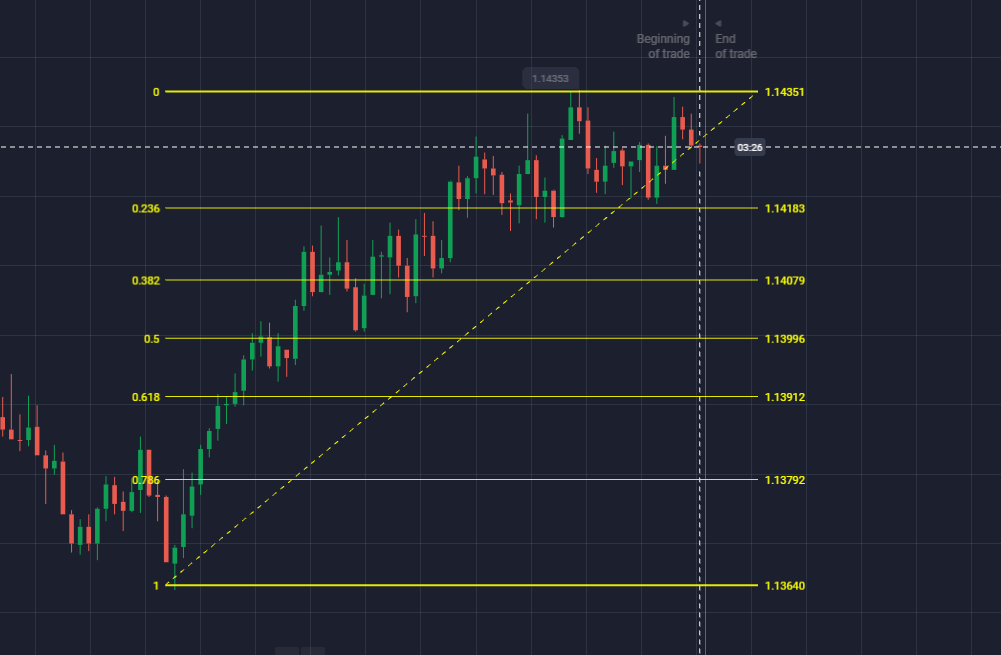
Уровни коррекции Фибоначчи представлены на графике горизонтальными линиями. Эти линии представляют уровни поддержки и сопротивления на графике. Уровни получены из последовательности Фибоначчи и представлены в процентах.
Здесь процент показывает, насколько цена откатилась от предыдущего движения. Шесть уровней: 23.6%, 38.2%, 50%, 61.8%, 78.6% и 100%. Помимо этого, 50% также является соотношением Фибоначчи. Однако официально это не утверждено. Эти процентные значения помогают трейдеру узнать об областях на графике, в которых цена актива развернется или остановится.
Трейдеры могут использовать индикатор восстановления Фибоначчи, чтобы провести между двумя важными ценовыми точками, скажем, низкой и высокой ценой актива. После этого индикатор создает уровень между двумя ценовыми точками.
Например, цена актива увеличивается на $10, а затем падает на $2,36. Таким образом, можно сделать вывод, что цена откатилась на 23,6%. Коррекция Фибоначчи также используется для определения уровня стоп-лосса, размещения ордеров на вход и установки ценовых целей.
Как рассчитать уровни коррекции Фибоначчи?
Что ж, не существует конкретной формулы для расчета уровня коррекции Фибоначчи. Но вычислить положение можно, выбрав две крайние точки. После этого вам необходимо провести линию, соединяющую эти две точки.
Линия соединения называется линией тренда, потому что она показывает ценовой тренд между двумя точками. Другие линии могут быть нарисованы при изменении процента.
Например, цена товара меняется с $10 до $15. Вы можете использовать эти две точки для построения индикатора восстановления. Теперь, чтобы рассчитать 23,6% предмета, необходимо произвести быстрый расчет.
$15 - ($5 x 0,236) = $13,82
После этого расчета, как трейдер, вы можете сделать вывод, что уровень 23,6% предмета будет на уровне цены $13,82.
Как коррекция Фибоначчи может помочь в торговле бинарными опционами?

Для использования коррекции Фибоначчи трейдеры должны нарисовать на графике процентные линии. Эти линии помогают предсказать, где на рынке произойдут изменения цен. Эти данные могут помочь вам понять, когда вы должны покупать или продавать бинарные опционы.
Есть три правила, которые трейдеры должны помнить при использовании инструмента коррекции Фибоначчи.
- Уровень коррекции Фибоначчи не следует рассматривать как сигнал. Это потому, что это уровень, на котором вероятно возникновение сигнала на рынке торговли бинарными опционами.
- Сигналы, возникающие на одном из процентов коррекции, лучше, чем на других уровнях. Но иногда между двумя линиями также возникает сильный сигнал.
- Если уровень восстановления на торговом графике пробит хотя бы один раз, цель смещается на следующий уровень восстановления. Если движение сильнее предыдущего уровня, движение продолжится в том же направлении.
(Предупреждение о рисках: ваш капитал может быть в опасности)
Как использовать уровни коррекции Фибоначчи?
Чтобы получить больше прибыли от инструмента «Восстановление Фибоначчи», вы можете запомнить несколько вещей.
- Вы должны торговать финансовыми инструментами с сильным трендом, такими как золото, EURUSD и другие.
- Используйте точные временные рамки, например дневной график.
Вы также можете проанализировать предыдущие движения цен, чтобы понять природу ma. Например, если вы рассчитываете рост цены предмета снизу вверх, чтобы рассчитать уровень восстановления. Измеренный уровень может помочь вам понять откат цены, когда она продолжила движение вверх после роста.
Точно так же вы можете рассчитать падение цены сверху вниз, чтобы узнать уровень восстановления. Этот уровень указывает на восстановление цены актива, когда она продолжала двигаться в нисходящем направлении после падения.
Трейдеры восходящего тренда используют модели покупок. Точно так же трейдеры нисходящего тренда используют модель продажи.

Является ли инструмент коррекции Фибоначчи надежным?
Хотя ретрейсмент Фибоначчи является отличным способом узнать движение цены актива, он не является надежным. Это потому, что у него есть определенные ограничения.
Если новый трейдер использует инструмент коррекции Фибоначчи для понимания рынка бинарных опционов, он, скорее всего, будет использовать данные и линии, как показано на графике. Однако опытный трейдер всегда корректирует линии, чтобы получить точную информацию.
Кроме того, рынок бинарных опционов нестабилен. Таким образом, становится практически невозможно предсказать точное положение актива или движение цены. И когда трейдеры используют такие данные, они могут потерять деньги, которые они вложили в торговлю.
Более того, уровень коррекции Фибоначчи не определяет точную точку разворота цены на рынке. Хотя вы можете получить приблизительную информацию, вы не можете принять ее за точную цену.
Не говоря уже о том, что вся концепция коррекции Фибоначчи основана на числах и вычислениях. Хотя расчет производится на основе процента Фибоначчи, логики здесь нет.
Из-за отсутствия логики коррекция Фибоначчи становится сложным индикатором для трейдеров, ищущих рассуждения в их торговая стратегия.
Брокерские инструменты
Без сомнения, коррекция Фибоначчи - отличный способ определения цены актива. Однако расчеты, числа и коэффициенты могут ошеломить трейдера.
Но вы можете использовать мощный брокерский инструмент, который поставляется с расширенным программным обеспечением для построения графиков, чтобы все вычисления выполнялись легко и быстро.
Вот несколько популярных брокеров, предлагающих графические модели Фибоначчи.
Quotex
Если вы ищете торговую платформу с более низкой минимальной суммой депозита, вам следует выбрать Quotex. Требуется минимальный депозит $5. После внесения денег вы можете получить доступ к демо-счету.
При торговле с Quotex вы можете рассчитывать на ставку выплаты 98%, что является самой высокой ставкой выплат, предлагаемой любой платформой для торговли опционами. Однако этот брокер официально не зарегистрирован.
(Предупреждение о рисках: ваш капитал может быть в опасности)
IQ Option
IQ Option - это известная платформа для торговли бинарными опционами, которую регулирует CySEC. Этому надежному брокеру необходим минимальный депозит $10. После внесения депозита вы можете начать торговать с IQ Option, используя графические паттерны Фибоначчи.
После внесения минимальной суммы вы также можете получить доступ к демо-счету. А ставка выплаты, предлагаемая IQ Option, составляет 90%.
(Предупреждение о рисках: ваш капитал может подвергаться риску)
RaceOption
RaceOption - еще одна торговая платформа, которую вы можете использовать для инвестирования своих денег в рынок бинарных опционов, используя графические паттерны Фибоначчи. Платформа была запущена в 2014 году и предлагает ставку выплат 90%.
Минимальный депозит, необходимый для торговли с RaceOption, составляет $250. Хотя сумма немного высока, она того стоит, потому что этот брокер предлагает доступ к трем различным торговым платформам в зависимости от суммы, которую вы заплатили.
(Предупреждение о рисках: ваш капитал может подвергаться риску)
Вывод. Ретрейсмент Фибоначчи — отличный инструмент, который может помочь вам достичь ваших торговых целей.
Восстановление Фибоначчи - популярный торговый инструмент, который используют несколько трейдеров для анализа рынка бинарных опционов. Используя линии Фибоначчи, трейдеры могут получить представление о ценовом тренде актива.
Однако нельзя полностью полагаться на эти данные, потому что они не говорят о точном повороте цены актива на рынке. Кроме того, у этого индикатора есть определенные ограничения, которые трейдеры не могут игнорировать.
Но в целом коррекция Фибоначчи - отличный инструмент, который может помочь вам достичь ваших торговых целей.
Часто задаваемые вопросы об инструменте уровня Фибоначчи:
Что такое инструмент коррекции Фибоначчи в торговле бинарными опционами?
Инструмент «Ретрейсмент Фибоначчи» — это инструмент технического анализа, используемый в торговле бинарными опционами для прогнозирования потенциальных уровней поддержки и сопротивления. Он основан на последовательности Фибоначчи и помогает трейдерам определить возможные точки разворота на рынке, рисуя горизонтальные линии на определенных процентных уровнях (23,6%, 38,2%, 50%, 61,8%, 78,6% и 100%) на графике.
Как рассчитать уровни коррекции Фибоначчи?
Чтобы рассчитать уровни коррекции Фибоначчи, выберите две значимые ценовые точки (обычно верхнюю и нижнюю точки) на графике актива. Нарисуйте линию, соединяющую эти точки, а затем примените к этой линии проценты Фибоначчи. Например, если актив перемещается с $10 на $15, уровень коррекции 23,6% будет рассчитываться как $15 – ($5 x 0,236) = $13,82.
Является ли инструмент коррекции Фибоначчи надежным при прогнозировании движений рынка?
Нет, инструмент коррекции Фибоначчи не является надежным. Хотя он может быть ценным инструментом для прогнозирования потенциальных уровней поддержки и сопротивления, он имеет ограничения из-за волатильности рынка и субъективного характера размещения линий. Трейдерам следует использовать его как часть более широкой стратегии, а не полагаться исключительно на него при принятии торговых решений.
Каковы лучшие практики использования коррекции Фибоначчи в торговле бинарными опционами?
При использовании коррекции Фибоначчи лучше всего торговать финансовыми инструментами с сильным трендом и использовать точный временной интервал, например дневной график. Анализируйте предыдущие движения цен, чтобы понять природу рынка, и помните, что уровни коррекции — это не сигналы, а скорее точки, где сигналы могут возникнуть. Также рекомендуется использовать этот инструмент в сочетании с другими индикаторами и методами анализа.


